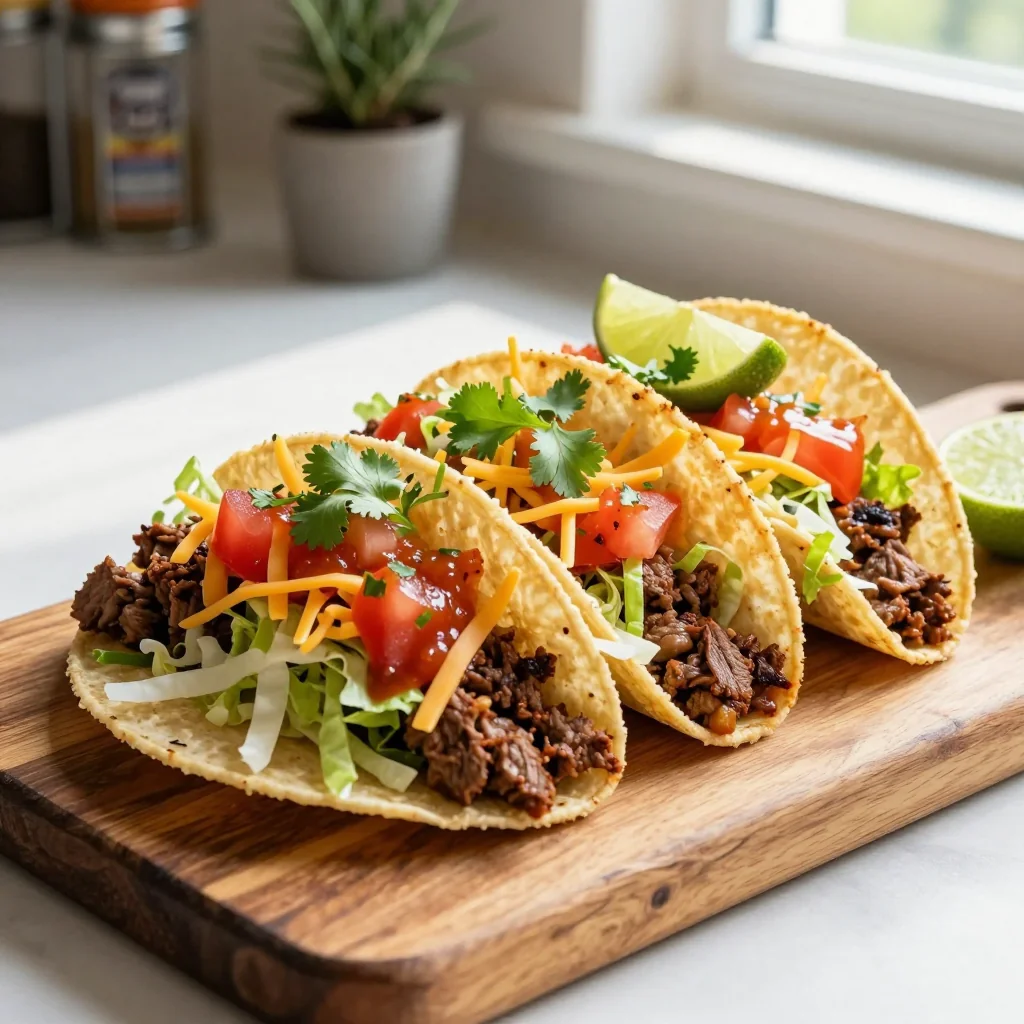
Crispy taco shells filled with seasoned beef, fresh toppings, and a burst of lime – a handheld celebration of flavor.
When I was a teenager, my family would gather around the kitchen every Friday night for a taco night that felt more like a fiesta than a meal. The sizzle of ground beef hitting a hot skillet, the aroma of cumin and chili mingling with fresh cilantro, and the inevitable crunch of a perfectly fried taco shell created a sensory memory that still makes my mouth water. I still recall the excitement of spreading salsa across the shell, the cool tang of sour cream, and the bright burst of lime that finished each bite.
Beef tacos are a staple of Mexican street food, beloved for their simplicity, bold flavors, and the joy of customizing each bite. Hard shells, with their satisfying crack, give a textural contrast that soft tortillas can’t match, making them an ideal canvas for a hearty beef filling and fresh toppings.
In this article, I’ll walk you through every step of creating authentic, restaurant‑quality beef tacos at home. From choosing the right cut of beef to mastering the perfect seasoning blend, you’ll learn how to achieve depth of flavor, texture, and visual appeal that will impress anyone at your table.
So grab your skillet, preheat the oil, and let’s bring a taste of Mexico into your kitchen together.
🌟 Why This Recipe Will Win Your Heart
Whether you’re cooking for a quick weeknight dinner or a lively gathering, these tacos deliver flavor, texture, and a dash of excitement.
- ✨ Perfect Balance of Spice and Freshness: The taco seasoning is calibrated to give a gentle heat that never overwhelms, while fresh cilantro, lime, and crisp lettuce provide bright counterpoints.
- ✨ Foolproof Crispy Shells: By frying the shells just long enough, they stay crunchy without becoming greasy, ensuring every bite starts with that irresistible snap.
- ✨ Customizable Toppings: The recipe includes a versatile set of toppings, but you can swap in avocado, pickled onions, or even a smoky chipotle mayo for a personal twist.
- ✨ Nutritionally Balanced: With lean ground beef, plenty of vegetables, and controlled portions of cheese and sour cream, the dish offers protein, fiber, and essential vitamins without excess calories.
- ✨ Speedy Preparation: From start to finish the entire process takes under 40 minutes, making it perfect for busy evenings.
- ✨ Crowd‑Pleaser: The combination of textures and flavors appeals to both kids and adults, guaranteeing a satisfied crowd every time.
🥗 The Ingredients
📝 Complete Ingredient List
For the Beef Filling:
For the Toppings & Assembly:
For the Optional Chipotle Mayo (Sauce):
🔍 Focus on Key Ingredients
Ground Beef
Ground beef provides the hearty, protein‑rich base for the tacos. Choose a lean blend (80‑85% lean) to keep the filling juicy without excessive grease. When browned, the meat develops a caramelized crust that adds depth, while the added water prevents it from drying out during the brief simmer with seasoning.
Taco Seasoning
The seasoning blend is the soul of the dish. A classic mix of chili powder, cumin, paprika, oregano, and a pinch of cayenne delivers warmth without overwhelming heat. If you prefer a milder profile, reduce the cayenne or substitute smoked paprika for a subtle smokiness.
Hard Taco Shells
Hard shells are traditionally made from corn masa and fried to a golden crisp. They hold their shape well, offering a satisfying crunch that contrasts with the soft fillings. For a lighter version, you can bake the shells at 200 °C (390 °F) for 5‑7 minutes, but frying gives the authentic texture most people love.
🔄 Quick Substitutions
| If you don’t have… | Use instead… |
|---|---|
| Ground beef | Ground turkey or chicken (same weight) |
| Taco seasoning | Homemade blend of chili powder, cumin, paprika, oregano, garlic powder, onion powder, and a pinch of cayenne |
| Hard taco shells | Soft corn tortillas (warm them briefly on a skillet) |
👨🍳 Step‑by‑Step Instructions
Follow these detailed steps to create tacos that look as good as they taste. Each phase is broken down so you can focus on one task at a time.
📋 Phase 1: Prep & Mise en Place
Organizing your workspace makes the cooking process smooth and enjoyable.
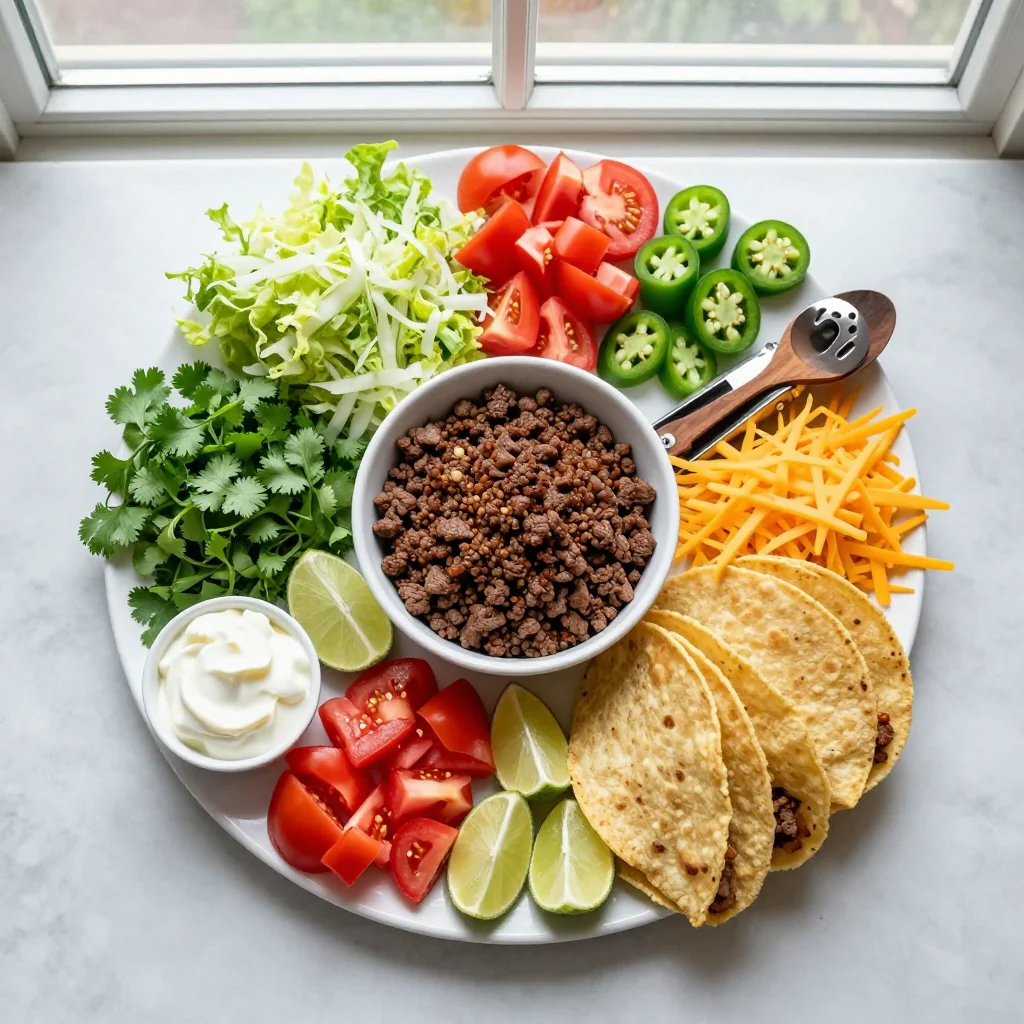
Gather and Measure All Ingredients
Lay out every ingredient on a clean countertop. Use measuring cups for liquids, a kitchen scale for the beef, and a small bowl for the taco seasoning. This visual checklist prevents last‑minute scrambling and ensures you have the correct proportions before the heat turns on.
Prep the Vegetables
Finely dice the onion, mince the garlic, and chop the cilantro. Dice the tomato and shred the lettuce. Place each in separate small bowls so you can add them quickly during assembly.
🔥 Phase 2: Cooking & Assembly
This is where flavors develop and the tacos start to take shape.
Brown the Beef
Heat a large skillet over medium‑high heat and add the olive oil. Once shimmering, add the ground beef, breaking it up with a wooden spoon. Cook for 5‑7 minutes, stirring occasionally, until the meat loses its pink color and begins to caramelize. Drain any excess fat if necessary.
Add Aromatics and Seasoning
Reduce the heat to medium and stir in the chopped onion and minced garlic. Sauté for 2‑3 minutes until translucent and fragrant. Sprinkle the taco seasoning over the mixture, then pour in the water. Stir well, bring to a gentle simmer, and let it reduce for about 5 minutes. The sauce should cling lightly to the beef.
Fry the Hard Shells
In a separate deep pan, heat vegetable oil to 180 °C (350 °F). Gently slide each taco shell into the oil, frying for 15‑20 seconds until they puff up and turn golden. Remove with tongs and place on paper towels to absorb excess oil. Let them cool slightly; they will become crispier as they rest.
✨ Phase 3: Finishing Touches & Serving
The final assembly brings together texture, flavor, and visual appeal.
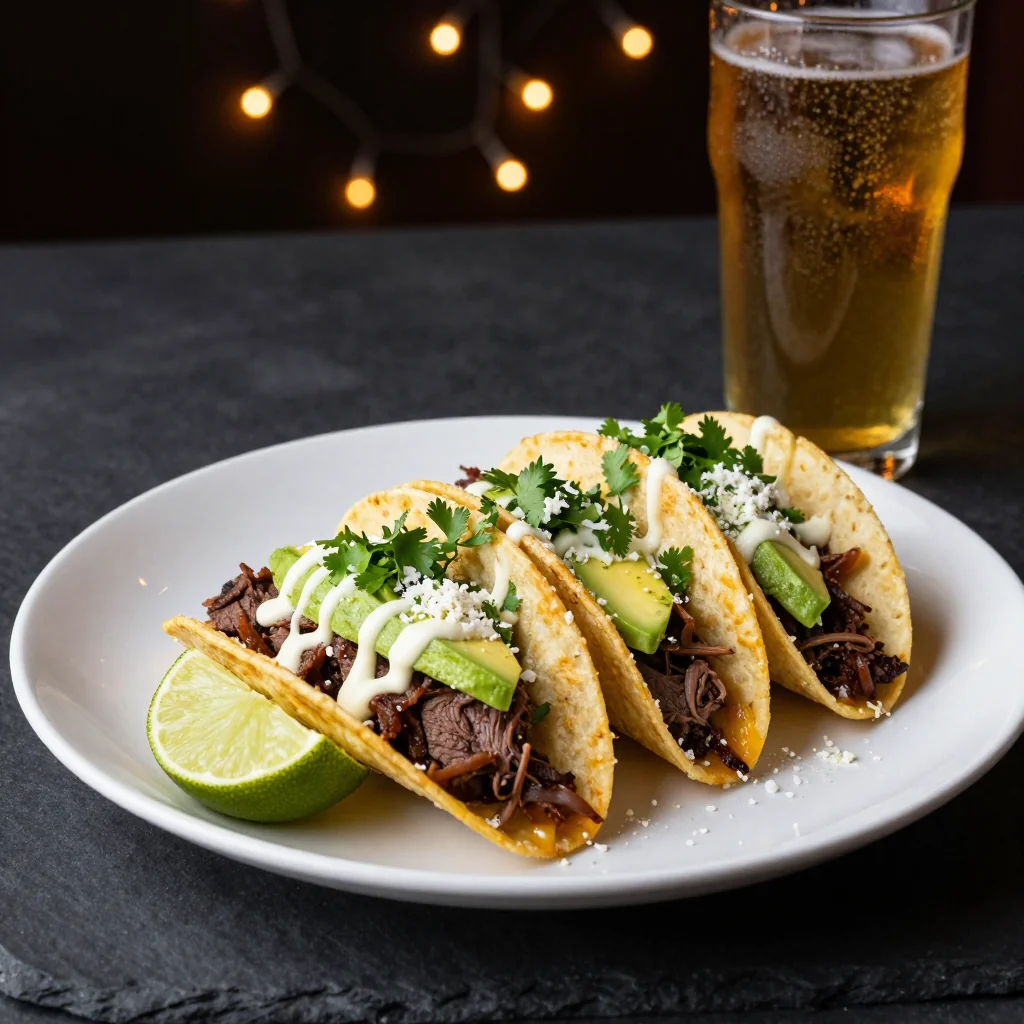
Prepare the Optional Chipotle Mayo
In a small bowl, whisk together the minced chipotle, mayonnaise, and lime juice until smooth. Adjust salt to taste. This sauce adds a smoky, creamy element that pairs beautifully with the beef.
Assemble the Tacos
Take a warm, crispy shell and spoon a generous portion of seasoned beef into the center. Sprinkle shredded cheddar cheese while the meat is still hot so it melts slightly. Add lettuce, diced tomato, a dollop of sour cream, a spoonful of salsa, and a few cilantro leaves. Finish with a squeeze of fresh lime juice.
Optional Drizzle
If you prepared the chipotle mayo, drizzle a thin line across the top of each taco. The creamy heat will complement the bright lime and fresh herbs.
Serve Immediately
Serve the tacos hot, accompanied by extra lime wedges and a side of guacamole if desired. The shells are at their crispiest right after frying, so encourage guests to eat promptly.
Enjoy and Share
Gather around the table, let everyone customize their tacos, and enjoy the burst of flavors. Snap a photo, share it on social media, and revel in the smiles of satisfied diners.
💡 Expert Tips & Tricks
🛒 Choosing the Best Ingredients
When selecting ground beef, look for a bright red color and a firm texture. Avoid meat that appears gray or has a strong odor. Fresh cilantro should have vibrant green leaves without any yellowing; the stems are just as flavorful as the leaves, so don’t discard them. For the shells, opt for those made from 100% corn masa without added preservatives for the most authentic taste.
🔪 Preparation Techniques
Use a sharp chef’s knife to dice onions and tomatoes uniformly; this ensures even cooking and a consistent bite. When mincing garlic, crush the cloves first with the flat side of the knife to release more aroma. Keep a bowl of ice water nearby for the lettuce; a quick rinse and spin in a salad‑spinner will keep the leaves crisp.
🌡️ Mastering the Cooking Process
Maintain medium‑high heat when browning the beef to develop a caramelized crust. If the pan temperature drops, the meat will release water and steam instead of sear. For the shells, a consistent oil temperature of 180 °C (350 °F) is crucial; use a thermometer or test with a small piece of tortilla to gauge readiness.
🍽️ Presentation & Service
Arrange the assembled tacos on a large platter, alternating colors for visual contrast. Garnish the platter with extra cilantro sprigs, lime wedges, and a small bowl of salsa. Serve with a side of Mexican rice or black beans for a complete meal.
🏆 Pro Tips
Elevate your taco game from good to restaurant‑level with these insider techniques.
- 🎯 Flavor Layering: Add a pinch of smoked paprika to the taco seasoning and finish the beef with a splash of dark soy sauce. The umami depth from soy balances the spice and adds a subtle smokiness without overwhelming the palate.
- 🎯 Perfect Crust on Beef: After browning, de‑glaze the pan with a teaspoon of tequila or a splash of beef broth. This lifts caramelized bits, known as fond, and incorporates them back into the sauce for richer flavor.
- 🎯 Shell Crispness: Lightly dust the inside of each taco shell with a pinch of sea salt before frying. The salt draws out moisture, ensuring the shell remains crisp even after being filled.
- 🎯 Balanced Heat: If you like heat but want control, serve sliced jalapeños on the side. Guests can add as much or as little as they prefer, keeping the base recipe family‑friendly.
- 🎯 Efficient Portion Scaling: Use the portion adjuster on the recipe card to instantly recalculate ingredient quantities. This prevents guesswork when cooking for larger gatherings.
- 🎯 Final Touch of Acidity: Just before serving, drizzle a few drops of aged balsamic vinegar over the assembled tacos. The sweet‑tart note heightens the overall flavor profile and adds a sophisticated twist.
"The secret to great tacos is not just the meat, but the harmony of textures and the freshness of each topping." — Chef Enrique Olvera
🔄 Variations & Adaptations
This recipe is a versatile canvas. Feel free to experiment with different proteins, spices, and dietary tweaks.
🥬 Vegetarian / Vegan Version
Swap the ground beef for 500 g of crumbled firm tofu or a plant‑based mince. Sauté the tofu with the same aromatics and taco seasoning, adding a splash of vegetable broth for moisture. Replace cheese with a vegan cheddar shreds and use a coconut‑based sour cream alternative. The result is a hearty, protein‑rich taco that satisfies vegans and vegetarians alike.
- Use black beans or lentils as an additional protein boost.
- Add roasted sweet potato cubes for natural sweetness and texture.
🌶️ Flavor Variations
Customize the flavor profile to match your mood or the season. Below are three popular twists.
Spicy Version
Increase the cayenne in the seasoning to ½ teaspoon, add 1 finely chopped serrano pepper to the beef, and finish with a drizzle of hot sauce. Serve with pickled jalapeños for an extra kick.
Mediterranean Version
Replace taco seasoning with 1 tsp dried oregano, ½ tsp smoked paprika, and a pinch of cinnamon. Add crumbled feta cheese and a spoonful of tzatziki instead of sour cream. Garnish with sliced olives and a dash of lemon juice.
Asian Fusion Version
Season the beef with 1 tbsp soy sauce, 1 tsp sesame oil, and ½ tsp five‑spice powder. Top with shredded cabbage, sliced radishes, and a drizzle of sriracha‑lime mayo. Finish with toasted sesame seeds.
⚠️ Dietary Adaptations
Gluten‑Free
All ingredients are naturally gluten‑free. Ensure the taco seasoning you use does not contain wheat flour as a thickener. Use corn‑based taco shells and double‑check any packaged sauces.
Lactose‑Free
Swap cheddar cheese for a lactose‑free cheese alternative and use a coconut‑based sour cream. The chipotle mayo can be made with dairy‑free mayo.
Low‑Calorie
Use 250 g lean ground turkey instead of beef, reduce cheese to 50 g, and substitute sour cream with Greek yogurt (fat‑free). Increase the proportion of lettuce and tomato for volume without many calories.
👶 Kid‑Friendly Version
For picky eaters, omit the spicy elements and serve the beef with a mild cheese blend. Offer a side of guacamole for dipping and let children assemble their own tacos, encouraging them to explore textures and flavors at their own pace.
📦 Storage & Reheating
🧊 Conservation
Refrigerator:
- Duration: 3 days
- Recommended container: Airtight glass or BPA‑free plastic container
- Tip: Store the beef filling separate from the shells to maintain crispness.
Freezer:
- Duration: 2 months
- Method: Portion the cooked beef into freezer‑safe bags, flatten, and label with date.
- Defrosting: Transfer to the refrigerator overnight or use the microwave’s defrost setting.
💡 For best texture, re‑heat the filling on the stovetop with a splash of water before assembling fresh shells.
♨️ Reheating
🔥 Oven (Recommended):
- Preheat to 180 °C (350 °F).
- Cover the beef filling in an oven‑safe dish with foil.
- Heat for 10‑12 minutes, stirring halfway through.
- Remove foil and continue for 2‑3 minutes to evaporate excess moisture.
⚡ Microwave (Quick):
- Place the beef in a microwave‑safe bowl, cover with a microwave‑safe lid.
- Heat on medium power for 1 minute, stir, then heat another 30 seconds if needed.
- Stir again to ensure even temperature.
🍳 Stovetop:
Warm the beef in a skillet over medium heat, adding a tablespoon of water or broth to prevent drying. Stir constantly for 3‑5 minutes until steaming hot.
🍷 Perfect Pairings
🥗 Side Dishes
- Mexican Street Corn (Elote): Grilled corn slathered in mayo, cotija cheese, chili powder, and lime adds a sweet‑smoky complement.
- Black Bean Salad: A cold salad of black beans, corn, red onion, cilantro, and lime vinaigrette offers freshness and protein.
- Jicama Slaw: Crisp jicama tossed with orange zest, lime juice, and a pinch of salt provides a refreshing crunch.
🍷 Wine & Beverage Pairings
- Rosé (dry, chilled): Its bright acidity balances the richness of the beef and the heat of the spices.
- Mexican Lager (e.g., Pacifico): Light carbonation cuts through the fat, while subtle malt notes complement the corn shells.
- Non‑Alcoholic: Sparkling agua fresca flavored with hibiscus or cucumber offers a refreshing, slightly sweet counterpoint.
🍰 To Complete the Meal
Begin with a light avocado and citrus salad, then enjoy the tacos as the main course. Finish with a classic churro topped with cinnamon sugar and a drizzle of chocolate sauce, or a simple mango sorbet for a fruity, palate‑cleansing dessert.
❓ Frequently Asked Questions
Q: Can I use pre‑made taco seasoning packets?
Yes, pre‑made packets work fine. Choose a brand that lists natural spices and minimal additives. Adjust the amount to taste; typically one 2‑ounce packet is equivalent to the 2 tbsp of homemade seasoning listed in the recipe.
Q: How do I keep the taco shells from getting soggy after filling?
Fill the shells just before serving and avoid over‑loading them with wet ingredients. Pat the lettuce and tomato dry with a paper towel, and drizzle sauces lightly. If you must prepare ahead, store the shells in a single layer on a parchment‑lined tray, covered loosely with foil to maintain crispness.
Q: What’s the best way to store leftover beef filling?
Allow the filling to cool to room temperature, then transfer it to an airtight container. Refrigerate for up to three days. Reheat using the stovetop method with a splash of broth to restore moisture before re‑assembling tacos.
Q: Can I make these tacos gluten‑free?
Absolutely. The recipe already uses corn‑based shells, which are naturally gluten‑free. Just verify that the taco seasoning and any packaged sauces you use are certified gluten‑free, as some contain wheat‑derived thickeners.
Q: How can I make the tacos spicier without changing the core recipe?
Increase the amount of chipotle in the optional mayo, add a dash of hot sauce to the beef mixture, or serve sliced fresh jalapeños on the side. For a deeper heat, incorporate a pinch of smoked chipotle powder into the taco seasoning.
Q: Is it possible to prepare the tacos ahead of time for a party?
Yes. Prepare the beef filling and store it in the refrigerator. Fry the shells a few hours before serving and keep them in a single layer on a cooling rack covered with a clean kitchen towel. Assemble tacos just before guests arrive to preserve the crunch.
🎉 Let’s Get Cooking!
This Beef Tacos with Hard Shells recipe brings together bold Mexican flavors, satisfying crunch, and the joy of hands‑on assembly. By following the step‑by‑step guide, you’ll achieve a restaurant‑quality dish that impresses family and friends alike. Remember the key points: brown the beef properly, fry the shells just enough to stay crisp, and balance the toppings with fresh acidity.
Give the recipe a try, experiment with the suggested variations, and don’t hesitate to make it your own. Your kitchen will fill with the irresistible aroma of seasoned beef, and the first bite will reward you with a perfect harmony of textures.
Have you tried this recipe?
Leave a comment and rating below! Share your photos on Instagram with #TacoFiesta for a chance to be featured.
Beef Tacos with Hard Shells
Crispy shells filled with seasoned beef, fresh toppings, and a burst of lime – a handheld celebration of flavor.
📝 Ingredients
Beef Filling
Toppings & Assembly
Optional Chipotle Mayo
👨🍳 Instructions
- 1
Gather and measure all ingredients; keep them organized in separate bowls.
- 2
Dice onion, mince garlic, chop cilantro, dice tomato, and shred lettuce.
- 3
Heat olive oil in a skillet over medium‑high heat and brown the ground beef, breaking it up with a spoon.
- 4
Add onion and garlic; sauté until translucent, then stir in taco seasoning and water. Simmer 5 minutes.
- 5
Fry hard taco shells in hot oil (180 °C) for 15‑20 seconds, then drain on paper towels.
- 6
Whisk together chipotle, mayo, and lime juice for the optional sauce.
- 7
Assemble tacos: fill each shell with beef, sprinkle cheese, add lettuce, tomato, sour cream, salsa, cilantro, and a lime wedge.
- 8
Drizzle chipotle mayo if desired.
- 9
Serve immediately while shells remain crisp.
- 10
Enjoy, share photos, and let us know how you customized the recipe!
🥗 Nutrition per Serving
*Nutritional values are estimates based on standard ingredient data.