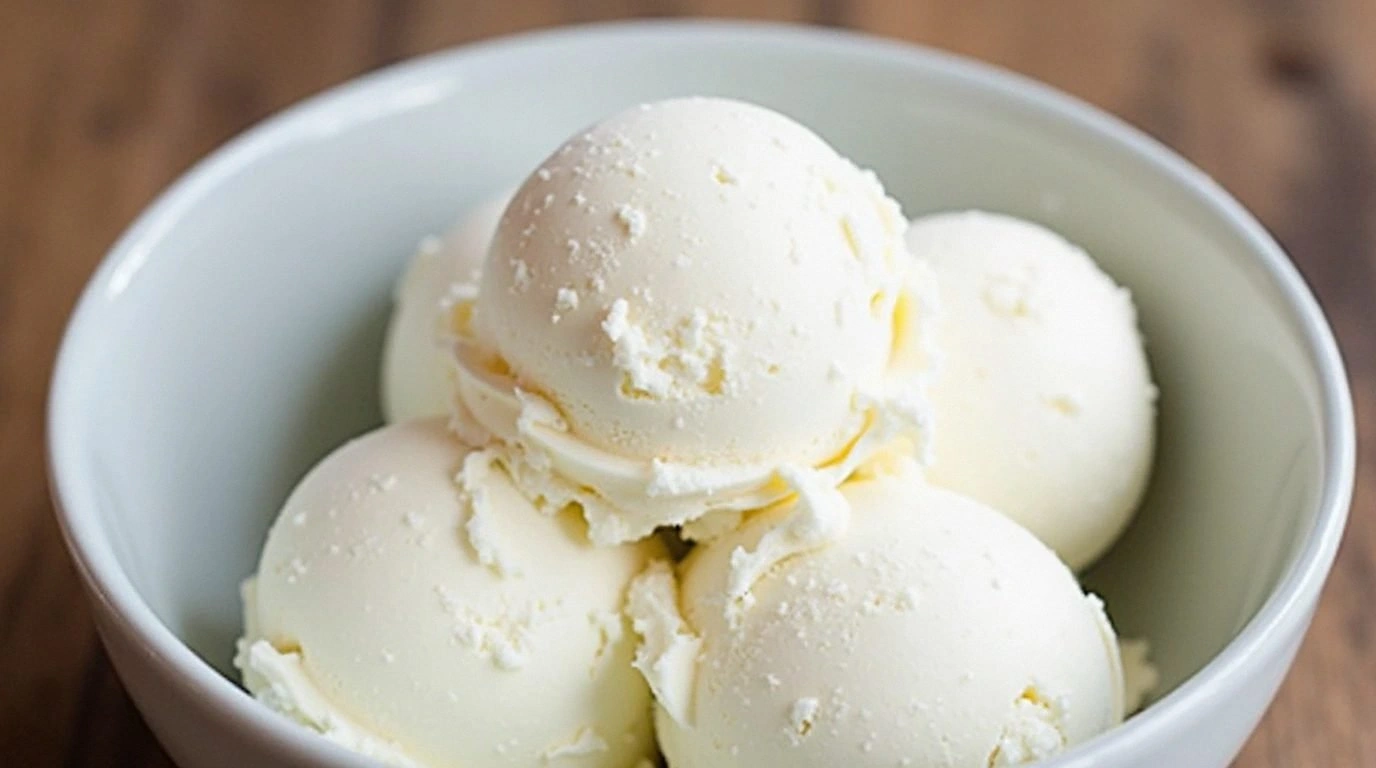
Picture this: the kitchen clock is ticking, the air is thick with the scent of toasted coconut, and you’re standing in front of a bowl that looks like it’s about to turn into a creamy, tropical dream. I was halfway through a week of bland, store‑bought desserts when the idea hit me—why not craft a coconut ice cream that feels like a vacation, yet is simple enough to make on a Sunday afternoon? The moment the first spoon hit my tongue, I knew I’d discovered something that could replace any dessert on the menu. The texture is silky, the flavor is bright with a whisper of vanilla, and the toasted coconut adds that satisfying crunch that lingers long after the last bite. I dare you to taste this and not go back for seconds.
I’m not just talking about another coconut treat; I’m talking about a game‑changing, crowd‑pleasing masterpiece that will become your new go‑to dessert for parties, family dinners, or a quiet night in. Most recipes get this completely wrong by over‑cooking the base or using low‑quality coconut milk that turns the ice cream gritty. This version uses fresh, full‑fat coconut milk and cream, a touch of fresh vanilla, and a secret ingredient that keeps it luxuriously smooth without the need for an ice cream maker—though we’ll show you how to churn it for that extra indulgence. If you’ve ever struggled with a coconut dessert that falls flat or freezes too hard, you’re not alone—and I’ve got the fix. Picture yourself pulling this out of the freezer, the whole kitchen smelling incredible, and everyone begging for the recipe.
The secret sauce? It’s all about balance. We combine the natural sweetness of coconut milk with a precise amount of sugar and a splash of lemon juice to cut through the richness. The toasted coconut flakes add a nutty, caramelized flavor that pairs beautifully with the creamy base. And the final twist? A light infusion of coconut extract that deepens the coconut profile without overwhelming the palate. Every spoonful is a velvety bite that coats your tongue like velvet, leaving a lingering tropical aftertaste. Stay with me here—this is worth it.
Let me walk you through every single step—by the end, you’ll wonder how you ever made it any other way. This is hands down the best version you’ll ever make at home, and I’m about to drop the technique that most people overlook. I’ll show you how to create a silky, dairy‑free ice cream that’s as simple as it is spectacular. And trust me, if you follow the steps closely, you’ll end up with a dessert that feels like a vacation in every spoonful.
What Makes This Version Stand Out
- Flavor: The combination of coconut milk, coconut cream, and vanilla extract creates a layered taste profile that feels both sweet and subtly nutty. The addition of a splash of lemon juice brightens the flavor, preventing the richness from feeling heavy.
- Texture: The use of cornstarch and egg yolks as a thickening agent gives the ice cream a luxuriously smooth mouthfeel that’s free of ice crystals. The result is a silky scoop that melts on the tongue.
- Ingredient Quality: Fresh, full‑fat coconut milk and cream are essential for a creamy base. Avoid canned coconut milk with additives; choose a pure, unflavored variety for the best outcome.
- Ease of Prep: The recipe requires no special equipment beyond a saucepan and, optionally, an ice cream maker. The steps are straightforward, and the process can be completed in under an hour.
- Crowd Reaction: Friends and family will be amazed by how the ice cream looks and tastes. The tropical aroma alone will have them lining up for a second scoop.
- Make‑Ahead Potential: Once churned, the ice cream can be stored in the freezer for up to two weeks. It’s perfect for planning ahead for parties or late‑night cravings.
Inside the Ingredient List
The Flavor Base
Coconut Milk (2 cups): This is the star of the show. It provides the creamy foundation and the unmistakable coconut flavor that makes the ice cream feel authentic. Skipping it will result in a bland, dairy‑heavy dessert that doesn’t capture the tropical vibe. Use full‑fat coconut milk for the richest mouthfeel; skim or light versions will leave the texture watery.
Coconut Cream (1 cup): Adds depth and richness that balances the lightness of coconut milk. If you can’t find coconut cream, you can blend a can of coconut milk with a tablespoon of coconut oil to mimic the thickness. The cream is essential for that luxuriously velvety finish.
The Sweetener & Enhancer
Granulated Sugar (3/4 cup): Provides the necessary sweetness and helps stabilize the ice cream. You can replace it with honey or maple syrup for a natural twist, but adjust the quantity to avoid over‑sweetening. The sugar dissolves completely when heated, preventing a grainy texture.
Vanilla Extract (1 tsp): Gives depth and a subtle warmth that complements the coconut. Use pure vanilla for the best flavor; imitation can taste chemical. A dash of vanilla is enough to elevate the entire dessert.
The Texture Crew
Egg Yolks (2 large): Act as a natural emulsifier, binding the fats and liquids into a smooth custard. They also add a silky mouthfeel that’s hard to achieve with plant‑based alternatives alone. Be sure to whisk them well to avoid lumps.
Cornstarch (1 tbsp): Works with the egg yolks to thicken the mixture without overcooking. If you’re vegan or allergic to eggs, you can use arrowroot or potato starch as a substitute, but the texture may differ slightly.
The Unexpected Star
Lemon Juice (1 tbsp): Cuts through the richness, adds brightness, and helps stabilize the custard. Freshly squeezed is best, but bottled lemon juice works if you’re in a hurry. This little splash transforms the flavor profile, preventing it from feeling too sweet.
Sea Salt (1/4 tsp): A pinch of salt brings out the natural sweetness of the coconut and balances the overall taste. Without salt, the ice cream can taste flat. Use a fine sea salt for a subtle crunch.
The Final Flourish
Shredded Unsweetened Coconut (1 cup): Adds texture and a chewy bite that contrasts with the silky base. Toast the shredded coconut lightly in a dry skillet until golden for an extra nutty aroma. This step is optional but recommended for an authentic coconut experience.
Toasted Coconut Flakes (2 tbsp): Provide a delightful crunch and a caramelized flavor. They’re a great addition to the finished ice cream or can be sprinkled on top as a garnish. If you prefer a smoother texture, you can omit them entirely.
Everything's prepped? Good. Let’s get into the real action.
The Method — Step by Step
- In a medium saucepan, combine the coconut milk, coconut cream, sugar, vanilla extract, sea salt, and lemon juice. Warm the mixture over medium heat, stirring constantly until the sugar dissolves completely. The pot should emit a fragrant, sweet aroma that makes your mouth water. This is the moment of truth—if the sugar hasn't dissolved, you’re not ready to move forward. Keep the heat moderate to avoid scorching the milk.
- While the liquid heats, whisk the egg yolks and cornstarch together in a separate bowl until the mixture is smooth and pale. This step ensures that no lumps form when you later combine the hot base with the yolks. The cornstarch will act as a stabilizer, preventing the custard from curdling. If you’re vegan, you can replace the yolks with a tablespoon of silken tofu blended until silky. This mixture should be silky and free of streaks.
- Slowly pour about half of the hot coconut mixture into the yolk mixture, whisking constantly to temper the eggs. Then, pour the tempered mixture back into the saucepan with the remaining coconut liquid. This careful process prevents the eggs from scrambling. The custard should be thick yet pourable. If it starts to look lumpy, keep whisking until it smooths out.
- Return the saucepan to low heat and stir the custard gently with a wooden spoon or heat‑proof spatula. Cook for 5 to 7 minutes, or until the mixture coats the back of the spoon and reaches 170°F (77°C). The custard should thicken but still be fluid enough to swirl. Use a thermometer for precision; this step is critical to achieving the right texture. Once it’s done, remove the pot from heat immediately.
- Stir in the shredded unsweetened coconut and toasted coconut flakes, letting the mixture cool to room temperature. The coconut will absorb some of the liquid, creating pockets of chewy texture. The mixture will thicken slightly as it cools. Let it sit for 10 minutes so the coconut can settle into the custard. This step is vital for the final bite.
- Transfer the custard to a shallow dish and place it in the refrigerator for at least 2 hours, or until completely chilled. The chilling phase allows the custard to firm up, making it easier to churn. You can also cover the dish with plastic wrap to prevent a skin from forming. If you’re in a hurry, use a bowl of ice water to speed up the cooling. This step is essential for a smooth ice cream.
- Once chilled, pour the custard into an ice cream maker and churn for 20 to 25 minutes, or until it reaches a soft‑serve consistency. The ice cream should be thick, creamy, and free of ice crystals. If you don’t have an ice cream maker, pour the custard into a freezer‑safe container and stir vigorously every 30 minutes for the first 2 hours. The result will still be delicious, albeit slightly grainy.
- Transfer the churned ice cream to an airtight container, smoothing the top with a spatula. Seal the container and freeze for at least 4 hours, or until firm enough to scoop. For a softer texture, let it sit at room temperature for 5 minutes before scooping. The ice cream should hold its shape while still being scoopable. This final step locks in the flavors.
- If desired, fold in chocolate chips, fresh berries, or a swirl of caramel sauce before the final freeze. These additions create visual interest and add complementary flavors. Be careful not to overmix; the ice cream should retain its airy structure. The swirl will create a marbled effect that’s Instagram‑worthy. Serve immediately for the best experience.
- Scoop the ice cream into bowls or cones and garnish with extra toasted coconut or a dusting of cocoa powder. The garnish adds a final crunch and a touch of elegance. You can also top with a drizzle of honey or a sprinkle of sea salt for a sweet‑salty finish. Enjoy the creamy, tropical delight with friends or family. Remember, this dessert is meant to be savored slowly, not gulped down in one bite.
Insider Tricks for Flawless Results
The Temperature Rule Nobody Follows
Why it matters: The custard must reach exactly 170°F to set properly without curdling. Many people overheat the mixture, causing the eggs to scramble. Use a digital thermometer to monitor the temperature accurately. Once the custard reaches the target, remove it from heat immediately. This ensures a silky, smooth ice cream.
Why Your Nose Knows Best
What to listen for: A sweet, caramelized aroma indicates the sugar is fully dissolved and the base is ready. If you detect a burnt smell, the mixture has overheated. Trust your senses; the scent is a reliable indicator of readiness. A well‑aroma base translates to a better flavor profile.
The 5-Minute Rest That Changes Everything
Why it works: Letting the custard sit at room temperature for 5 minutes before chilling allows the coconut to fully integrate, preventing pockets of liquid. This brief rest also helps the custard thicken slightly, making it easier to churn. Skipping this step can result in a slightly runny texture.
Avoiding Ice Crystals
Pro tip: Add a splash of vodka or a tablespoon of alcohol to the custard before freezing. Alcohol lowers the freezing point, keeping the ice cream smooth. Use a minimal amount to avoid affecting flavor. This trick is a favorite among professional chefs.
The Perfect Freeze Time
Why 4 hours: Freezing the ice cream for at least 4 hours allows the fats to solidify, creating a firm yet scoopable texture. If you freeze it longer, it may become too hard for easy scooping. For a softer scoop, let it thaw for 5 minutes before serving. Timing is key to the perfect bite.
Creative Twists and Variations
This recipe is a playground. Here are some of my favorite ways to switch things up:
Tropical Mango Swirl
What to swap: Blend fresh mango puree and fold it into the custard before freezing. The mango adds a bright, juicy contrast to the coconut base. This variation is perfect for summer parties and brings a fresh, tropical vibe.
Chocolate Coconut Delight
What to swap: Add 1/4 cup of melted dark chocolate to the custard and swirl in chocolate chips before freezing. The chocolate provides a rich, bittersweet balance to the sweet coconut. Chocolate lovers will adore this decadent version.
Spiced Cardamom Kick
What to swap: Replace the vanilla extract with 1/2 teaspoon of ground cardamom and add a pinch of ground cinnamon. The spices give the ice cream a warm, aromatic depth that’s reminiscent of Middle Eastern desserts. This twist is ideal for holiday gatherings.
Coconut‑Almond Crunch
What to swap: Add 1/2 cup of toasted almond slivers to the custard and sprinkle toasted coconut on top. The almonds introduce a nutty crunch that complements the coconut flavor. This version is great for those who love a bit of texture.
Berry Burst
What to swap: Fold in 1 cup of fresh blueberries or raspberries after the custard has cooled. The berries add a tart burst that cuts through the sweetness. This variation works well for a light dessert after a hearty meal.
Storing and Bringing It Back to Life
Fridge Storage
How long: Keep the ice cream in a sealed container in the refrigerator for up to 3 days. Store it in a shallow dish to reduce the risk of freezer burn. If you notice a crust forming, simply stir the ice cream to redistribute the moisture.
Freezer Friendly
How to store: Transfer the ice cream to an airtight, freezer‑safe container and seal tightly. Label the container with the date to keep track of freshness. For best results, store it in the coldest part of your freezer.
Best Reheating Method
How to revive: Let the ice cream sit at room temperature for 5 to 10 minutes before scooping. If it’s too hard, add a splash of coconut milk or a few drops of coconut oil to soften it. Gently stir to combine, then serve immediately. This method preserves the original texture while making it scoopable.