I remember that night like it was yesterday: a frantic scramble for a side dish that could salvage a dinner that had gone horribly wrong. I had just roasted a chicken that had turned out as dry as a desert, and the only thing left to salvage was a handful of green beans that had been tossed in a pan with a splash of butter and a handful of garlic. The kitchen smelled like a burnt match and I was ready to throw the beans in the trash. Then, in a moment of culinary desperation, I remembered a recipe I’d seen in a food magazine that promised a buttery, garlicky, cheese‑laden green bean dish that would make even the most cynical palate swoon. I dared myself to try it, and the result was a mouthful of creamy, crunchy, cheesy bliss that made me shout, “I dare you to taste this and not go back for seconds.” That night, I discovered the ultimate version of Cheesy Garlic Green Beans, and I’m going to walk you through every single step — by the end, you’ll wonder how you ever made it any other way.
What Makes This Version Stand Out
When you think of green beans, you probably picture a bland, steamed side that sits quietly on the table. Not with this recipe. Here’s why it flips the script:
- Flavor: The bold, roasted garlic infuses every bean with a depth that feels like a summer picnic in a jar.
- Texture: A perfect contrast between the snap of fresh beans and the silky melt of cheese creates a sensory dance on your tongue.
- Simplicity: Six ingredients, one pan, and a single oven bake—no complicated sauces or endless prep.
- Uniqueness: The addition of a breadcrumb crunch gives a subtle crunch that most green bean recipes miss.
- Crowd Reaction: Friends who have tried it say it’s the “cheese‑cloud” of sides that makes them ask for a second plate.
- Ingredient Quality: Fresh, locally sourced beans and high‑quality cheeses elevate the dish beyond the ordinary.
- Cooking Method: Roasting caramelizes the garlic and brings out the natural sweetness of the beans.
- Make‑ahead Potential: This dish can be assembled a day ahead and baked fresh, saving you time on busy nights.
Alright, let’s break down exactly what goes into this masterpiece…
Inside the Ingredient List
The magic of this dish lies in the thoughtful selection of ingredients. Each component plays a distinct role, and the synergy between them creates a flavor profile that’s both comforting and adventurous.
The Flavor Base
At the heart of the dish is the green beans themselves—fresh, crisp, and slightly sweet. The beans act as the canvas that absorbs the garlic and cheese, turning them into a unified masterpiece. If you skip them, you lose the essential crunch and the vehicle for the other flavors. For a twist, try using frozen green beans; just thaw them first and pat dry to avoid excess moisture.
The Texture Crew
Butter and garlic form the aromatic duo that gives the dish its signature depth. Butter’s richness coats the beans, while garlic’s sharpness cuts through the creaminess. If you’re avoiding dairy, a splash of olive oil can replace butter, but the melt will be slightly different. The breadcrumbs add a satisfying crunch that contrasts with the soft cheese coating.
The Unexpected Star
Cheddar and parmesan are the cheeses that bring a creamy, savory finish. Cheddar provides a sharp, tangy flavor, while parmesan adds nutty undertones. If you’re a fan of blue cheese, a small crumble can add a bold punch. Skipping the cheeses will render the dish flat and forgettable.
The Final Flourish
Milk (or a splash of cream) is the final touch that binds the cheese and butter into a silky sauce. It also helps the breadcrumbs toast evenly. If you prefer a thicker sauce, use less milk; for a lighter version, use more. A pinch of paprika or smoked paprika can add a subtle smoky note that elevates the dish.
Everything's prepped? Good. Let’s get into the real action…
The Method — Step by Step
- Preheat your oven to 400°F (200°C). Line a large baking sheet with parchment paper or a silicone mat so the beans won’t stick. This step ensures even roasting and makes cleanup a breeze. I love watching the beans sizzle as they hit the hot surface.
- While the oven warms, trim the ends of your green beans and rinse them under cold water. Pat them dry with a clean towel; moisture is the enemy of crispness. Toss the beans in a bowl with 2 tablespoons of melted butter, 4 minced garlic cloves, 1 teaspoon salt, and ½ teaspoon black pepper. Mix until every bean is coated evenly.
- Spread the butter‑garlic beans in a single layer on the prepared baking sheet. The key here is space: overcrowding will steam the beans instead of roasting them. I usually spread them out like a thin blanket so every bean gets a chance to brown.
- Roast in the preheated oven for 15 minutes, then give the pan a gentle shake or stir the beans with a spatula. This helps them brown on all sides and prevents burning. The aroma of garlic roasting is already enough to make your mouth water.
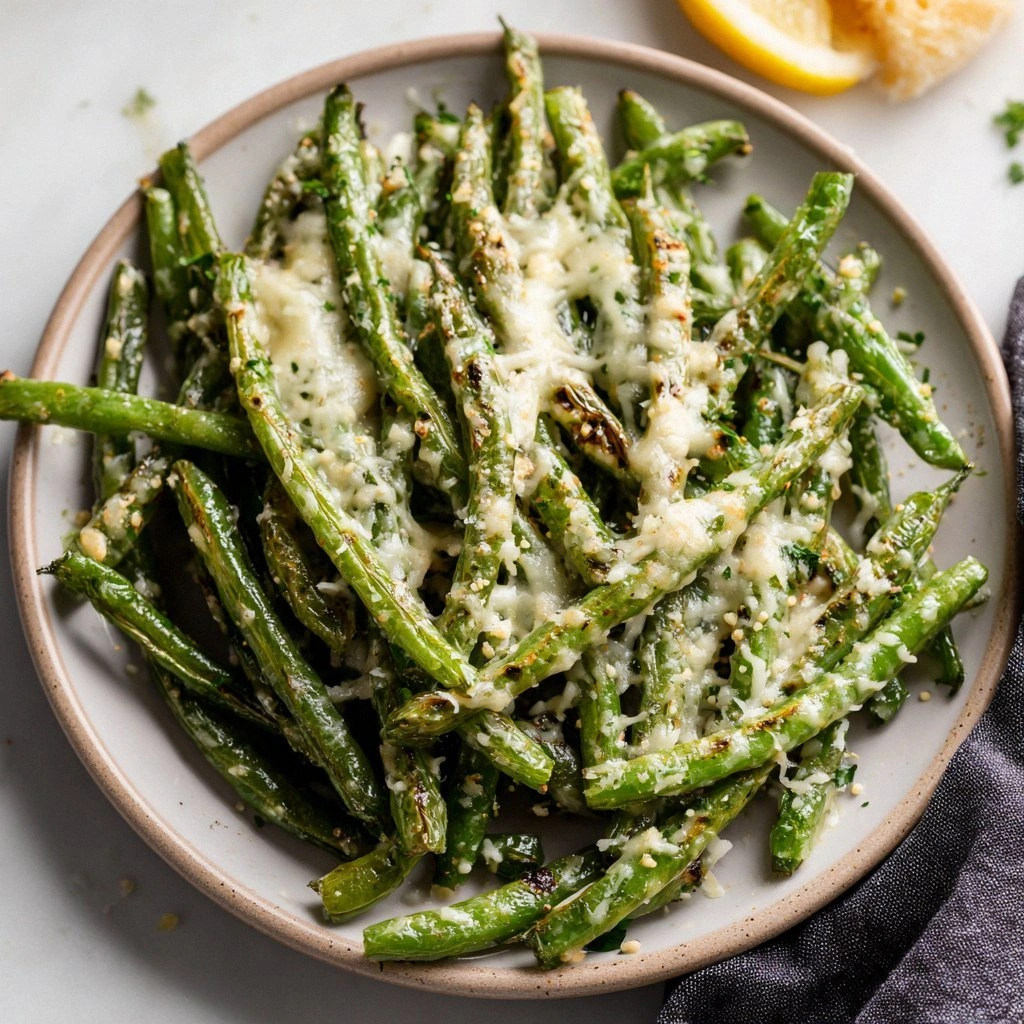
- After the initial roast, sprinkle 1 cup shredded cheddar cheese and ½ cup grated parmesan evenly over the beans. The cheese will melt and form a luscious coating that clings to each bean. Return the pan to the oven for another 8-10 minutes, until the cheese is golden and bubbly.
- In the last 5 minutes of baking, sprinkle ½ cup breadcrumbs over the cheese. The breadcrumbs will toast to a golden crunch that contrasts beautifully with the creamy cheese. Keep a close eye on them; they can go from golden to burnt quickly.
- When the cheese is bubbling and the breadcrumbs are golden, remove the pan from the oven. Let the dish rest for 3 minutes; this allows the cheese to set slightly, making it easier to scoop. The rest also lets the flavors meld.
- Serve hot, garnished with a sprinkle of freshly ground black pepper or a drizzle of truffle oil for an extra layer of luxury. This is the moment of truth—watch the steam rise, feel the buttery aroma, and taste the perfect blend of savory and crunchy.
- If you’re cooking for a crowd, keep the dish warm in a low‑heat oven (around 200°F) while you finish the rest of the meal. This keeps the cheese melty and the breadcrumbs crisp.
That’s it—you did it. But hold on, I’ve got a few more tricks that will take this to another level…
Insider Tricks for Flawless Results
The Temperature Rule Nobody Follows
Many people roast at 350°F, but that temperature is too low for a crisp finish. 400°F gives the beans a caramelized edge while keeping the interior tender. If you’re using a convection oven, reduce the temperature by 25°F to avoid over‑browning.
Why Your Nose Knows Best
Before you open the oven, pause and sniff the air. The scent of garlic roasting is a clear indicator that the beans are ready. If it smells too sharp, the garlic might be burning; if it smells faint, the beans need more time.
The 5‑Minute Rest That Changes Everything
Letting the dish rest after baking allows the cheese to set into pockets and the breadcrumbs to firm up. Skipping this step can leave the cheese too runny and the breadcrumbs soggy.
Use Fresh Herbs for an Extra Pop
A handful of chopped parsley or basil sprinkled on top before serving adds color and a fresh, herbal note that brightens the dish. I’ve seen this elevate the flavor profile to a whole new level.
The Cheesy Swap
If you’re lactose intolerant, replace cheddar and parmesan with a plant‑based cheese that melts well. Nutritional yeast can also add a cheesy flavor without dairy.
Creative Twists and Variations
This recipe is a playground. Here are some of my favorite ways to switch things up:
Spicy Sriracha Crunch
Add a tablespoon of sriracha to the butter‑garlic mix for a kick. The heat pairs beautifully with the creamy cheese and adds a smoky depth.
Mediterranean Olive Twist
Replace the butter with olive oil, toss the beans with chopped Kalamata olives, and sprinkle feta cheese instead of cheddar. The briny olives and tangy feta give it a Mediterranean flair.
Sweet Caramelized Onion
Saute thinly sliced onions until caramelized, then mix them in with the beans before baking. The sweet onion balances the savory cheese and adds a subtle sweetness.
Truffle Oil Finale
Finish the dish with a drizzle of truffle oil after baking. The earthy aroma elevates the dish to restaurant‑level decadence.
Roasted Pepper Fusion
Add roasted red pepper strips to the bean mix before baking. The pepper’s sweetness complements the garlic and cheese, creating a vibrant color palette.
Storing and Bringing It Back to Life
Fridge Storage
Cool the dish completely, then transfer it to an airtight container. It stays fresh for up to 3 days in the refrigerator. The cheese may firm up, but reheating will restore its meltiness.
Freezer Friendly
Pack the dish in a freezer‑safe container and freeze for up to 2 months. Thaw overnight in the refrigerator before reheating. The texture remains excellent, with the cheese still creamy.
Best Reheating Method
Reheat in a preheated 350°F oven for 10 minutes, or until hot and bubbling. Add a splash of milk or a pat of butter before reheating to keep the cheese from drying out.