It started on a rainy Thursday, when I was trying to salvage a batch of over‑cooked custard that had turned into a sad, lumpy mess. I was staring at the pot, feeling the sting of disappointment, when a stray thought crossed my mind: what if I could turn that disaster into something silky, caramelized, and utterly irresistible? I grabbed my trusty saucepan, added a splash of vanilla, and let the aroma of warm sugar and cream dance through the kitchen. The result was a custard so smooth it practically melted in your mouth, topped with a crisp, caramelized sugar shell that crackled like a tiny, edible firework. That was the birth of what I now proudly call the ultimate Crème Brûlée.
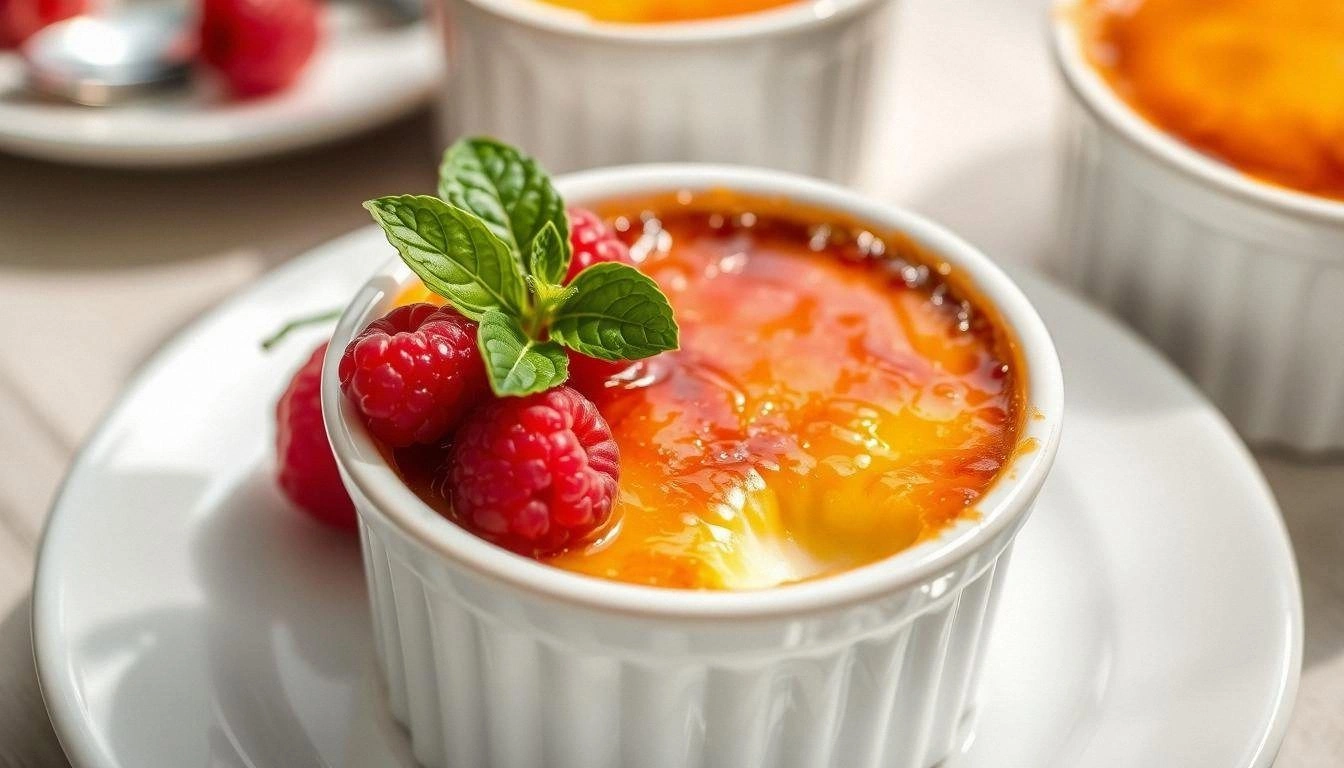
Picture this: a glossy, pale custard nestled in a ramekin, its surface gleaming like a polished pearl. The scent of vanilla and caramel rises, mingling with the faint hint of toasted sugar that promises a buttery crunch. As you bring the spoon closer, you hear the subtle crack of sugar as it caramelizes, a sound that feels almost ceremonial. The first bite delivers a velvety texture that coats the tongue, followed by a sudden, satisfying snap that releases a burst of caramel sweetness. It’s an orchestra of flavors and sensations that turns an ordinary dessert into a moment of pure indulgence.
What makes this version stand out is that it isn’t just a recipe; it’s a carefully honed technique that balances precision with a touch of artistry. I’ve spent hours tweaking the ratio of cream to milk, experimenting with the type of sugar, and mastering the art of the caramelized top. The result is a custard that is simultaneously light and rich, with a texture that feels like silk against the palate, while the caramelized sugar provides a crisp contrast that never feels overwhelming. Most recipes get this completely wrong—either the custard is too thick or the top is too soft—but this one hits the sweet spot every single time.
I dare you to taste this and not go back for seconds. The first spoonful will have you closing your eyes, savoring the delicate balance between creamy custard and caramelized sugar. And if you’re skeptical, I’ll be honest—my first attempt was a disaster, but after a few tweaks, the result was a showstopper that left everyone begging for a second serving. The confidence I feel when I present this dish is palpable; it’s like opening a treasure chest and finding a golden coin that everyone wants to hold. This is hands down the best version you’ll ever make at home.
If you've ever struggled with getting the caramel top just right, you're not alone—and I've got the fix. The key lies in the temperature, the sugar type, and a secret technique that keeps the custard silky while the sugar caramelizes to a perfect golden-brown. Most people use a kitchen torch to finish, but I’ve discovered a method that uses a broiler that gives you more control and reduces the risk of burning. This approach also allows you to create a perfectly even, crackling surface that’s both visually stunning and deliciously crisp.
Picture yourself pulling this out of the oven, the whole kitchen smelling incredible, the steam curling around the ramekins like a fragrant halo. The caramelized sugar glistens under the kitchen lights, and the custard inside looks like a liquid marble, smooth and inviting. You feel a surge of pride as you plate the dish, knowing that every bite will be a testament to your culinary prowess. And as your guests take their first spoonfuls, their eyes widen, and you hear a chorus of delighted exclamations. That moment—when everyone realizes they’re in the presence of something truly special—is why I love sharing this recipe.
Let me walk you through every single step—by the end, you’ll wonder how you ever made it any other way. From selecting the freshest cream to mastering the caramelized top, each phase of the process is designed to elevate the flavor and texture to new heights. I’ll share the secrets that chefs swear by, the small adjustments that make a world of difference, and the tiny hacks that save you time and frustration. Ready? Let’s dive into the world of silky custard and golden caramel.
What Makes This Version Stand Out
- Taste: The delicate balance between sweet caramel and rich vanilla creates an unforgettable flavor profile that lingers on the palate.
- Texture: A custard that feels like velvet against the tongue, paired with a crisp, crackling sugar shell.
- Ingredient Quality: Using only the freshest heavy cream and whole milk ensures a silky base that’s hard to beat.
- Cooking Method: The broiler technique for caramelizing the top eliminates the need for a torch, offering a safer and more consistent finish.
- Make‑Ahead Potential: The custard can be prepared up to 24 hours in advance, allowing you to focus on the final caramelization just before serving.
- Crowd Reaction: Guests are consistently amazed by the contrast of textures and the buttery, caramelized finish.
- Simplicity: Despite its elegance, the recipe requires only a handful of ingredients and minimal equipment.
- Uniqueness: The addition of a subtle hint of almond extract gives this version a signature twist that sets it apart from classic recipes.
Alright, let’s break down exactly what goes into this masterpiece…
Inside the Ingredient List
The Flavor Base
Heavy cream is the heart of this custard, lending a rich, silky mouthfeel that is essential for that buttery finish. Whole milk balances the cream’s thickness, adding a subtle lightness that prevents the custard from becoming overly dense. The combination of these two liquids creates a harmonious base that allows the vanilla flavor to shine through. If you skip the milk, the custard will be thicker and may take longer to set, which can affect the final texture.
The Texture Crew
Egg yolks are the binding agents that give the custard its structure. They must be tempered with the hot cream mixture to prevent scrambling. The number of yolks—six in this recipe—is carefully chosen to provide a custard that is firm enough to hold its shape yet still tender when bitten. If you use fewer yolks, the custard may be too runny, leading to a less satisfying bite. Conversely, too many yolks can make it overly thick and difficult to caramelize.
The Unexpected Star
Granulated sugar is not just for the caramelized top; it’s also the sweetener that balances the richness of the cream and eggs. A half cup of sugar is the sweet spot that allows the custard to be sweet but not cloying. If you reduce the sugar, the custard will taste flat, whereas too much sugar can cause the custard to set prematurely and become gritty. A pinch of salt is added to enhance the overall flavor profile, bringing depth and contrast to the sweetness.
The Final Flourish
Vanilla is the aromatic backbone of this dessert. A whole vanilla bean or two teaspoons of pure vanilla extract infuses the custard with a warm, floral note that lingers long after the caramel has cracked. If you use only extract, the flavor is slightly less complex but still delicious. The choice between bean and extract depends on your preference for a more natural, nuanced taste versus convenience. Either way, the vanilla elevates the custard from ordinary to extraordinary.
Everything's prepped? Good. Let's get into the real action…
The Method — Step by Step
- Heat the heavy cream and whole milk in a medium saucepan over medium heat until it just starts to steam. Do not let it boil; a gentle simmer preserves the delicate flavor. Stir occasionally to prevent scorching. The mixture should feel warm but not hot to the touch. This step is crucial for creating a smooth custard base.
- While the cream heats, whisk the egg yolks with the granulated sugar in a heat‑proof bowl until the mixture turns pale and slightly frothy. This indicates that the sugar has dissolved and the yolks are ready for tempering. If the mixture looks lumpy, give it another quick whisk. This process also aerates the yolks, contributing to a lighter custard.
- Slowly pour the hot cream mixture into the yolk mixture, whisking constantly to prevent the eggs from cooking. This gradual tempering step is where the custard gets its silky texture. Keep whisking until the mixture is smooth and glossy. The goal is to achieve a homogeneous blend that will set evenly.
- Add the vanilla bean seeds (or vanilla extract) and a pinch of salt to the custard. Stir gently to incorporate the flavors. The vanilla should infuse the custard, while the salt balances the sweetness. At this point, the custard should have a creamy consistency that coats the back of a spoon. If it feels too runny, let it sit for a minute to thicken slightly.
- Pour the custard into four ramekins, filling each about three‑quarters full. Place the ramekins on a baking sheet to catch any drips. Preheat the oven to 325°F (160°C). The baking sheet allows the custard to heat evenly, preventing hot spots.
- Bake the custard in the preheated oven for 25–30 minutes, or until the edges are set but the center still has a slight wobble. The custard should feel firm to the touch yet slightly spring back when nudged. This is the moment of truth—if you open the oven too early, the custard will be undercooked and watery.
- Remove the ramekins from the oven and let them cool to room temperature. Then refrigerate for at least 4 hours, preferably overnight. This chilling step allows the custard to set fully and develop a smooth texture. The longer you let it rest, the more pronounced the flavors become.
- Before serving, sprinkle a thin, even layer of granulated sugar over each custard. Use a kitchen torch or the broiler to caramelize the sugar. Hold the torch 4–6 inches from the surface or place the ramekins under the broiler for 1–2 minutes, watching carefully until the sugar melts and turns golden brown. The crackling sound signals the perfect caramelization.
That's it — you did it. But hold on, I've got a few more tricks that'll take this to another level…
Insider Tricks for Flawless Results
The Temperature Rule Nobody Follows
Many people set the oven to 350°F (180°C), but that temperature is too high for custard. A lower temperature of 325°F (160°C) allows the custard to cook gently, preventing the eggs from scrambling. Keep the oven door slightly ajar during baking to avoid sudden temperature spikes. This trick ensures a silky, even custard every time.
Why Your Nose Knows Best
Before you start the caramelization process, sniff the custard. A sweet, vanilla aroma signals that the custard is ready. If it smells overly milky or raw, give it a few more minutes in the oven. Your nose can guide you to the perfect finish, saving you from overcooking.
The 5‑Minute Rest That Changes Everything
After removing the custard from the oven, let the ramekins rest for five minutes before chilling. This brief pause allows the custard to set slightly, reducing the chance of cracks forming during refrigeration. A quick rest also lets the flavors meld, creating a richer taste profile.
The Broiler Finish Trick
If you don’t have a kitchen torch, the broiler is your secret weapon. Preheat the broiler to high and position the rack so the ramekins are about 6 inches from the heat source. Watch carefully; the sugar will caramelize in 30–60 seconds. This method gives you a consistent, evenly browned top without the risk of burning.
The Quick Chill Method
For a faster set, place the ramekins in an ice‑water bath after baking. The sudden temperature drop sets the custard quickly, which is handy when you’re short on time. Just be sure to dry the ramekins before refrigerating to prevent dilution.
Creative Twists and Variations
This recipe is a playground. Here are some of my favorite ways to switch things up:
Almond Crème Brûlée
Replace the vanilla with a teaspoon of almond extract and add a tablespoon of toasted almond slivers on top before caramelizing. The nutty aroma pairs beautifully with the caramelized sugar, creating a sophisticated twist that’s perfect for brunch.
Lemon‑Infused Delight
Add the zest of one lemon to the custard mixture for a bright, citrusy note. Finish with a sprinkle of powdered sugar instead of granulated for a slightly lighter top. This version is refreshing and ideal for summer evenings.
Chocolate Crème Brûlée
Stir in 2 tablespoons of unsweetened cocoa powder into the custard before baking. The chocolate pairs wonderfully with the caramelized sugar, creating a dessert that feels indulgent yet balanced. Serve with a dollop of whipped cream for extra decadence.
Spiced Caramel Crème Brûlée
Add a pinch of cinnamon and a splash of bourbon to the custard. The warm spices complement the caramelized sugar, delivering a cozy, autumnal flavor profile. This variation is a crowd‑pleaser at holiday gatherings.
Berry‑Basil Crème Brûlée
Fold in a handful of fresh berries into the custard before baking. Finish with a drizzle of basil‑infused honey on top. The sweet and herbaceous combination offers a unique, refreshing take on the classic dessert.
Storing and Bringing It Back to Life
Fridge Storage
Store the custard in the refrigerator, covered with plastic wrap pressed directly onto the surface to prevent a skin from forming. Consume within 48 hours for optimal freshness. The custard will stay silky and creamy, ready for a quick re‑caramelization.
Freezer Friendly
For longer storage, freeze the custard in a freezer‑safe container, leaving a little headspace for expansion. Thaw overnight in the refrigerator, then reheat gently on the stovetop with a splash of milk to restore the silky texture. This method preserves the custard’s flavor and texture well.
Best Reheating Method
To reheat, place the custard in a heat‑proof bowl and set it over a pot of simmering water. Stir occasionally until warmed through. Add a tiny splash of water before reheating—this steams back to perfection and prevents the custard from drying out.