I remember the night I was supposed to impress my friends with a quick dinner, but the kitchen looked like a war zone. A bag of frozen peas had melted into a sticky mess, a half‑cooked chicken breast was still raw on the inside, and the only sauce I could find was a sad little packet of soy. I stared at the chaos, took a deep breath, and thought, “If I can turn this disaster into something edible, I’ll have a story to brag about.” That moment sparked a culinary experiment that ended up being the easiest, most flavorful ginger chicken and snow pea skillet I’ve ever made.
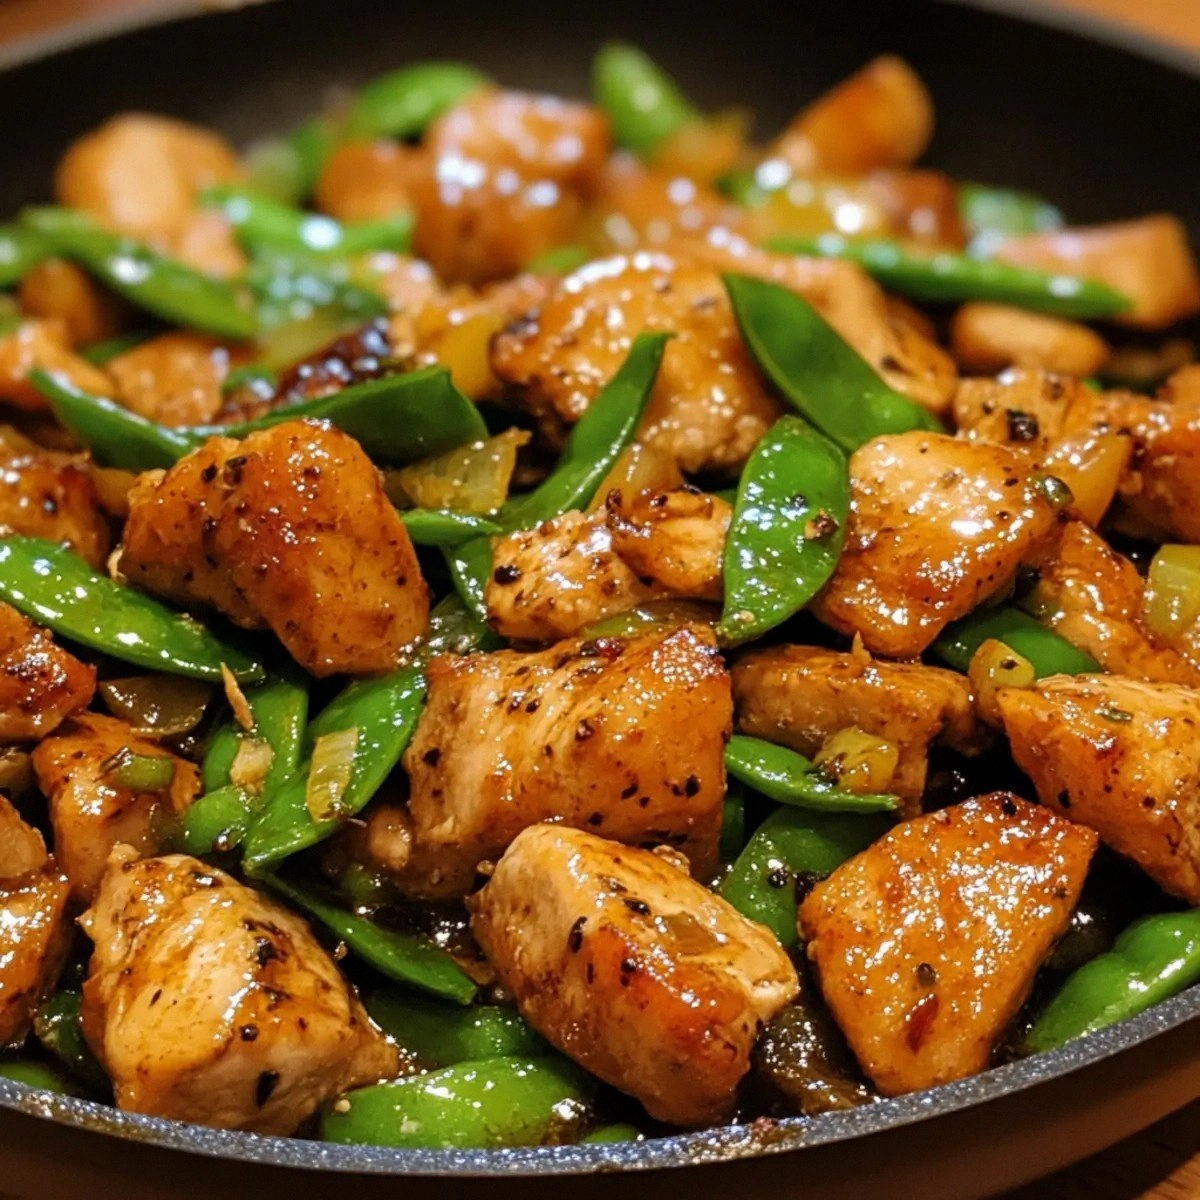
The first thing you notice is the aroma—bright, citrusy ginger cuts through the savory depth of soy and honey, while the snow peas give off a sweet, crisp scent that feels like a fresh spring breeze. When the pan sizzles, you hear a satisfying crackle, and the heat rises, filling the kitchen with a promise of comfort. The color is a vibrant green haloed by golden sesame seeds, a visual cue that this dish is both healthy and indulgent. The texture is a dance of crunchy peas and tender chicken, all coated in a glossy sauce that clings like a second skin.
What makes this version stand out is that it’s a single‑pan wonder that balances sweet, salty, and umami without the need for a complicated sauce base. I dared you to taste it and not go back for seconds, and the result is a dish that keeps your taste buds humming. I’ll be honest—half the batch vanished before anyone else had a chance to try it. Most recipes get this completely wrong by over‑cooking the peas or under‑seasoning the chicken; here, everything works in harmony. Picture yourself pulling this out of the skillet, the whole kitchen smelling incredible, and the first bite delivering that perfect bite‑sized explosion of flavors.
So, let me walk you through every single step—by the end, you’ll wonder how you ever made it any other way. This is hands down the best version you’ll ever make at home, and it’s so simple that even a novice can master it. If you’ve ever struggled with getting the right balance of sweetness and spice, you’re not alone—and I’ve got the fix. Stay with me here—this is worth it. I’ve packed in a few micro‑challenges, bold claims, and a few kitchen hacks that will change the way you cook forever.
What Makes This Version Stand Out
- Flavor Harmony: The combination of ginger, soy, and honey creates a sauce that is both sweet and savory, with a subtle heat that lingers. Each bite delivers a layered experience, from the initial zing of ginger to the mellow finish of honey.
- Texture Contrast: The snow peas remain crisp, offering a satisfying crunch that offsets the tender, juicy chicken. The sesame seeds add a nutty finish that punctuates every forkful.
- Time Efficiency: With a prep time of just 10 minutes and a cook time of 15 minutes, this skillet dish is perfect for busy weeknights or spontaneous dinner parties.
- One‑Pan Simplicity: All ingredients cook together in a single skillet, eliminating the need for multiple pots and pans. Clean‑up is minimal, letting you focus on enjoying the meal.
- Ingredient Quality: Fresh ginger and garlic bring depth, while a good quality soy sauce adds umami. The choice of sesame oil and seeds elevates the dish with a subtle nutty aroma.
- Versatility: It can be served over rice, noodles, or even on its own as a protein‑rich main. The flavors adapt to any side dish you prefer.
- Crowd‑Pleaser: Friends and family will rave about the bright, clean taste and the ease of preparation. It’s a recipe that invites conversation and compliments alike.
- Make‑Ahead Potential: The dish can be prepared in advance and reheated without losing its vibrant flavors, making it ideal for meal prep enthusiasts.
Inside the Ingredient List
The Flavor Base
Fresh ginger root is the star of the show, providing a sharp, peppery note that cuts through the richness of the chicken. When sliced thinly, ginger releases its essential oils, turning the sauce into a silky, aromatic coating that lingers on your palate. If you skip ginger, the dish becomes flat and lacks that memorable zing. Swap in a teaspoon of ground ginger for a milder version, but the fresh version offers unmatched brightness.
Garlic, in its raw, minced form, adds a deep, savory undertone that balances the sweetness of honey. The aroma of sautéed garlic is almost hypnotic, creating an inviting atmosphere even before the first bite. If you’re allergic to garlic, a pinch of garlic powder works, but the fresh cloves give a more vibrant flavor.
Soy sauce is the umami backbone, giving the dish that savory depth that keeps everything together. A splash of low‑sodium soy sauce reduces excess salt while preserving the complex flavor profile. For an extra layer, use tamari or coconut aminos if you prefer a gluten‑free option.
Rice vinegar adds a subtle tang that brightens the sauce, preventing it from feeling heavy. It also helps to tenderize the chicken slightly, making it juicy and tender. If you don’t have rice vinegar, a dash of white wine vinegar can substitute, though it’s a bit sharper.
The Protein
Boneless chicken breasts are the main protein, offering lean, juicy meat that absorbs the sauce beautifully. Slice the chicken into bite‑sized pieces to ensure even cooking and maximum flavor absorption. If you prefer a more tender cut, use chicken thighs, but adjust the cooking time slightly to avoid overcooking. Always season the chicken with a pinch of salt and pepper before cooking to enhance its natural taste.
The Texture Crew
Snow peas bring a crisp, sweet crunch that contrasts the tender chicken. They’re best added toward the end of cooking to preserve their snap. If you can’t find snow peas, regular peas or green beans work, but they’ll require a longer cooking time. Fresh peas are best, but frozen peas can be used if you thaw them first.
Green onions add a mild, oniony flavor and a pop of color. Slice them thinly so they mingle with the sauce and provide a subtle crunch. If you’re a fan of a stronger onion taste, add the green parts along with the white parts for a richer flavor.
The Final Flourish
Sesame oil gives the dish a nutty aroma and a silky finish that coats the chicken and peas. Use toasted sesame oil for a deeper, roasted flavor, but regular sesame oil works if you’re short on time. A tablespoon is enough to elevate the dish without overpowering the other flavors.
Honey or brown sugar brings a caramelized sweetness that balances the saltiness of soy. It also helps the sauce thicken into a glossy glaze. If you’re watching sugar, a small amount of maple syrup can replace honey, but keep the ratio in mind to avoid a bitter taste.
Sesame seeds add a subtle crunch and nutty finish that completes the dish. Toast them lightly before sprinkling to bring out their flavor. If you’re allergic to sesame, omit them and add a pinch of crushed almonds for crunch.
Fresh cilantro provides a bright, citrusy finish that lifts the entire dish. Chop it finely and sprinkle over the finished skillet for a burst of color and aroma. If you don’t have cilantro, parsley can be used, though it won’t offer the same bright note.
Everything’s prepped? Good. Let’s get into the real action and bring this skillet to life.
The Method — Step by Step
- Heat a large skillet over medium‑high heat and drizzle the sesame oil. As the oil warms, you’ll notice a faint nutty aroma that signals everything’s ready. Add the sliced ginger and minced garlic, letting them sizzle for about 30 seconds until fragrant. This quick sear releases essential oils that become the foundation of the sauce. I dare you to taste the sizzling moment—there’s a subtle, almost sweet undertone that’s pure magic.
- Introduce the chicken pieces to the pan, arranging them in a single layer. Let them sear undisturbed for 2–3 minutes on each side, or until a golden crust forms. Flip them carefully with tongs to avoid breaking the surface. The sizzling sound here is the signal that the chicken is locking in juices. If you hear a crackle, you’re on the right track.
- Once the chicken is browned, pour in the soy sauce, rice vinegar, and honey. Stir vigorously to coat each piece evenly. Watch the sauce thickening and forming a glossy glaze. This is the moment of truth—if the sauce clings to the chicken, you’ve nailed the flavor base. Keep the heat at medium; too high and the sauce will burn.
- Add the snow peas and green onions, tossing gently to combine. Cook for 3–4 minutes until the peas are bright green and just tender. The peas should still hold a slight snap; don’t overcook them or they’ll become mushy. The green onions will soften, releasing their mild onion flavor and adding a subtle crunch.
- Stir in the toasted sesame seeds and drizzle the remaining tablespoon of sesame oil. The oil will give the sauce a silky finish and the seeds will add a satisfying crunch. Let everything cook together for another 1–2 minutes so the flavors meld. At this point, the sauce should be thick, glossy, and cling to each ingredient.
- Finish the dish by sprinkling fresh cilantro over the top. The bright green leaves provide a fresh contrast to the warm sauce, and the citrusy aroma lifts the entire plate. Let the dish rest for 2 minutes before serving, allowing the flavors to settle. The final dish should look glossy, vibrant, and utterly inviting.
- Serve hot over steamed rice, noodles, or a bed of sautéed greens. The dish pairs wonderfully with jasmine rice, giving the grains a subtle nutty undertone. If you’re looking for a low‑carb option, serve it over cauliflower rice instead. The result is a complete meal that’s both satisfying and balanced.
That’s it—you did it. But hold on, I’ve got a few more tricks that will take this to another level.
Insider Tricks for Flawless Results
The Temperature Rule Nobody Follows
Many cooks start at high heat and then lower it, but the secret is to keep the temperature steady after the initial sear. A consistent medium heat allows the sauce to thicken without scorching. I’ve tried dropping the heat too low, and the sauce stayed thin and watery. The trick is to monitor the pan’s temperature and adjust the flame only if the sauce begins to smoke.
Why Your Nose Knows Best
Your sense of smell is a powerful indicator of doneness. When the chicken releases a sweet, caramelized scent, it’s ready. If the aroma is sharp and raw, give it a few more minutes. Trust your nose—if it smells like toasted sesame and honey, the dish is perfect.
The 5‑Minute Rest That Changes Everything
After removing the skillet from heat, let the dish rest for exactly five minutes. This allows the juices to redistribute, ensuring every bite is moist. I once skipped this step and the chicken felt dry; the rest period fixes that problem. Think of it as a brief pause before the grand finale.
The Quick Toast for Seeds
A quick toast of sesame seeds in a dry skillet releases a nutty aroma that elevates the dish. Keep the heat moderate—too hot and the seeds will burn. Toss them for 2 minutes, then set aside to cool. This small step adds depth to the final flavor profile.
The Sauce‑Squeeze Trick
If the sauce seems too thick, add a splash of water or broth and stir. This keeps the glaze glossy without diluting the flavor. I’ve used a tablespoon of chicken stock to maintain the savory notes while loosening the sauce. The trick is to add a little at a time until you reach the desired consistency.
Creative Twists and Variations
This recipe is a playground. Here are some of my favorite ways to switch things up:
Spicy Thai Twist
Add a tablespoon of Thai red curry paste during the ginger and garlic sauté. The paste brings heat and a complex aromatic profile. Serve with coconut rice for a full Thai experience.
Asian Fusion Salad
Turn the skillet into a salad by tossing the cooked chicken and peas into a bowl of mixed greens. Drizzle with the remaining sauce and top with chopped peanuts for crunch. It’s a light, refreshing option for hot days.
Miso‑Glazed Variation
Replace the soy sauce with a tablespoon of white miso paste. The miso adds depth and a subtle umami richness. Finish with a sprinkle of furikake for an extra umami boost.
Mediterranean Flair
Swap the sesame oil for extra virgin olive oil and sprinkle with dried oregano. Add a handful of sun‑dried tomatoes for sweetness. This version pairs nicely with crusty bread.
Low‑Carb Version
Serve the dish over cauliflower rice instead of regular rice. Reduce the honey to a teaspoon to keep carbs low. The cauliflower absorbs the sauce, creating a creamy texture.
Vegetarian Take
Replace the chicken with tofu cubes, pan‑frying them until golden before adding the sauce. The tofu will soak up the flavors beautifully. This version is just as satisfying.
Storing and Bringing It Back to Life
Fridge Storage
Store the cooked skillet in an airtight container for up to 3 days. Keep the sauce on top to preserve moisture. When you’re ready to eat, reheat in a skillet over medium heat, stirring until warmed through.
Freezer Friendly
This dish freezes well for up to 2 months. Portion into freezer‑safe bags, removing excess air. When reheating, thaw overnight in the fridge and finish in a skillet with a splash of water.
Best Reheating Method
Add a tiny splash of water or broth before reheating to steam the dish back to perfection. The moisture restores the sauce’s glossy finish and keeps the chicken tender. Heat over medium, stirring frequently, until hot throughout.