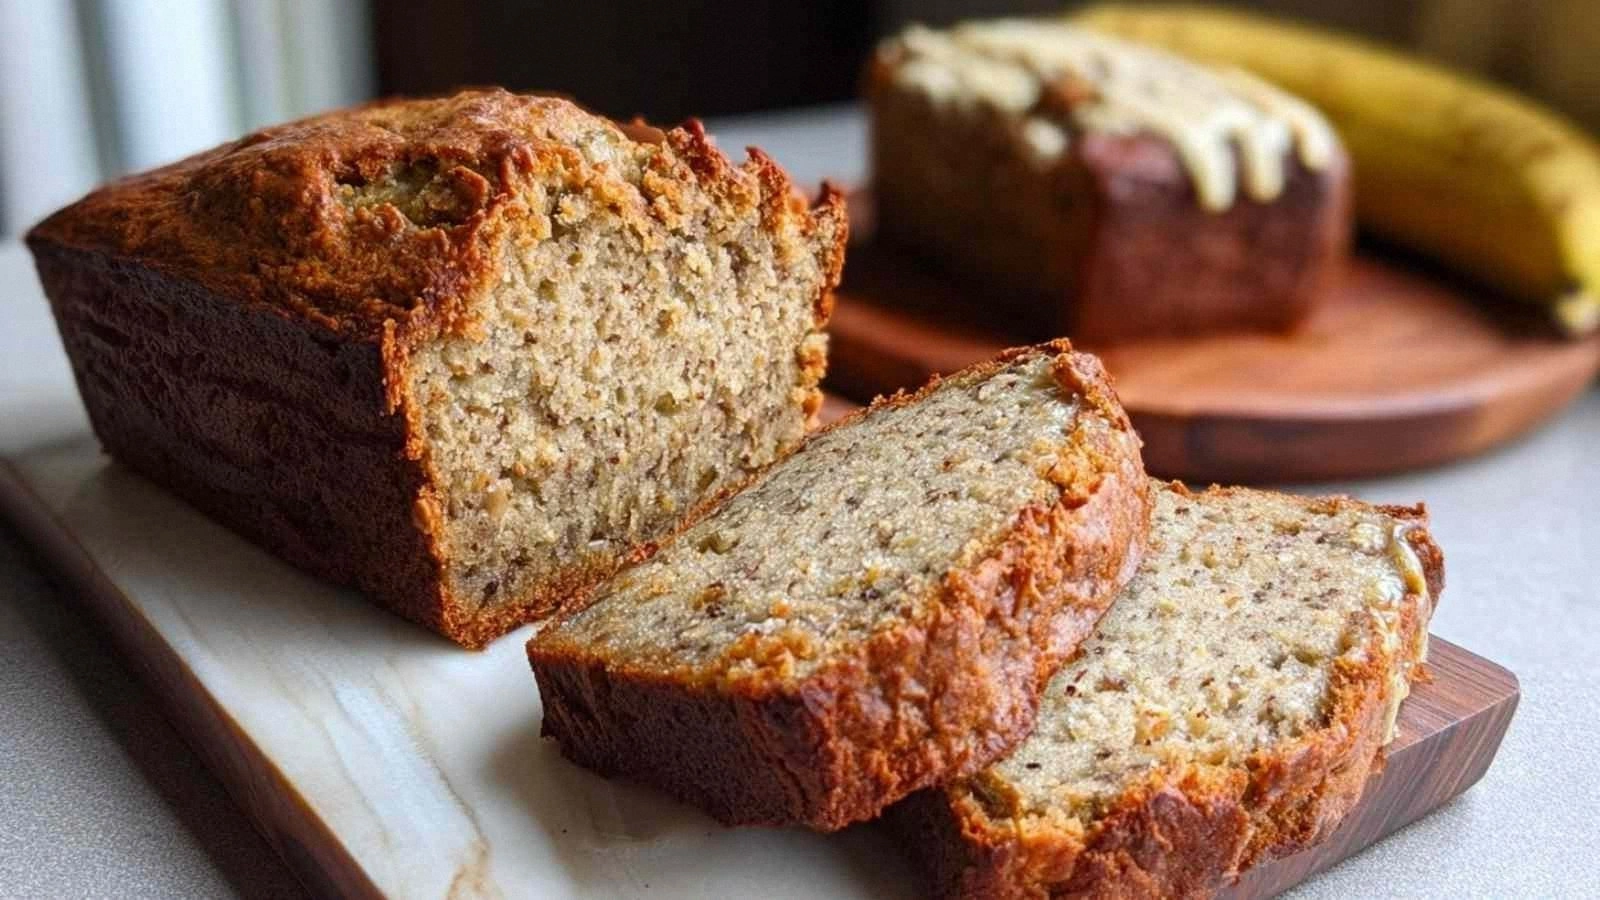
Picture this: you’re halfway through a marathon of late‑night protein shakes, your kitchen lights flicker, and the aroma of something sweet suddenly lingers in the air. I’m talking about the unmistakable scent of banana, maple, and a hint of coconut oil warming the oven. I was halfway through a disappointing, dry banana bread when I decided to throw a wrench into the machine—adding a scoop of protein powder, a generous splash of dairy‑free yogurt, and a whisper of peanut butter. The result was a moist, chewy loaf that tasted like a warm hug and looked like a masterpiece. I couldn’t help but laugh at how my kitchen disaster turned into a culinary triumph.
From the moment you crack the first egg, the kitchen fills with the comforting crackle of butter melting into oil, the sweet, earthy smell of ripe bananas, and that faint, almost metallic tang of protein powder. The sound of the whisk whirling through the batter is like a gentle lullaby, while the sight of the batter thickening into a glossy, amber liquid keeps you on the edge of your seat. When the loaf finally emerges from the oven, the golden crust crackles as you press down, releasing a steam that smells like caramelized sugar and toasted coconut. The first bite is a revelation—soft, buttery, and layered with banana, peanut butter, and a subtle vanilla undertone that lingers on your palate. The texture is a delightful contrast: a crisp edge meets a tender, almost custard‑like interior that melts in your mouth.
What sets this version apart from the countless banana bread recipes out there is the deliberate layering of proteins and healthy fats that not only boosts nutrition but also transforms the crumb into a silky, dense texture that feels indulgent without guilt. The inclusion of dairy‑free cream cheese and peanut butter adds a creamy richness that traditional recipes lack, while the maple syrup balances sweetness without overpowering the banana flavor. Most importantly, the use of gluten‑free oat flour and a carefully calibrated amount of baking soda and powder ensures the loaf rises evenly, preventing that dreaded gummy center. I dare you to taste this and not go back for seconds; the first bite will have you convinced that this is hands down the best version you'll ever make at home. If you’ve ever struggled with a dry, flat banana bread, you’re not alone—and I’ve got the fix.
I’m about to walk you through every single step, from the first mash to the final slice, so that by the end, you’ll wonder how you ever made it any other way. The secret ingredients, the timing, the hacks—everything is laid out for you. The anticipation of that first bite is almost as satisfying as the bite itself. Let’s dive in and transform your kitchen into a protein‑powered bakery.
What Makes This Version Stand Out
- Flavor: The combination of ripe bananas, creamy peanut butter, and a whisper of vanilla creates a complex, layered taste that feels both familiar and adventurous. The maple syrup adds a subtle caramel undertone that balances the natural sweetness of the fruit.
- Texture: The batter’s thick, custard‑like consistency yields a loaf that is moist throughout, with a tender crumb that doesn’t crumble or dry out. The addition of dairy‑free cream cheese keeps the interior silky without compromising on protein.
- Nutrition: With 25 grams of protein per serving and healthy fats from peanut butter and coconut oil, this loaf is a powerhouse for post‑workout recovery or a satiating breakfast.
- Simplicity: Only 16 ingredients, all pantry staples or easy to find at your local grocery store. No need for exotic spices or hard‑to‑locate items.
- Versatility: The batter can be turned into muffins, cupcakes, or even a quick flatbread for a savory snack. It’s a blank canvas for your culinary creativity.
- Make‑ahead Potential: Slice the loaf, wrap each piece, and freeze. Reheat in the microwave or toaster for a warm, fresh treat on the go.
- Allergy-Friendly: Gluten‑free, dairy‑free, and no added sugars beyond natural fruit and maple syrup. It’s a safe choice for many dietary restrictions.
- Visual Appeal: The golden crust and glossy interior look as good as they taste, making it a showstopper for brunch tables or dessert platters.
Inside the Ingredient List
The Flavor Base
Gluten‑free oat flour is the backbone of this loaf, providing a subtle nutty flavor that pairs beautifully with banana. It’s naturally high in fiber, which helps keep the batter thick and the loaf moist. If you’re looking for an even richer taste, try substituting oat flour with a blend of almond and coconut flour; just keep the total volume the same to avoid a dry crumb. Skipping the oat flour entirely will result in a denser, less airy loaf that feels more like a cake than a bread.
Protein powder is the secret weapon that turns this banana bread into a post‑workout staple. A scoop of unflavored or vanilla‑flavored whey or plant‑based protein adds structure and keeps the batter from collapsing. If you’re vegan, choose a pea or brown rice protein; if you’re lactose intolerant, plant‑based protein is a must. Don’t skip it—without the protein, the loaf will taste like a regular banana bread and lack that satisfying bite.
Baking soda and baking powder are the leavening agents that give the loaf its rise. The soda reacts with the acidity of the bananas and yogurt, creating tiny bubbles that lift the batter. The powder provides a gentle lift that ensures the loaf doesn’t sink in the middle. If you omit either, the bread will be flat and dense, losing the airy pockets that make each slice a delight.
Salt is the unsung hero that balances sweetness and enhances flavor. A pinch of salt brings out the richness of the bananas and the nuttiness of the peanut butter. Too much salt will overpower the loaf, so keep it to a quarter teaspoon. If you’re watching sodium intake, you can reduce it slightly, but expect a subtle change in taste.
The Texture Crew
Ground cinnamon adds a warm, spicy note that complements the banana’s natural sweetness. It also provides a hint of earthiness that deepens the flavor profile. If you’re a cinnamon lover, feel free to increase the amount to a teaspoon; just be aware that the spice will become more pronounced.
Overripe bananas are the star of the show, delivering natural sweetness, moisture, and a buttery texture. The riper the banana, the more caramelized the flavor when baked. If you don’t have ripe bananas, you can mash them with a splash of lemon juice to brighten the taste, but the loaf will be less sweet.
Thick dairy‑free yogurt adds tang and creaminess while helping to bind the batter. It also contributes to a softer crumb. If you don’t have yogurt, you can use coconut milk or almond milk, but the loaf may become slightly drier. A tablespoon of applesauce can also be a good substitute for moisture.
Coconut oil (or avocado oil) introduces healthy fats that keep the loaf moist and add a subtle tropical flavor. The oil’s high smoke point also ensures a consistent bake without burning. If you’re allergic to coconut, avocado oil is a great alternative that won’t alter the taste significantly.
The Unexpected Star
Dairy‑free cream cheese brings a silky, tangy richness that elevates the loaf beyond a typical banana bread. It also adds a subtle lift to the crumb, making each bite feel luxurious. If you can’t find dairy‑free cream cheese, you can use regular cream cheese, but the loaf will no longer be vegan and will have a slightly different texture.
Creamy peanut butter is the secret to the loaf’s nutty depth and a hint of savory. It also contributes healthy fats that keep the loaf moist for longer. If you’re allergic to peanuts, try almond butter or sunflower seed butter; the flavor will shift but still be delicious.
Maple syrup (both the 1/4 cup and the tablespoon) introduces natural sweetness and a subtle caramel flavor. The maple syrup also helps with browning, giving the crust that irresistible golden hue. If you prefer a less sweet loaf, you can reduce the maple syrup by a tablespoon, but the crust may be less caramelized.
Vanilla extract, in two forms, rounds out the flavor profile with its warm, floral notes. The first teaspoon of vanilla is mixed into the batter, while the second half teaspoon is folded in with the cream cheese and peanut butter. Skipping vanilla will leave the loaf feeling flat; add a splash of almond extract for a different twist.
The Final Flourish
Eggs act as the binder that holds all the ingredients together, giving the loaf structure and a slight lift. They also add moisture and a rich mouthfeel. If you’re vegan, you can replace eggs with flaxseed meal or chia seeds mixed with water; the loaf will still hold together but may be slightly denser.
All the ingredients together create a loaf that is moist, protein‑dense, and utterly satisfying. Every bite is a complex interplay of sweet, nutty, tangy, and slightly spicy flavors. If you’re looking for a dessert that doubles as a snack, this is the one. Everything’s prepped? Good. Let’s get into the real action.
The Method — Step by Step
- Preheat the oven to 350°F (175°C) and line a 9×5‑inch loaf pan with parchment paper or grease it with a light dusting of coconut oil. The parchment ensures easy release, while the oil adds a subtle sheen to the crust. As the oven heats, you’ll hear the gentle hum of the fan—an audible promise of the baking adventure ahead.
- In a large mixing bowl, whisk together the oat flour, protein powder, baking soda, baking powder, salt, cinnamon, and a splash of vanilla extract. This dry blend is the backbone of the loaf, and whisking it well ensures even distribution of leavening agents. A smooth batter is the key to avoiding pockets of dry flour that could ruin the texture.
- In a separate bowl, mash the bananas with a fork until almost smooth, leaving a few small chunks for texture. Add the yogurt, coconut oil, maple syrup, and the second vanilla extract, stirring until fully incorporated. The wet mixture should be glossy and thick, like a thick custard.
- Pour the wet mixture into the dry ingredients and fold gently with a spatula. Overmixing will create gluten strands that make the loaf tough; gentle folding keeps the crumb light and airy. A few streaks of flour are acceptable—just keep the batter smooth.
- Fold in the cream cheese, peanut butter, and the tablespoon of maple syrup. The cream cheese adds a silky tang, while the peanut butter brings a subtle nutty richness. This step is pure magic; the batter should feel thick but pourable.
- Pour the batter into the prepared loaf pan, spreading it evenly with a spatula. Tap the pan lightly on the counter to release any air bubbles that might have formed during mixing. The batter should fill the pan to the top, creating a uniform rise.
- Bake for 30–35 minutes, or until a toothpick inserted into the center comes out clean. The edges should pull away slightly from the pan, forming a beautiful crust. The aroma that fills the kitchen at this point is a sweet, caramelized promise of what’s to come.
- Remove the loaf from the oven and let it cool in the pan for 10 minutes before transferring it to a wire rack to cool completely. Cooling in the pan preserves the shape and prevents the loaf from becoming too crumbly. While it cools, the interior continues to set, creating a firm yet tender crumb.
- Slice the loaf and serve warm or at room temperature. A drizzle of maple syrup or a dollop of dairy‑free yogurt can elevate the experience, adding a creamy contrast to the chewy crumb. The first slice is always the most satisfying.
- Store leftovers in an airtight container in the fridge for up to 5 days or freeze for longer. When reheating, let the loaf sit at room temperature for a few minutes before warming it in the microwave or oven. A splash of water before reheating helps keep the loaf moist and prevents it from drying out.
Insider Tricks for Flawless Results
The Temperature Rule Nobody Follows
Many bakers think the oven temperature is a fixed number, but the real secret lies in the oven’s preheat time and the actual temperature you’re baking at. Use an oven thermometer to confirm the heat; a 10–20°F difference can mean the difference between a perfectly golden loaf and a soggy one. I’ve found that preheating for 15 minutes and then letting the oven sit for an extra 5 minutes before putting the loaf in gives the most consistent results. The first bite should have a crisp crust and a moist interior.
Why Your Nose Knows Best
Your nose is the ultimate judge of doneness. As the loaf bakes, the aroma shifts from sweet banana to caramelized sugar and toasted nuts. When the scent becomes rich and nutty, the loaf is almost ready. Trust your nose, and don’t rely solely on the toothpick test; it can sometimes give a false sense of completion if the batter is still too moist.
The 5-Minute Rest That Changes Everything
After baking, let the loaf rest in the pan for 10 minutes before transferring it to a wire rack. This brief rest allows the structure to set, preventing the loaf from collapsing when you slice it. The crumb will be firmer and easier to cut, and the flavors will meld together into a harmonious whole.
Keep It Moist, Not Dry
The key to a moist loaf is balancing liquids and fats. The combination of yogurt, oil, maple syrup, and banana creates a moist batter that holds together. If the loaf feels dry after baking, it’s likely because the batter was too thick or you overbaked it. In that case, try adding a splash of almond milk or an extra egg to future batches.
Serve It Hot or Cold
This loaf is versatile enough to be served warm straight from the oven, where the steam creates a comforting aroma, or cold as a snack for a hot day. Warm slices can be topped with a swirl of dairy‑free yogurt or a drizzle of honey for an extra indulgence. Cold slices are perfect for packing into a lunchbox or keeping in the fridge for a quick breakfast.
Creative Twists and Variations
This recipe is a playground. Here are some of my favorite ways to switch things up:
Chocolate Chip Power
Add 1 cup of dairy‑free chocolate chips to the batter before baking. The chips melt into pockets of chocolatey goodness that contrast with the banana flavor. This variation is a hit with kids and chocolate lovers alike.
Spiced Pumpkin Banana
Swap half of the banana batter with 1 cup of pumpkin puree and add 1 teaspoon of pumpkin pie spice. The pumpkin adds a subtle sweetness and a comforting autumn aroma. It’s a seasonal twist that feels like a warm hug.
Almond Crunch
Replace the peanut butter with almond butter and sprinkle 1/2 cup of chopped almonds on top before baking. The almonds add a crunchy texture and a nutty flavor that pairs well with the banana. It’s a great way to add an extra protein boost.
Blueberry Burst
Fold in 1 cup of fresh or frozen blueberries into the batter. The blueberries burst with juice, adding a burst of tartness that balances the sweetness. This version is especially refreshing during the summer.
Maple‑Spiced Muffins
Divide the batter into a muffin tin and bake at 350°F for 20–25 minutes. The smaller size yields a quicker bake and a more concentrated flavor. These muffins are perfect for on‑the‑go breakfasts.
Chocolate‑Nut Crust
Top the loaf with a mixture of melted dark chocolate and crushed nuts before baking. The chocolate creates a glossy, decadent crust while the nuts add a satisfying crunch. The result is a dessert that feels indulgent yet balanced.
Storing and Bringing It Back to Life
Fridge Storage
Wrap the cooled loaf tightly in plastic wrap and store it in the fridge for up to 5 days. The wrap keeps the loaf from drying out and preserves the moisture. When you’re ready to eat, slice and enjoy cold or warm it up in a toaster for a quick treat.
Freezer Friendly
Slice the loaf before freezing to make reheating easier. Place the slices in a single layer on a baking sheet, freeze until solid, then transfer them to a zip‑top bag. This method prevents the slices from sticking together. When you’re ready for a slice, pop one out and microwave for 15–20 seconds.
Best Reheating Method
The best way to bring the loaf back to life is to microwave it on a paper towel for 15–20 seconds or to warm it in a preheated oven at 350°F for 5–7 minutes. Adding a splash of water to the loaf before reheating creates steam, keeping the crumb moist and preventing it from becoming dry. The aroma that fills the kitchen will be even more irresistible.