Picture this: I’m standing in my cramped kitchen, the aroma of sizzling onions and browned beef filling the air, when the phone rings. My friend texts, “I’m craving Philly cheesesteak but I’m on keto, can you help?” I stared at the screen, heart racing, because I’ve never tried to marry the comfort of a cheesesteak with the strictness of keto. The moment the idea landed in my mind, I knew I had to act fast.
I grabbed a skillet, tossed in the ground beef, and let it sizzle like a drumbeat. The sound was unmistakable—rich, caramelized, and utterly inviting. The scent that rose was a buttery blend of onions and pepper, a scent that made my mouth water. I could already taste the creamy, melty cheese melting over the meat, the peppery bite cutting through the richness. The texture of the beef was a perfect balance between tender and slightly chewy, and the whole kitchen felt alive with anticipation.
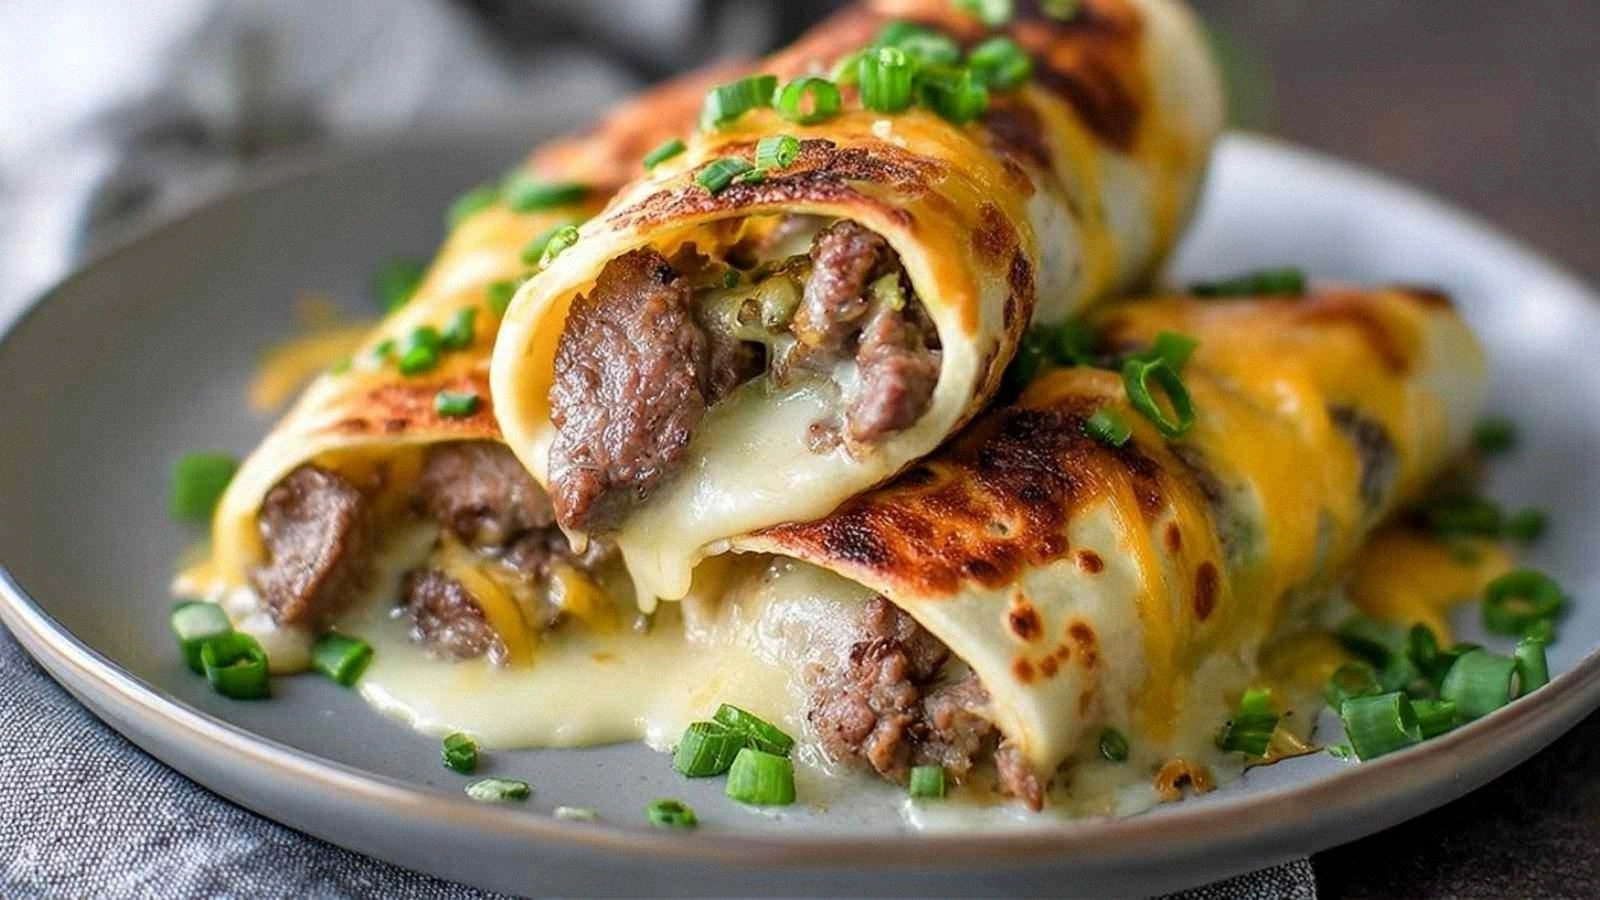
I’ve tried countless versions of a keto Philly cheesesteak before—some too dry, some too greasy, some just plain forgettable. This one is different because it captures the authentic flavor profile of the original while keeping the carb count low and the taste unforgettable. It’s a roll that delivers the same melt-in-your-mouth satisfaction without the guilt. The secret? A luscious blend of Monterey Jack and cream cheese that coats the beef like velvet, and a perfectly seasoned mix of onions and peppers that keeps every bite fresh.
And there’s a twist you won’t see in most recipes: the use of a low‑carb dough that’s so soft it practically dissolves in your mouth. That dough, combined with the cheesy filling, gives you a roll that feels indulgent yet stays within keto boundaries. I dare you to taste this and not go back for seconds. If you’ve ever struggled to find a keto version that feels authentic, you’re not alone—and I’ve got the fix.
Let me walk you through every single step—by the end, you’ll wonder how you ever made it any other way. I’ll share the exact ratios, the timing, the tricks that keep the dough from sticking, and how to get that golden crust without overcooking the filling. The result will be a roll that’s as satisfying as the original Philly cheesesteak and as keto-friendly as it gets. So, grab your apron, and let’s get cooking.
What Makes This Version Stand Out
- Flavor: The blend of Monterey Jack and cream cheese creates a creamy, savory profile that mirrors the classic cheesesteak’s signature melt.
- Texture: The dough is soft and pliable, ensuring each bite offers a tender bite that doesn’t feel doughy.
- Convenience: All ingredients are pantry staples, so you can whip this up on a weekday night.
- Authenticity: The combination of onions, bell pepper, and Worcestershire sauce gives it that unmistakable Philly street‑food vibe.
- Make‑ahead: The rolls can be assembled and frozen, then baked fresh when you’re ready to eat.
- Portability: These rolls are perfect for lunch boxes, picnics, or a quick dinner on the go.
- Low Carbs: The recipe stays under 6 grams of net carbs per serving, making it truly keto‑friendly.
- Versatility: Swap out the beef for ground turkey or sausage for a different twist.
Alright, let’s break down exactly what goes into this masterpiece…
Inside the Ingredient List
The Flavor Base
Monterey Jack cheese is the heart of this recipe. Its mild, buttery taste and excellent meltability make it the ideal stand‑in for the classic provolone or American cheese found in traditional Philly cheesesteaks. The cheese adds a creamy richness that balances the savory beef. If you can’t find Monterey Jack, Swiss or mozzarella will work, but they may alter the flavor slightly.
The Texture Crew
Ground beef is the cornerstone of the filling. I use 80/20 lean to keep the fat content moderate while still ensuring the meat stays juicy. The 16 ounces of beef yield a generous amount of protein and fat, but the balance is just right for a satisfying bite. Skipping the beef will make the rolls flat and unremarkable.
The Unexpected Star
Cream cheese is the secret weapon that turns a simple roll into a decadent experience. Its high fat content creates a silky coating that keeps the cheese from separating during baking. If you prefer a lighter version, try using a low‑fat cream cheese or a mixture of cream cheese and Greek yogurt. The result will still be creamy, just with a slightly tangier flavor.
The Final Flourish
Onion, bell pepper, and Worcestershire sauce bring the bright, savory notes that define a Philly cheesesteak. The onion adds sweetness, the bell pepper brings a subtle crunch, and Worcestershire sauce injects umami and depth. Together they create a symphony of flavors that dance on your palate. If you’re a spice lover, consider adding a pinch of red pepper flakes for a subtle heat.
Everything’s prepped? Good. Let’s get into the real action…
The Method — Step by Step
- First, heat a large skillet over medium‑high heat and add the ground beef. Break it up with a spatula and let it brown until no pink remains, about 5–7 minutes. As the beef cooks, it will release a rich aroma that instantly makes your kitchen feel like a neighborhood diner. Once browned, drain off any excess grease to keep the filling from becoming greasy.
- Add the diced onion and bell pepper to the skillet. Sauté for 3–4 minutes until the vegetables soften and start to caramelize. The onions will turn translucent and the peppers will develop a slight char, adding depth to the flavor. Keep the heat steady so the veggies don’t burn, which would ruin the subtle sweetness.
- Stir in the Worcestershire sauce, salt, and pepper. Let the mixture simmer for an additional 2 minutes, allowing the flavors to meld. The sauce will thicken slightly, coating the meat and vegetables in a savory glaze. Taste and adjust seasoning if needed—this is the moment to personalize the flavor.
- Remove the skillet from heat and let the filling cool for a few minutes. While it’s still warm, fold in the shredded Monterey Jack and cream cheese. The residual heat will melt the cheeses, creating a silky, cohesive filling. If the mixture seems too thick, add a splash of beef broth to loosen it.
- Meanwhile, roll out the keto dough on a lightly floured surface until it’s about 1/4 inch thick. If the dough is too stiff, let it rest for 5 minutes to relax. Cut the dough into 8 equal squares, each about 4 inches on each side. The size ensures each roll is bite‑sized yet substantial.
- Place a generous spoonful of the filling in the center of each dough square. Fold the dough over to create a sealed roll, pinching the edges to ensure no filling leaks out. The rolls should look like little parcels, ready to be baked to perfection.
- Preheat your oven to 375°F (190°C) and line a baking sheet with parchment paper. Arrange the rolls on the sheet, leaving a little space between each. Bake for 18–20 minutes, or until the dough is golden brown and the cheese is bubbling. The heat will create a crisp crust while keeping the inside moist.
- Once baked, let the rolls rest for 2 minutes before serving. This short rest allows the filling to set slightly, preventing it from spilling out when you take a bite. Serve immediately with a side of keto-friendly dipping sauce or a fresh salad.
That's it— you did it. But hold on, I've got a few more tricks that'll take this to another level. These extra steps will elevate the flavor, texture, and overall experience of your rolls.
First, consider adding a splash of garlic butter to the skillet before adding the beef. The butter will give the meat a richer flavor and a glossy finish. Second, sprinkle a pinch of smoked paprika over the filling before sealing the rolls; this adds a subtle smoky depth that makes the rolls feel even more authentic. Third, finish the rolls with a drizzle of keto-friendly hot sauce for a touch of heat that contrasts beautifully with the creamy filling.
Insider Tricks for Flawless Results
The Temperature Rule Nobody Follows
Many people bake at 350°F, but that can result in a dough that’s too soft. I’ve found 375°F is the sweet spot—it creates a golden, crispy crust while keeping the inside tender. If you’re using a convection oven, lower the temperature by 25°F to avoid over‑browning. This small tweak can make a huge difference in the final texture.
Why Your Nose Knows Best
The aroma of the filling is a real indicator of doneness. When the cheese is fully melted and the beef is cooked through, the scent will be rich and inviting. If the smell is too raw, let the filling simmer a bit longer. Trust your nose; it’s a reliable guide that no digital thermometer can beat.
The 5‑Minute Rest That Changes Everything
Letting the rolls rest for exactly five minutes after baking allows the cheese to set just enough to hold its shape. A shorter rest may cause the filling to ooze out, while a longer rest can cause the dough to become soggy. Five minutes is the sweet spot for a firm yet still soft interior.
Avoiding the Sticky Dough
If your dough sticks to the rolling pin, dust it generously with almond flour. This keeps the surface smooth and prevents tearing. Also, keep the dough chilled for a few minutes before rolling to improve its pliability.
Cheese Pairing Perfection
Monterey Jack works wonderfully, but if you want a sharper bite, try adding a dash of pepper jack. The slight heat will complement the beef and onions without overpowering the dish. Just remember to use it sparingly so the overall flavor remains balanced.
Keeping It Fresh
If you’re not eating the rolls immediately, wrap them tightly in foil and store them in the refrigerator for up to 2 days. When reheating, place them on a parchment‑lined sheet and bake at 350°F for 10 minutes. This will restore the crispness without drying them out.
Creative Twists and Variations
This recipe is a playground. Here are some of my favorite ways to switch things up:
Turkey & Spinach Roll
Swap the ground beef for ground turkey and add a handful of fresh spinach to the filling. The turkey keeps the protein high while the spinach adds a burst of green and a subtle earthiness. This version is lighter but still satisfies the craving.
Sausage & Mushroom Delight
Use sliced Italian sausage and sautéed mushrooms in place of the beef and onions. The sausage brings a smoky flavor, and the mushrooms add umami. This variation is perfect for when you want something a bit different.
Cheddar & Jalapeño Crunch
Add shredded sharp cheddar and diced jalapeños to the cheese mixture. The sharpness of the cheddar and the heat from the jalapeños create a bold, spicy profile that pairs well with the savory filling.
Buffalo Chicken Roll
Replace the beef with shredded rotisserie chicken and toss it in buffalo sauce before adding the cheese. Top the finished rolls with a drizzle of ranch or blue cheese dressing for a tangy finish. This version is a crowd‑pleaser for game‑day gatherings.
Pesto & Sun‑Dried Tomato Twist
Stir a spoonful of basil pesto and chopped sun‑dried tomatoes into the filling. The pesto adds a herby aroma, while the tomatoes bring a sweet, slightly acidic note. This variation is a refreshing change for those who love Mediterranean flavors.
These variations prove that the base recipe is versatile enough to accommodate any craving. Whether you’re in the mood for something spicy, smoky, or fresh, you can tweak the ingredients to fit the moment.
Storing and Bringing It Back to Life
Fridge Storage
Store the baked rolls in an airtight container in the refrigerator for up to 2 days. The dough will keep its shape, and the filling will stay moist. When you’re ready to eat, reheat them in a preheated oven at 350°F for 10 minutes to restore the crisp crust.
Freezer Friendly
You can freeze the assembled rolls before baking. Place them on a parchment‑lined tray and freeze until solid, then transfer to a freezer bag. When ready to bake, place directly in a preheated oven at 375°F for 25 minutes. This method saves time and keeps the rolls fresh.
Best Reheating Method
The secret to reheating is to add a splash of water to the baking dish or wrap the rolls in foil with a tiny splash of water. This creates steam that keeps the interior moist while the oven restores the exterior crispness. Avoid microwaving the whole roll; it can become rubbery.