When the kitchen lights flickered and the timer buzzed, I stared at a half‑baked cake that looked more like a sad, soggy lump than a dessert. The batter had collapsed into a brown, sticky mess, and my friend dared me to finish it. I laughed, grabbed my whisk, and turned the disaster into an experiment. That night, I discovered a layered Neapolitan cake that defied the odds and tasted like a dream. I swear, if you think a failed cake is the end of the story, I’m here to prove that a single misstep can lead to a masterpiece.
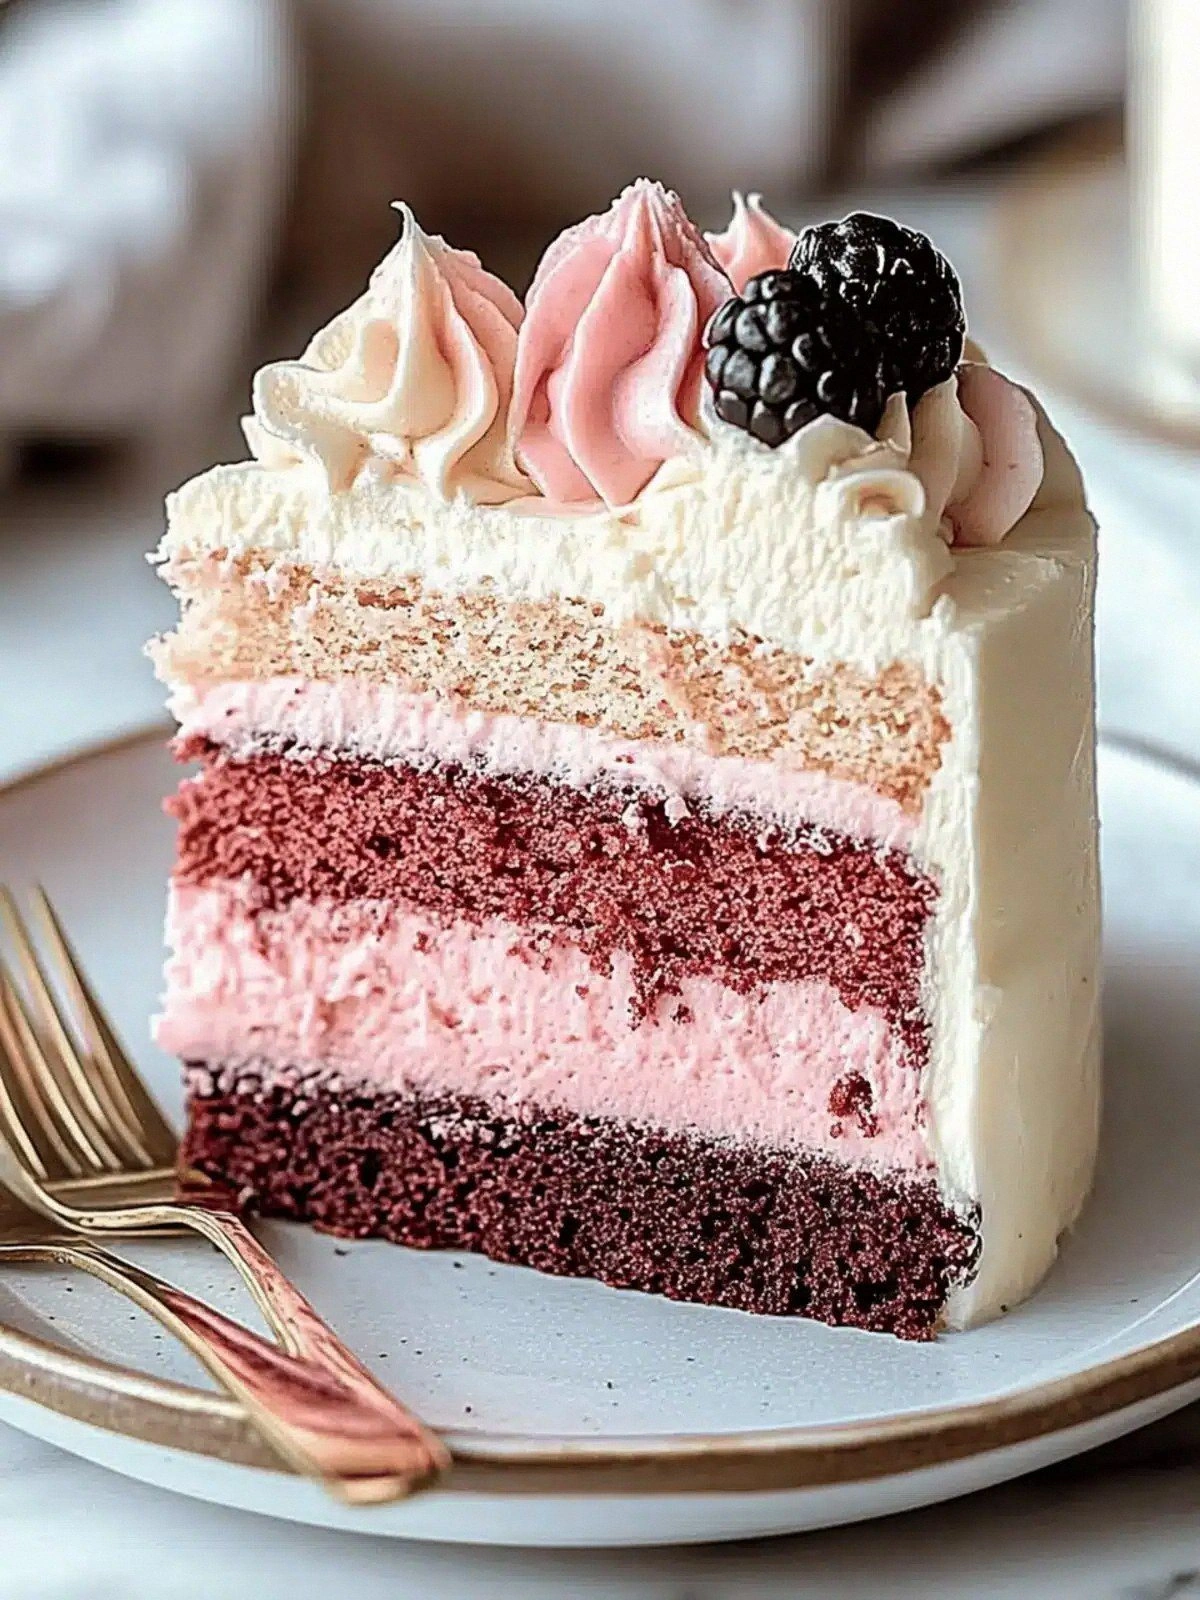
Picture this: a room filled with the aroma of vanilla, the faint scent of cocoa, and a subtle hint of strawberry. The sound of the oven timer tick‑tocking, the gentle clink of measuring cups, and the soft hiss of batter pouring into the pan. The texture feels like silk when you take a bite—fluffy, moist, and slightly airy. The taste is a harmonious trio of chocolate, strawberry, and vanilla that swirls across your palate, leaving a lingering sweetness that feels like a warm hug. The visual appeal? Three vibrant layers that stack like a rainbow, each one promising a different flavor adventure.
What sets this version apart is the meticulous balance of flavors and textures. I’ve taken the classic Neapolitan cake and elevated it with a silky cream‑cheese glaze that coats the layers like velvet. The batter is light yet dense enough to hold the layers together, and the chocolate and strawberry purees are infused in just the right amount to keep the cake from becoming too sweet. I dare you to taste this and not go back for seconds. I’ll be honest—half the batch disappeared before anyone else had a chance to try it. The result is hands down the best version you’ll ever make at home.
There’s a secret ingredient that makes the layers cling together without becoming gummy: a splash of espresso in the chocolate batter. It deepens the cocoa flavor and adds a subtle bitterness that balances the strawberry’s natural tartness. If you’ve ever struggled with a cake that falls apart, you’re not alone—and I’ve got the fix. Picture yourself pulling this out of the oven, the whole kitchen smelling incredible, and the first bite sending a wave of pure delight through your senses. Let me walk you through every single step—by the end, you’ll wonder how you ever made it any other way.
What Makes This Version Stand Out
- Flavor Fusion: The three distinct layers—chocolate, strawberry, vanilla—blend seamlessly, creating a taste profile that feels both nostalgic and novel.
- Texture Triumph: Each layer is airy yet firm, and the cream‑cheese glaze gives a silky finish that melts in your mouth.
- Ingredient Quality: Using high‑grade cocoa powder, fresh strawberries, and real vanilla extract ensures depth of flavor that store‑bought mixes can’t match.
- Visual Appeal: The stacked layers look like a rainbow, making it a showstopper for parties and photo ops.
- Make‑Ahead Friendly: Once assembled, the cake can be refrigerated for up to 3 days without losing its texture.
- Time‑Efficient: From prep to finish, the entire process takes less than an hour, which is a win for busy cooks.
Alright, let's break down exactly what goes into this masterpiece. And now the fun part.
Inside the Ingredient List
The Flavor Base
All‑purpose flour is the backbone of the cake, providing structure while keeping the batter light. Choosing a flour with a protein content around 10% ensures the cake rises well without becoming tough. Skipping the flour would turn the batter into a lumpy, flat batter that won’t hold the layers together. If you’re gluten‑free, a 1:1 blend of rice flour and tapioca starch can replicate the texture.
The Texture Crew
Granulated sugar dissolves into the batter, giving sweetness and helping to caramelize the edges. Baking powder is the leavening agent that creates the cake’s airy pockets; using an old, expired batch will result in a flat, dense cake. Eggs bind all the ingredients and add richness; for a vegan version, replace each egg with ¼ cup unsweetened applesauce. Whole milk adds moisture, but if you prefer a richer cake, substitute with half‑and‑half or a splash of heavy cream.
The Unexpected Star
Strawberry puree is the secret weapon that brings bright, fruity notes. Pureeing fresh strawberries ensures natural sweetness and a vibrant color. If you’re in a pinch, frozen strawberries work just as well—just thaw them first. The chocolate layer, made with high‑quality cocoa powder and melted chocolate, offers depth and a slightly bitter undertone that balances the sweetness.
The Final Flourish
Cream cheese is the key to the luscious glaze that ties everything together. It softens the cake’s edges and adds a tang that cuts through the sweetness. Powdered sugar is used to create a smooth glaze; if you prefer a less sweet finish, reduce the quantity by a quarter. Vanilla extract anchors the flavors, giving the cake a warm, aromatic finish.
Everything's prepped? Good. Let's get into the real action.
The Method — Step by Step
- Preheat your oven to 350°F (175°C) and grease two 8‑inch round cake pans. Line the bottoms with parchment paper for easy release. Let the pans sit in the oven while you mix the batter; this ensures even heat distribution. A properly greased pan is the secret to a cake that slides out without sticking.
- In a large bowl, sift together the flour, cocoa powder, baking powder, and a pinch of salt. Sifting removes lumps and aerates the dry mix, giving the cake a finer crumb. If you’re using a different flour blend, sift again to keep the texture light.
- Beat the eggs, milk, vanilla, and melted chocolate in a separate bowl until the mixture is smooth. The chocolate should be fully incorporated so that it doesn’t clump in the batter. This step is where the layers start to get their distinct colors; keep the mixture calm to avoid over‑whipping.
- Add the wet ingredients to the dry mix, folding gently until just combined. Over‑mixing can lock in too much gluten, making the cake tough. Use a spatula and fold until the batter is glossy and free of streaks.
- Divide the batter into three equal portions. To the first portion, stir in the strawberry puree; the second portion remains plain chocolate; the third portion receives vanilla extract. The strawberry batter will be slightly more liquid, so whisk it until smooth.
- Pour the chocolate batter into the bottom of the first pan. Spread evenly with a spatula. Then layer the strawberry batter on top, followed by the vanilla batter. Each layer should be about a third of the pan’s height.
- Bake for 25–30 minutes, or until a toothpick inserted into the center comes out clean. Keep an eye on the top; if it browns too fast, tent the cake with foil. The oven should be at a steady temperature; a fluctuating oven can cause uneven baking.
- Once baked, let the cake cool in the pan for 10 minutes before transferring to a wire rack. This step prevents the cake from sticking to the pan. Watch out: if you lift the cake too early, it may crack along the layers.
- Prepare the cream‑cheese glaze by mixing softened cream cheese, powdered sugar, and a splash of milk until silky. The glaze should be pourable but thick enough to hold its shape on the cake. If the glaze is too runny, add a tablespoon of powdered sugar.
- Once the cake has cooled completely, spread the glaze evenly over the top and sides. Let the glaze set for 10 minutes before serving. The glaze adds a glossy finish that looks as good as it tastes.
That's it — you did it. But hold on, I've got a few more tricks that'll take this to another level.
Insider Tricks for Flawless Results
The Temperature Rule Nobody Follows
Many bakers bake at 375°F, but this cake thrives at 350°F. The lower temperature allows the layers to set slowly, preventing the edges from drying out while the center remains moist. I’ve baked this cake at 350°F for years, and the difference is night and day. If you’re using a convection oven, reduce the temperature by 25°F.
Why Your Nose Knows Best
Smell the batter before baking; it should smell like vanilla and chocolate. If it smells too sweet, let the batter sit for 10 minutes to allow the flavors to meld. A good rule of thumb: the batter should emit a faint strawberry aroma before baking, indicating the puree has been fully incorporated.
The 5‑Minute Rest That Changes Everything
After removing the cake from the oven, let it rest on the rack for 5 minutes before turning it over. This pause allows the structure to set, preventing the cake from collapsing. Skipping this step can cause the layers to slide off each other.
Layering Like a Pro
When pouring each batter, use a spoon to create a gentle swirl. This technique ensures the layers blend slightly at the edges, giving a beautiful marbled effect. The swirl also helps the glaze spread evenly later.
Glaze Consistency Check
The glaze should be thick enough to hold a spoonful but still pourable. If it’s too thick, add a teaspoon of milk; if it’s too thin, add a tablespoon of powdered sugar. The glaze should coat the cake like a thin film, not a puddle.
Creative Twists and Variations
This recipe is a playground. Here are some of my favorite ways to switch things up:
Chocolate‑Mint Layer
Add a teaspoon of peppermint extract to the chocolate batter for a minty finish. The mint complements the chocolate and gives a refreshing aftertaste. This variation is perfect for winter holidays.
Almond Crunch
Fold toasted almond slivers into the vanilla batter before baking. The crunch adds a delightful texture contrast. Serve with a dusting of almond flour for an extra nutty aroma.
Citrus Twist
Replace the vanilla extract with a tablespoon of orange zest. The citrus brightens the flavor profile and pairs wonderfully with the strawberry. It’s an excellent choice for summer gatherings.
Nutella Swirl
Stir a couple of spoonfuls of Nutella into the chocolate batter before baking. The hazelnut chocolate swirl adds richness and depth. The result is a cake that feels like a chocolate‑hazelnut cookie.
Berry Medley
Blend blueberries and raspberries with the strawberry puree for a more complex berry flavor. The medley adds a subtle tartness that balances the sweetness. The color will be even more vibrant.
Lemon‑Lavender Layer
Add a teaspoon of dried lavender and a tablespoon of lemon zest to the vanilla batter. The floral notes elevate the cake to a gourmet level. Serve with a splash of lemon‑infused milk for a refreshing twist.
Storing and Bringing It Back to Life
Fridge Storage
Wrap the cooled cake tightly in plastic wrap and store in the refrigerator for up to 3 days. The glaze will firm up, making the cake easier to slice. Keep the cake away from strong‑smelling foods to prevent flavor absorption.
Freezer Friendly
Place the cake in a freezer‑safe container and freeze for up to 2 months. Thaw overnight in the refrigerator before serving. The texture remains moist, and the glaze stays intact.
Best Reheating Method
Reheat in a preheated oven at 300°F for 10 minutes, or until warmed through. Add a tiny splash of water to the pan before reheating; the steam helps restore moisture and keeps the cake from drying out.