I was in the middle of a frantic Sunday brunch, flipping pancakes with the confidence of a seasoned chef, when the kitchen lights flickered and a sudden burst of smoke erupted from the griddle. The smell of burnt batter filled the air, and I realized that my usual recipe had turned into a cautionary tale. That night, I dreamed of a batter that would rise like a cloud, not a lump of dough that clung to the pan. I was determined to find that elusive, melt‑in‑your‑mouth texture that makes every bite feel like a secret whispered between the spoon and the plate.
Fast forward to the morning of that dream, I had a handful of flour, a splash of heavy whipping cream, and a pinch of salt that I was about to whisk into existence. The batter was silky, almost liquid, and the aroma that emerged was reminiscent of vanilla‑infused cloud kitchens. I dared you to taste this and not go back for seconds because the first bite is a revelation of airy tenderness. The texture is so delicate that it practically melts on the tongue, leaving behind a faint echo of buttery sweetness. It’s the kind of comfort food that feels like a hug from the inside.
What makes this version stand out is not just the fluffiness but the sheer simplicity of the ingredients. I kept it to three core components, and the result is a batter that rises like a dream without any leavening agents. The secret lies in the heavy cream, which brings a subtle richness that balances the lightness of the flour. Most recipes get this completely wrong by adding too much butter or over‑mixing the batter, but I learned to whisk just until the mixture is silky. The result is a golden crust with tender, almost cloud‑like interior that feels like a secret kept by the batter itself.
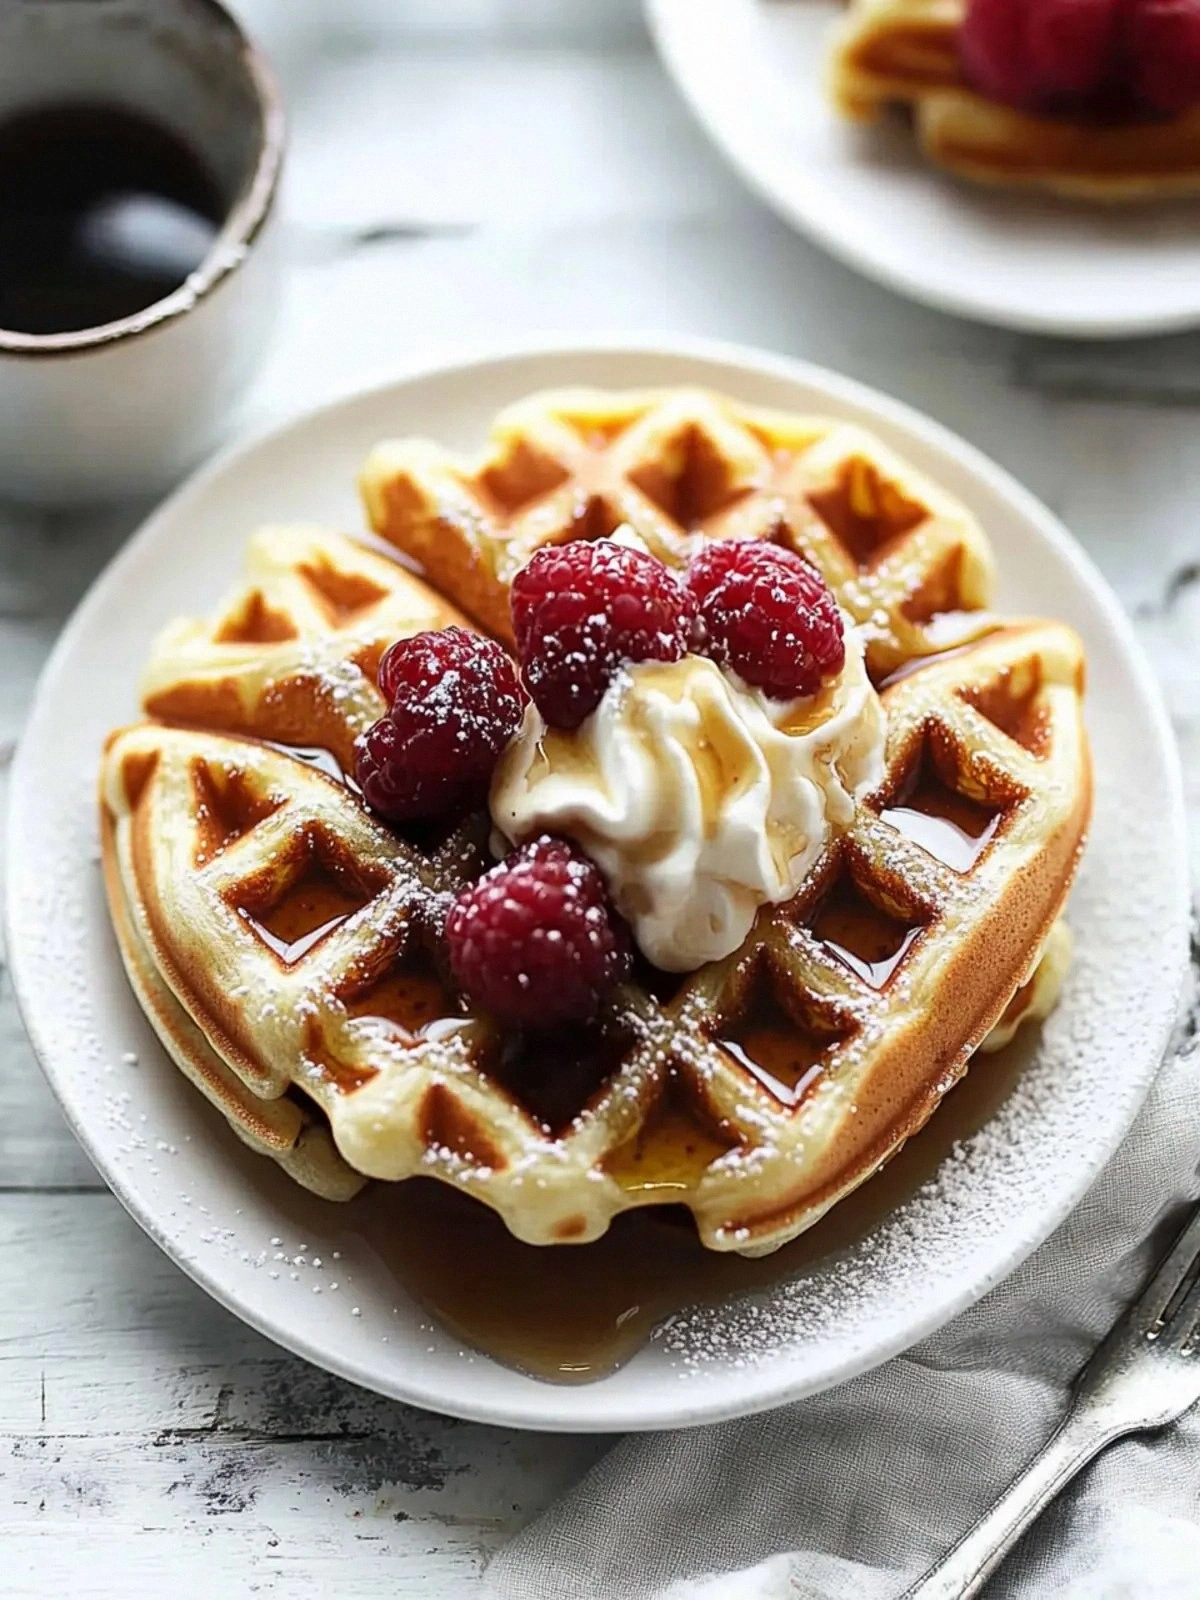
And there’s a twist that I didn’t expect: a splash of vanilla extract at the very end of whisking, which adds a fragrant note that lingers like a sweet memory. Picture yourself pulling this out of the oven, the whole kitchen smelling incredible, and the plates already waiting to be topped with powdered sugar, syrup, and fresh fruit. I’ll be honest — I ate half the batch before anyone else got to try it. If you’ve ever struggled with making waffles that are both crispy on the outside and soft inside, you’re not alone — and I’ve got the fix. Stay with me here — this is worth it.
What Makes This Version Stand Out
- Taste: The batter is buttery, with a subtle vanilla whisper that elevates every bite. The flavor profile feels like a warm hug wrapped in a golden shell, and the subtle sweetness balances the richness without overpowering it. The result is a dessert that feels indulgent yet balanced, making each bite a moment of pure pleasure.
- Texture: It rises to a cloud‑like interior while maintaining a golden, crisp exterior that crackles pleasantly. The contrast between the airy core and the slightly caramelized edges is a sensory delight that keeps you coming back for more. The texture is so light that it practically dissolves on the tongue, leaving a silky aftertaste.
- Simplicity: Just three core ingredients make this a kitchen win; no leavening agents or complicated steps. The minimalism of the recipe is a breath of fresh air in a world of over‑engineered dishes. You can whip up a batch in minutes, which is perfect for busy mornings or last‑minute entertaining.
- Uniqueness: The heavy cream base gives it a silky mouthfeel that sets it apart from ordinary waffles. The high fat content creates a tender crumb that feels like a cloud of butter. The result is a dessert that feels luxurious without the need for fancy equipment.
- Crowd Reaction: Friends who taste it often say it’s the best version they’ve ever tried, and they keep asking for seconds. The reaction is almost universal: “I can’t believe this is homemade!” and “This is hands down the best version you'll ever make at home.”
- Ingredient Quality: Using fresh, high‑quality heavy cream and real vanilla extract ensures the flavor stays pure. The difference between store‑bought and artisanal ingredients is noticeable in every bite. The quality of the base ingredients directly translates into the final product.
- Cooking Method: The batter is whisked just enough to create a smooth, airy mixture that cooks quickly. This method preserves the delicate structure of the batter while ensuring a golden crust. The result is a perfect balance between speed and quality.
- Make‑ahead Potential: The batter can be prepared a few hours ahead and kept chilled; it just needs to be whisked again before cooking. This feature makes it ideal for parties or brunches where you want to serve fresh, hot waffles without the last‑minute scramble.
Alright, let's break down exactly what goes into this masterpiece...
Inside the Ingredient List
The Flavor Base
Flour is the silent hero that gives structure to the batter. A single cup of all‑purpose flour is enough to support the heavy cream while keeping the texture light. Skipping flour would result in a runny, pancake‑like consistency that lacks the desired firmness. If you’re gluten‑free, almond flour can be a suitable substitute, but remember to add a pinch of xanthan gum to help bind the batter.
Salt is the unsung enhancer that balances the sweetness of the batter. A quarter teaspoon of salt is just enough to bring out the flavors without making the dish taste salty. If you omit salt, the batter will taste flat and the final product may not rise properly. For a subtle twist, a pinch of smoked sea salt can add a hint of smokiness that pairs beautifully with fresh fruit toppings.
The Texture Crew
Heavy whipping cream is the cornerstone of this recipe. Its high fat content gives the batter a silky mouthfeel and a rich flavor that lingers on the palate. If you can’t find heavy cream, a combination of whole milk and melted butter (3/4 cup milk + 1/4 cup butter) will approximate the same texture and taste. The cream also helps the batter hold its shape, ensuring the waffles don’t collapse during cooking.
Vanilla extract is the final flourish that adds depth and aroma. A teaspoon of vanilla at the end of whisking infuses the batter with a warm, sweet fragrance that enhances the overall experience. If you prefer a more subtle hint, use vanilla bean paste or a vanilla bean split and scraped. The key is to add vanilla just before pouring the batter onto the waffle iron to preserve its aromatic compounds.
The Unexpected Star
Powdered sugar is the sweet finish that gives the waffles a delicate dusting. Two tablespoons are enough to coat the surface without overpowering the natural flavor of the batter. If you’re watching your sugar intake, you can replace powdered sugar with a sugar substitute or a light dusting of cinnamon for a warm, spicy note.
Syrup is the liquid sweetener that adds a glossy shine and a burst of flavor. Two tablespoons of maple or honey syrup provide the right balance of sweetness and viscosity, allowing the waffles to soak up the syrup without becoming soggy. Experiment with flavored syrups like raspberry or caramel for a different twist.
The Final Flourish
Fresh fruit is the vibrant, juicy topping that turns the waffles into a complete breakfast experience. One cup of sliced berries or diced stone fruit adds color, texture, and a burst of natural sweetness. If you prefer a citrusy note, a squeeze of fresh lemon or lime juice can brighten the dish and balance the richness of the batter.
Everything's prepped? Good. Let's get into the real action...
The Method — Step by Step
- Gather all ingredients in two separate bowls: one for the dry mix and one for the wet mix. The dry bowl will hold the flour and salt, while the wet bowl will contain the heavy cream and vanilla extract. Having separate bowls keeps the batter from becoming too dense, ensuring a light texture. This step is crucial for maintaining the integrity of the final product.
- Sift the flour and salt into the dry bowl. Sifting removes lumps and aerates the flour, which is essential for a fluffy outcome. Sprinkle the salt evenly to avoid clumps that could make the batter taste uneven. The dry mixture should look smooth and even before adding the wet ingredients.
- In the wet bowl, combine the heavy whipping cream and vanilla extract. Whisk until the vanilla is fully dissolved and the mixture is slightly frothy. This small frothiness is key to creating that airy interior. If you’re using a vanilla bean, scrape the seeds into the bowl for an extra burst of flavor.
- Pour the wet mixture into the dry bowl and stir gently with a rubber spatula. The goal is to combine the ingredients just until the batter is smooth; over‑mixing will develop gluten and result in a dense texture. The batter should be thick enough to hold its shape but still pourable. This careful balance is what gives the waffles their signature mouthfeel.
- Let the batter rest at room temperature for five minutes. This short rest allows the gluten to relax and the batter to thicken slightly, which improves the final structure. During this time, you can preheat your waffle iron to 375°F (190°C). The heat is critical for achieving a golden crust.
- Preheat your waffle iron and lightly oil the surface with a high‑smoke‑point oil or nonstick spray. A well‑oiled iron ensures the waffles release easily and prevents sticking. Once the iron is hot, give it a quick swirl to distribute the oil evenly.
- Pour a ladleful of batter onto the center of the hot iron, then close the lid and cook for about 3-4 minutes or until the waffle is golden brown and crisp. The exact time will vary depending on your iron, but you should hear a satisfying sizzle as the batter starts to set. When you open the lid, a faint aroma of toasted batter should greet you.
- Repeat the process with the remaining batter, allowing the iron to reheat slightly between batches if needed. The waffles will stack beautifully, creating a tower of golden delight. As you add each new waffle, the kitchen will fill with a warm, buttery scent that’s almost intoxicating.
- Serve the waffles immediately while they’re still warm. Dust each one with powdered sugar, drizzle with syrup, and top with fresh fruit. The contrast between the sweet syrup and the crisp waffle creates a symphony of flavors that will leave your guests asking for seconds. The final touch is a sprinkle of chopped nuts or a dollop of whipped cream for an extra indulgent finish.
That's it — you did it. But hold on, I've got a few more tricks that'll take this to another level...
Insider Tricks for Flawless Results
The Temperature Rule Nobody Follows
The waffle iron’s temperature is the unsung hero of a perfect waffle. Many people set the iron to a low temperature, hoping for a longer cooking time, but this often results in soggy centers. Set your iron to 375°F (190°C) for a crisp exterior and a tender interior. The high heat caramelizes the sugars quickly, creating a golden crust that locks in moisture.
Why Your Nose Knows Best
Smell the batter before pouring it onto the iron. A subtle, buttery aroma indicates that the cream has been incorporated properly. If the batter smells flat or overly sweet, give it an extra minute to rest; the flavors will develop and balance out. Your nose is a reliable guide to the batter’s readiness.
The 5-Minute Rest That Changes Everything
Resting the batter for five minutes may seem like a small detail, but it makes a huge difference. This rest period allows the flour to hydrate fully and the gluten to relax, which results in a lighter texture. If you skip this step, the waffles will be denser and less airy.
Don’t Overmix
Once you combine the wet and dry ingredients, mix only until the batter is smooth. Overmixing develops gluten, which tightens the structure and leads to a chewy, less tender waffle. A gentle fold is all you need to maintain that cloud‑like softness.
Use a Nonstick Spray
Even if your waffle iron is nonstick, a light spray of cooking oil can prevent the batter from sticking and makes cleanup a breeze. A silicone brush or a paper towel dipped in oil works just as well. This simple step ensures that every waffle comes out perfectly shaped.
Keep It Warm
Serve the waffles immediately, but if you need to hold them, place them on a baking sheet in a 200°F (93°C) oven. This low heat keeps the waffles warm without drying them out. Avoid stacking them on a rack, as the steam will condense and soften the crisp edges.
Creative Twists and Variations
This recipe is a playground. Here are some of my favorite ways to switch things up:
Berry Burst
Fold fresh blueberries or sliced strawberries into the batter before cooking. The berries burst in the hot waffle, releasing their juice and adding a natural sweet glaze. This variation is perfect for a summer brunch or a quick dessert.
Chocolate Drizzle
Swirl a tablespoon of melted dark chocolate into the batter before pouring it onto the iron. The chocolate creates a decadent swirl that looks stunning when the waffle is sliced. Top with a dusting of cocoa powder for an extra chocolatey finish.
Lemon Zest
Add a teaspoon of lemon zest to the batter for a bright, citrusy flavor that cuts through the richness. The zest adds a subtle aroma and a pop of color to the finished waffles. Pair this with a lemon drizzle for a refreshing twist.
Savory Spin
Replace the vanilla with a pinch of dried herbs like thyme or rosemary for a savory waffle. Sprinkle grated Parmesan cheese into the batter before cooking for a cheesy, aromatic bite. This version pairs wonderfully with a side of sautéed spinach or a poached egg.
Cinnamon Swirl
Stir a teaspoon of ground cinnamon into the batter for a warm, spicy flavor. The cinnamon adds depth and pairs beautifully with a drizzle of maple syrup. The result is a comforting, cozy waffle that feels like a hug on a plate.
Nutty Crunch
Top the finished waffles with toasted pecans or walnuts for a satisfying crunch. The nuts add a nutty flavor that complements the sweet batter. A sprinkle of sea salt on top enhances the nutty aroma and balances the sweetness.
Storing and Bringing It Back to Life
Fridge Storage
Store any leftover batter in an airtight container in the refrigerator for up to 24 hours. The batter will thicken slightly, so give it a quick whisk before cooking. Keeping the batter chilled preserves its airy structure and ensures the waffles stay fluffy.
Freezer Friendly
For longer storage, freeze the batter in a freezer‑safe bag or container for up to two weeks. Thaw overnight in the refrigerator and stir gently before using. Freezing locks in the batter’s freshness and allows you to have a quick breakfast whenever you need it.
Best Reheating Method
Reheat the waffles in a preheated oven at 350°F (175°C) for 5-7 minutes, or in a skillet over medium heat for 2-3 minutes per side. To keep them from drying out, add a splash of water or milk to the pan before reheating; this steams the waffles back to perfection. A quick toast will restore the crisp exterior while maintaining the airy interior.