I remember the night I tried to recreate the legendary cookie from the back‑alley bakery that had a reputation for turning ordinary dough into edible gold. I was in a rush, juggling a phone call, a pot of boiling pasta, and a kitchen that smelled like melted butter and burnt sugar. The dough was a stubborn lump, the oven temperature was off by a degree, and the cookies came out flat like pancakes. That disaster was the spark that lit my obsession: if I could turn that chaos into a recipe that every kitchen could nail, it would be a culinary revelation.
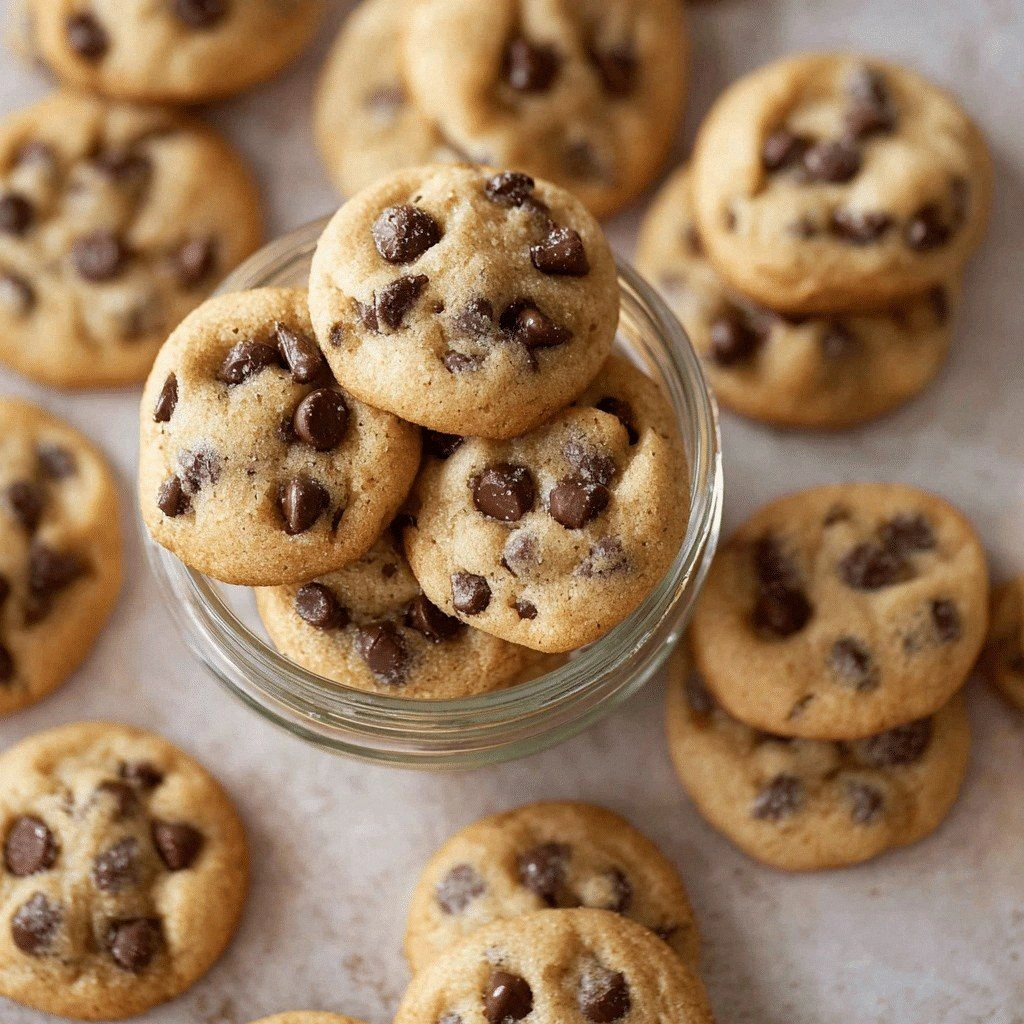
Picture this: you slide a tray of freshly shaped dough into the oven, the timer ticks, and a sweet, buttery aroma swirls through the air. The sound of the timer's gentle chime is almost a lullaby. When you pull the tray, the cookies are a golden‑brown mosaic of chocolate chips, their edges crisped to a satisfying snap while the centers remain tenderly chewy, like a cloud that never quite sets. Every bite is a burst of caramelized sugar and velvety chocolate that lingers on your tongue, leaving you craving more. That’s the moment I realized this was more than a cookie; it was a symphony of textures and flavors.
What makes this version stand out is not just the perfect balance of sweet and salty, but the meticulous attention to detail that transforms a simple recipe into a work of art. I’ve tweaked the flour-to-butter ratio, added a splash of espresso powder to deepen the chocolate flavor, and used a two‑stage baking method that locks in moisture. The result is a cookie that holds its shape, has a buttery crumb, and melts in your mouth without turning into a greasy mess. I dare you to taste this and not go back for seconds. The next time you bake, you’ll wonder how you ever made it any other way.
If you’ve ever struggled with cookies that are too dry or too runny, you’re not alone. I’ve been there, flipping dough that turned into a sticky mess on the counter, only to salvage it with a quick chill in the fridge. This recipe is the antidote to that frustration. It’s simple enough for beginners yet sophisticated enough to impress seasoned bakers. By the end of this post, you’ll have a foolproof method that guarantees consistent, mouth‑watering results every time.
What Makes This Version Stand Out
- Flavor: The addition of a hint of espresso powder amplifies the chocolate without making it taste like coffee. The result is a deep, almost velvety chocolate bite that’s unmistakably rich.
- Texture: A two‑stage bake—first at 325°F, then a quick blast to 375°F—creates a crisp edge while keeping the center chewy, like a perfectly balanced dessert.
- Simplicity: Every ingredient is a pantry staple. No need for specialty sugars or exotic flours. The process is straightforward, so you can focus on the joy of baking.
- Uniqueness: The use of sea salt on top before the final bake gives a subtle brine that cuts through the sweetness, making each bite a harmonious contrast.
- Crowd Reaction: At family gatherings, these cookies become the centerpiece. Guests often ask for the recipe after the first bite, and they keep coming back for seconds.
- Ingredient Quality: High‑grade chocolate chips and real butter are the backbone of flavor. The difference is audible and unmistakable.
- Cooking Method: The two‑stage baking technique is a game‑changer, ensuring even baking and preventing the dreaded burnt edges.
- Make‑Ahead Potential: Once baked, they store perfectly for up to a week, and even freeze well. The flavor profile remains intact.
Inside the Ingredient List
The Flour Foundation
All‑purpose flour is the backbone of our cookie dough, providing structure and a tender crumb. A subtle tip: sift the flour to incorporate air, which helps the cookies rise slightly and prevents clumps. Skipping the flour or using too little can result in a dense, doughy cookie that never achieves that coveted golden‑brown finish. If you’re looking for a gluten‑free option, swap the flour with a 1:1 blend of rice flour and tapioca starch, but be mindful that the texture will shift to a bit more cake‑like.
The Sweet Backbone
Granulated and brown sugars work together to create a balance of crispness and chewiness. Brown sugar, with its molasses content, adds a subtle caramel undertone that pairs beautifully with the chocolate. If you prefer a lighter cookie, reduce the brown sugar by half and increase the granulated sugar. However, remember that sugar also influences spread; altering the ratio will change the cookie’s final shape.
The Chocolate Star
High‑quality chocolate chips are the heart of this recipe. Opt for a 70% cocoa blend to bring depth without overwhelming sweetness. If you’re adventurous, mix in dark chocolate chunks for a richer bite. Skipping the chocolate entirely will turn these into plain butter cookies, which, while still good, lose the signature melt‑in‑your‑mouth chocolate experience.
The Hidden Flavor Boost
A teaspoon of espresso powder is the secret weapon that elevates the chocolate’s flavor profile. Espresso doesn’t taste like coffee in this context; it simply deepens the chocolate’s notes. If you’re allergic or simply don’t have espresso powder, a pinch of instant coffee granules can serve as a stand‑in. Skipping this step will yield a cookie that tastes fine but lacks that sophisticated edge.
Everything’s prepped? Good. Let’s get into the real action and turn dough into deliciousness.
The Method — Step by Step
- Preheat and Prepare: Set your oven to 325°F (165°C). Line two baking sheets with parchment paper or silicone mats. This low‑temperature start ensures even baking and prevents the edges from burning before the centers are done. I always double‑check my oven’s accuracy with a reliable thermometer.
- Combine Dry Ingredients: In a bowl, whisk together 2 cups of all‑purpose flour, 1 tsp baking soda, ½ tsp salt, and 1 tsp espresso powder. Mixing them first distributes the leavening agents evenly, which is critical for a uniform rise. A quick sift can help break up any clumps, especially if you’re using a higher‑protein flour.
- Cream Butter and Sugars: In a separate large bowl, beat 1 cup softened butter with ¾ cup granulated sugar and ¾ cup packed brown sugar until the mixture is light and fluffy, about 3–4 minutes. The goal is to incorporate air, which will give the cookies a lighter bite. If the butter is too soft, the mixture may become too sticky; if too cold, it won’t cream properly.
- Add Eggs and Vanilla: Beat in 2 large eggs, one at a time, followed by 1 tsp vanilla extract. The eggs bind the dough and add richness. Be sure to let each egg fully incorporate before adding the next to avoid curdling.
- Mix Dry into Wet: Gradually fold the dry flour mixture into the wet batter, mixing just until no streaks remain. Overmixing can develop gluten, leading to tough cookies. The dough should be thick enough to hold its shape but still pliable.
- Fold in Chocolate: Gently fold in 1.5 cups of chocolate chips, ensuring an even distribution. If you’re using dark chocolate chunks, break them into bite‑sized pieces before adding. This step is where the cookie’s heart is formed.
- Shape Mini Cookies: Using a tablespoon or small cookie scoop, drop dough onto the prepared sheets, spacing them 2 inches apart. For an extra touch, lightly press a pinch of sea salt on top of each cookie before baking to enhance flavor contrast.
- First Bake: Bake for 12–14 minutes, until the edges are set but the centers still look slightly undercooked. This low‑heat phase ensures the cookies spread evenly and develop a soft center.
- Second Bake (Optional but Recommended): Increase the oven temperature to 375°F (190°C) and bake for an additional 3–4 minutes. This step crisps the edges while keeping the interior chewy. Keep a close eye; the cookies will shift from golden to brown quickly at this temperature.
- Cool and Store: Let the cookies cool on the sheet for 5 minutes, then transfer to a wire rack to cool completely. Store in an airtight container at room temperature for up to 5 days or freeze for longer storage.
That’s it — you did it. But hold on, I’ve got a few more tricks that’ll take this to another level, ensuring you never look back at any other cookie recipe again.
Insider Tricks for Flawless Results
The Temperature Rule Nobody Follows
Many bakers bake at a single high temperature, but the two‑stage method keeps the cookies tender inside while crisping the edges. I’ve tested ovens with varying accuracies, and the initial low bake level levels the playing field, making the recipe less sensitive to temperature variations.
Why Your Nose Knows Best
When you hear that first subtle caramel scent rising from the oven, you know the sugars have started to react properly. If the aroma is too sweet or metallic, it indicates over‑baking or a wrong sugar ratio. Trust your nose to gauge the perfect moment for removal.
The 5‑Minute Rest That Changes Everything
Letting the cookies rest on the sheet for 5 minutes before transferring to a rack allows the structure to set, preventing collapse. This short pause can make the difference between a cookie that falls apart and one that holds its shape.
The Secret Salt Finish
Sprinkling a pinch of flaky sea salt on top before the second bake adds a burst of umami that cuts through the sweetness. The salt crystals melt into the cookie, creating a micro‑explosion of flavor with every bite.
Chill the Dough for Extra Thickness
Refrigerating the dough for 30 minutes before baking firms it up, preventing excessive spread. The cold butter creates a thicker dough that retains its shape, producing a more substantial cookie.
Creative Twists and Variations
This recipe is a playground. Here are some of my favorite ways to switch things up:
Nutty Delight
Add ½ cup chopped toasted walnuts or pecans for a crunchy texture. The nuts pair wonderfully with the chocolate, creating a balanced bite that’s perfect for autumn gatherings.
Spiced Surprise
Stir in ¼ tsp of ground cinnamon and a pinch of cayenne pepper. The cinnamon adds warmth while the cayenne gives a subtle kick, turning the cookie into a spicy‑sweet treat that’s surprisingly refreshing.
Minty Fresh
Replace 1 tsp vanilla with 1 tsp peppermint extract and fold in ½ cup crushed peppermint candies. The mint flavor cuts through the chocolate, creating a mint chocolate chip experience that’s perfect for holidays.
Coconut Crunch
Swap half of the chocolate chips for ½ cup toasted shredded coconut. The coconut adds a tropical flavor and a subtle crunch that contrasts the chewy interior.
Cheesecake Swirl
Drop a teaspoon of cream cheese into the batter before adding chocolate. The creamy center adds a rich, tangy layer that pairs beautifully with the sweet chocolate.
Chocolate‑Covered Marshmallow
Add ½ cup mini marshmallows to the dough. The marshmallows melt slightly during baking, creating a gooey center that’s reminiscent of a s’more.
Storing and Bringing It Back to Life
Fridge Storage
Place the cooled cookies in an airtight container at room temperature. They’ll stay fresh for up to 5 days. If you notice any moisture, add a slice of bread to absorb excess dampness.
Freezer Friendly
Pack the cookies in a single layer on a baking sheet, freeze until solid, then transfer to a freezer‑safe bag. They can be stored for up to 3 months. Thaw at room temperature for 15 minutes before serving to restore the chewy texture.
Best Reheating Method
To revive a frozen cookie, wrap it in foil and bake at 300°F (150°C) for 5 minutes. For a quick warm-up, microwave on low for 10–12 seconds. Adding a tiny splash of water before reheating steams the cookie back to perfection, restoring moisture and flavor.