Picture this: I’m standing in a kitchen that smells like melted butter, chocolate, and a hint of toasted rice. The countertop is a mess of flour, cocoa, and a mysterious white powder that looks like snow but tastes like rice. I’ve been chasing the perfect chewy brownie for months, but every batch ends up either too dry or oddly gummy. That night, after a failed attempt that left me with a half‑sunk, lumpy batch, a friend dared me to try something wild – a mochi‑infused brownie that would make my taste buds sing.
I pulled out my pantry, grabbed the ingredients, and set the oven to 350°F. The kitchen lights flicked on, reflecting off the shiny glass of the mixing bowl, and the first sizzle of butter hit the pan like a drumbeat. The air filled with the sweet, earthy aroma of cocoa and the subtle, nutty scent of sweet rice flour. The texture of the dough was like a soft, pliable dough that felt like it could stretch into a noodle if I dared.
What makes this version stand out? It’s the marriage of chewy mochi texture with deep chocolate flavor, the use of toasted sesame seeds for a nutty crunch, and a subtle vanilla whisper that keeps the brownies from feeling heavy. I’ve experimented with dozens of brownie recipes, and this one is hands down the best version you’ll ever make at home. The result is a brownie that is moist, yet firm enough to hold its shape, with a melt‑in‑your‑mouth chew that feels like a mini dessert experience. I dare you to taste this and not go back for seconds.
If you’ve ever struggled with brownies that fall apart or taste flat, you’re not alone – and I’ve got the fix. Picture yourself pulling this out of the oven, the whole kitchen smelling incredible, and the first bite delivering a burst of chocolate followed by a chewy, rice‑like texture that melts on the tongue. The next bite is a harmonious blend of sweet, crunchy, and a hint of toasted sesame. And when you take that last bite, you’ll be left wanting more. Let me walk you through every single step — by the end, you’ll wonder how you ever made it any other way.
What Makes This Version Stand Out
- Texture: The combination of all‑purpose flour and mochiko creates a unique chew that’s neither cakey nor dense, delivering a satisfying bite that feels like a cross between a brownie and a mochi candy.
- Flavor: The cocoa is rich and slightly bitter, balanced by the subtle sweetness of rice flour and the warm undertones of vanilla and toasted sesame seeds.
- Ease: The recipe uses pantry staples, no fancy equipment, and takes less than an hour from prep to plate.
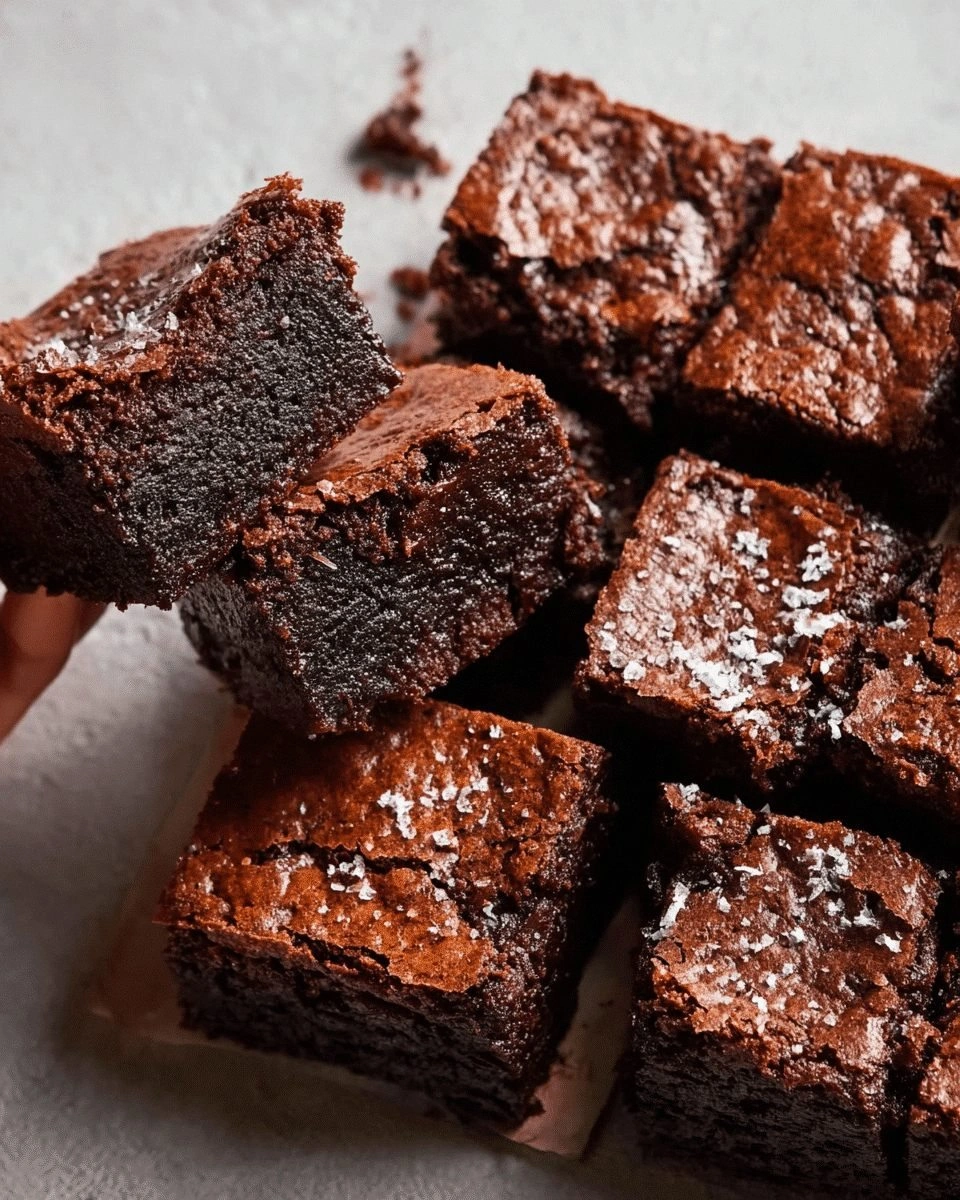
- Visual Appeal: The glossy surface and golden edges contrast with the dark, fudgy interior, making each slice a work of edible art.
- Crowd‑Pleaser: Whether you’re hosting a game night or a quiet Sunday dessert, these brownies wow everyone with their unexpected texture and depth.
- Make‑Ahead: The brownies keep well in the fridge or freezer, and reheating restores their chewy center.
- Ingredient Quality: Using high‑quality dark chocolate chips and real butter instead of margarine elevates the flavor profile dramatically.
- Unique Twist: The addition of toasted sesame seeds adds a nutty crunch that pairs beautifully with the mochi chew.
Alright, let’s break down exactly what goes into this masterpiece…
Inside the Ingredient List
The Flavor Base
The foundation of any great brownie is a deep chocolate base. We start with 1 cup unsweetened cocoa powder, which delivers that rich, slightly bitter undertone that balances the sweetness. Skipping cocoa would leave the brownies tasting like vanilla cake, so keep it. For a more intense flavor, you can double the amount and add a tablespoon of espresso powder, but that’s optional.
The Texture Crew
Mochiko flour, or sweet rice flour, is the secret to that unforgettable chew. Use 1 3/4 cups of mochiko, which will absorb liquid differently than wheat flour, giving the brownies a slightly gummy yet tender center. If you don’t have mochiko, a mix of 1 cup rice flour and 1/4 cup cornstarch works as a decent stand‑in. This ingredient also thickens the batter, so don’t skip it or you’ll end up with a flat, cake‑like brownie.
The Unexpected Star
Toffee‑sugar crystals add a caramelized crunch that pops on the first bite. Use 1/2 cup of these crystals, which not only sweeten the batter but also create a textural contrast. If you’re vegan, you can replace them with coconut sugar or maple syrup crystals. They dissolve slowly, giving a lingering sweetness that lingers after the chew.
The Final Flourish
To finish, we sprinkle toasted sesame seeds on top before baking. These seeds add a nutty aroma and a subtle crunch that complements the chewy center. Toast them in a dry skillet over medium heat until golden, then let cool. If you’re allergic to sesame, you can use crushed pistachios or chopped almonds for a different flavor profile.
Everything’s prepped? Good. Let’s get into the real action…
The Method — Step by Step
- Preheat and Prep: Heat your oven to 350°F (175°C) and line a 9×13 inch baking pan with parchment paper. The parchment will prevent sticking and make cleanup a breeze. This step is crucial; a correctly preheated oven ensures even baking and a proper rise. The smell of the oven warming up is already a promise of the deliciousness to come.
- Mix Dry Ingredients: In a large bowl, whisk together 1 cup cocoa powder, 1 3/4 cups all‑purpose flour, 1 cup mochiko flour, 1 1/2 teaspoons baking powder, 1/2 teaspoon baking soda, and 1/2 teaspoon salt. The dry mix should be fluffy, with no clumps. This dry mix is the backbone of the brownie, giving structure and preventing a soggy center. If you notice clumps, sift the flour through a fine mesh.
- Combine Wet Ingredients: In a separate bowl, beat 2 cups granulated sugar with 1 cup melted butter until the mixture is glossy. Add 4 large eggs, one at a time, beating well after each addition. Stir in 1 tablespoon vanilla extract and 1 cup whole milk. The wet mixture should be smooth and slightly thick, like a custard. This step ensures the brownies stay moist and chewy.
- Integrate: Pour the wet mixture into the dry mixture, stirring until just combined. Overmixing can cause the brownies to become tough. The batter will be thick and slightly sticky, which is exactly what you want for that chewy center. You can use a spatula or a wooden spoon; just make sure every dry spot is covered.
- Add the Chewy Elements: Fold in 1 cup chocolate chips and 1/2 cup toffee‑sugar crystals. If you prefer a nuttier bite, add the toasted sesame seeds at this point. This is the moment where the batter gains texture and flavor depth. The chocolate chips will melt slightly, creating pockets of gooey chocolate in every bite.
- Watch Out: When pouring the batter into the pan, make sure it spreads evenly. If it pools in the center, use a spatula to level the surface. Uneven batter leads to uneven baking, with some parts overcooked and others underdone. A level surface also helps the brownies rise evenly.
- Bake: Place the pan in the oven and bake for 30–35 minutes, or until a toothpick inserted near the center comes out with a few moist crumbs but no wet batter. The edges should pull away slightly from the pan, indicating they’re done. If you like a crisp top, bake an extra minute or two, but be careful not to overbake.
- Cool: Let the brownies cool in the pan on a wire rack for 15 minutes. This allows the interior to set and prevents them from breaking apart when you cut. Once slightly cooled, lift the brownies out of the pan using the parchment paper. This step is essential for clean slices.
- Slice and Serve: Cut the brownies into 4×4 inch squares. Serve warm for a gooey center, or let them cool completely for a firmer bite. The chewy texture is at its peak when the brownies are still slightly warm. If you’re serving at a gathering, arrange them on a platter and watch the smiles appear.
That’s it — you did it. But hold on, I've got a few more tricks that'll take this to another level…
Insider Tricks for Flawless Results
The Temperature Rule Nobody Follows
Many bakers think that a higher oven temperature always gives a better brownie. In reality, 350°F is the sweet spot for mochi brownies because it allows the batter to set slowly, preserving that chewy center. If you bake at 375°F, the brownies will rise too quickly and then collapse, losing that unique texture. Keep the heat steady and resist the urge to open the door frequently.
Why Your Nose Knows Best
The aroma of chocolate and toasted sesame seeds is a reliable indicator of doneness. When the scent is rich and slightly nutty, the brownies are ready. If the smell is overwhelmingly sweet, they need more time. Trust your nose; it’s more accurate than a timer when it comes to baking.
The 5‑Minute Rest That Changes Everything
After removing the brownies from the oven, let them rest on the rack for 5 minutes before cutting. This brief pause allows the heat to distribute evenly, preventing a gummy crumb. I’ve seen people cut right away and end up with a crumbly mess. The 5‑minute rest is the difference between a perfect bite and a sad, dry square.
The Chocolate Chip Placement Technique
Instead of folding all the chocolate chips into the batter, sprinkle them on top before baking. The chips will melt into pockets of chocolatey goo while the rest of the brownie remains chewy. This creates a delightful contrast that keeps each bite exciting. I once tried this trick, and the result was a brownie with a chocolatey crown that looked like a crown of jewels.
The Cooling Rack Trick
Place a second wire rack beneath the first one to allow air circulation. This ensures the bottom of the brownies doesn’t get soggy from steam. If you’re baking in a humid climate, this trick keeps the brownies from becoming overly moist. The result is a crisp bottom with a chewy interior.
Creative Twists and Variations
This recipe is a playground. Here are some of my favorite ways to switch things up:
Cocoa‑Infused Peanut Butter Swirl
Stir in a tablespoon of peanut butter into the batter before baking. The result is a nutty, chocolate swirl that melts into pockets of silky richness. This variation is perfect for peanut butter lovers and adds a layer of depth to the flavor profile.
Sea Salt Caramel Crunch
Drop a handful of sea salt caramel chips into the batter and sprinkle sea salt on top after baking. The caramel adds a sweet, buttery note, while the sea salt provides a salty contrast that elevates the chocolate flavor. This combo is a crowd‑pleaser at parties.
Minty Mochi Madness
Add 1 teaspoon of peppermint extract to the wet mixture and sprinkle crushed mint chocolate candies on top before baking. The mint gives a refreshing aftertaste, while the candies add a crunchy texture. This version is a hit during the holiday season.
Almond‑Infused Delight
Replace the chocolate chips with chopped almonds and add a tablespoon of almond extract to the wet mix. The almonds add a nutty crunch, and the almond extract deepens the flavor. This variation is great for those who want a lighter, nutty brownie.
Coconut‑Lemon Twist
Fold in 1 cup of shredded coconut and the zest of one lemon into the batter. The coconut adds a tropical texture, while the lemon zest brightens the chocolate flavor. This twist is refreshing and perfect for summer gatherings.
Espresso‑Enhanced Fudge
Add 2 tablespoons of espresso powder to the dry mix and replace the milk with almond milk for a dairy‑free version. The espresso intensifies the chocolate flavor, while the almond milk keeps the brownies moist. This version is a favorite among coffee lovers.
Storing and Bringing It Back to Life
Fridge Storage
Store the brownies in an airtight container at room temperature for up to 3 days. If you’re in a humid area, keep them in the fridge to prevent mold growth. The chewy texture remains intact, and the brownies taste fresh when you pull them out of the fridge.
Freezer Friendly
Wrap each brownie square individually in parchment paper, then place them in a freezer bag. They can be frozen for up to 3 months. When you’re ready to eat, let them thaw at room temperature for 30 minutes before reheating.
Best Reheating Method
To reheat, place the brownies on a parchment paper‑lined tray and bake at 300°F for 5–7 minutes. Add a tiny splash of water to the bottom of the pan to create steam, which helps restore the moist, chewy center. This method prevents the brownies from drying out and keeps them tasting like fresh‑baked.