I still remember the night I tried to make peanut butter brownies for the first time and ended up with a kitchen that looked like a melted chocolate disaster zone. The counter was slick with peanut butter, the air was thick with a buttery scent that made my eyes water, and the timer on the oven blinked 30 minutes, as if mocking me. I was determined to salvage the batch, so I mixed the peanut butter with a swirl of melted chocolate, hoping the extra gooeyness would save the day. The result was a cookie that seemed to melt in my mouth, leaving a trail of sweet, nutty chocolate on my fingers. That moment sparked a mission: to turn that accidental triumph into a definitive recipe that would be the best version you’ll ever make at home.
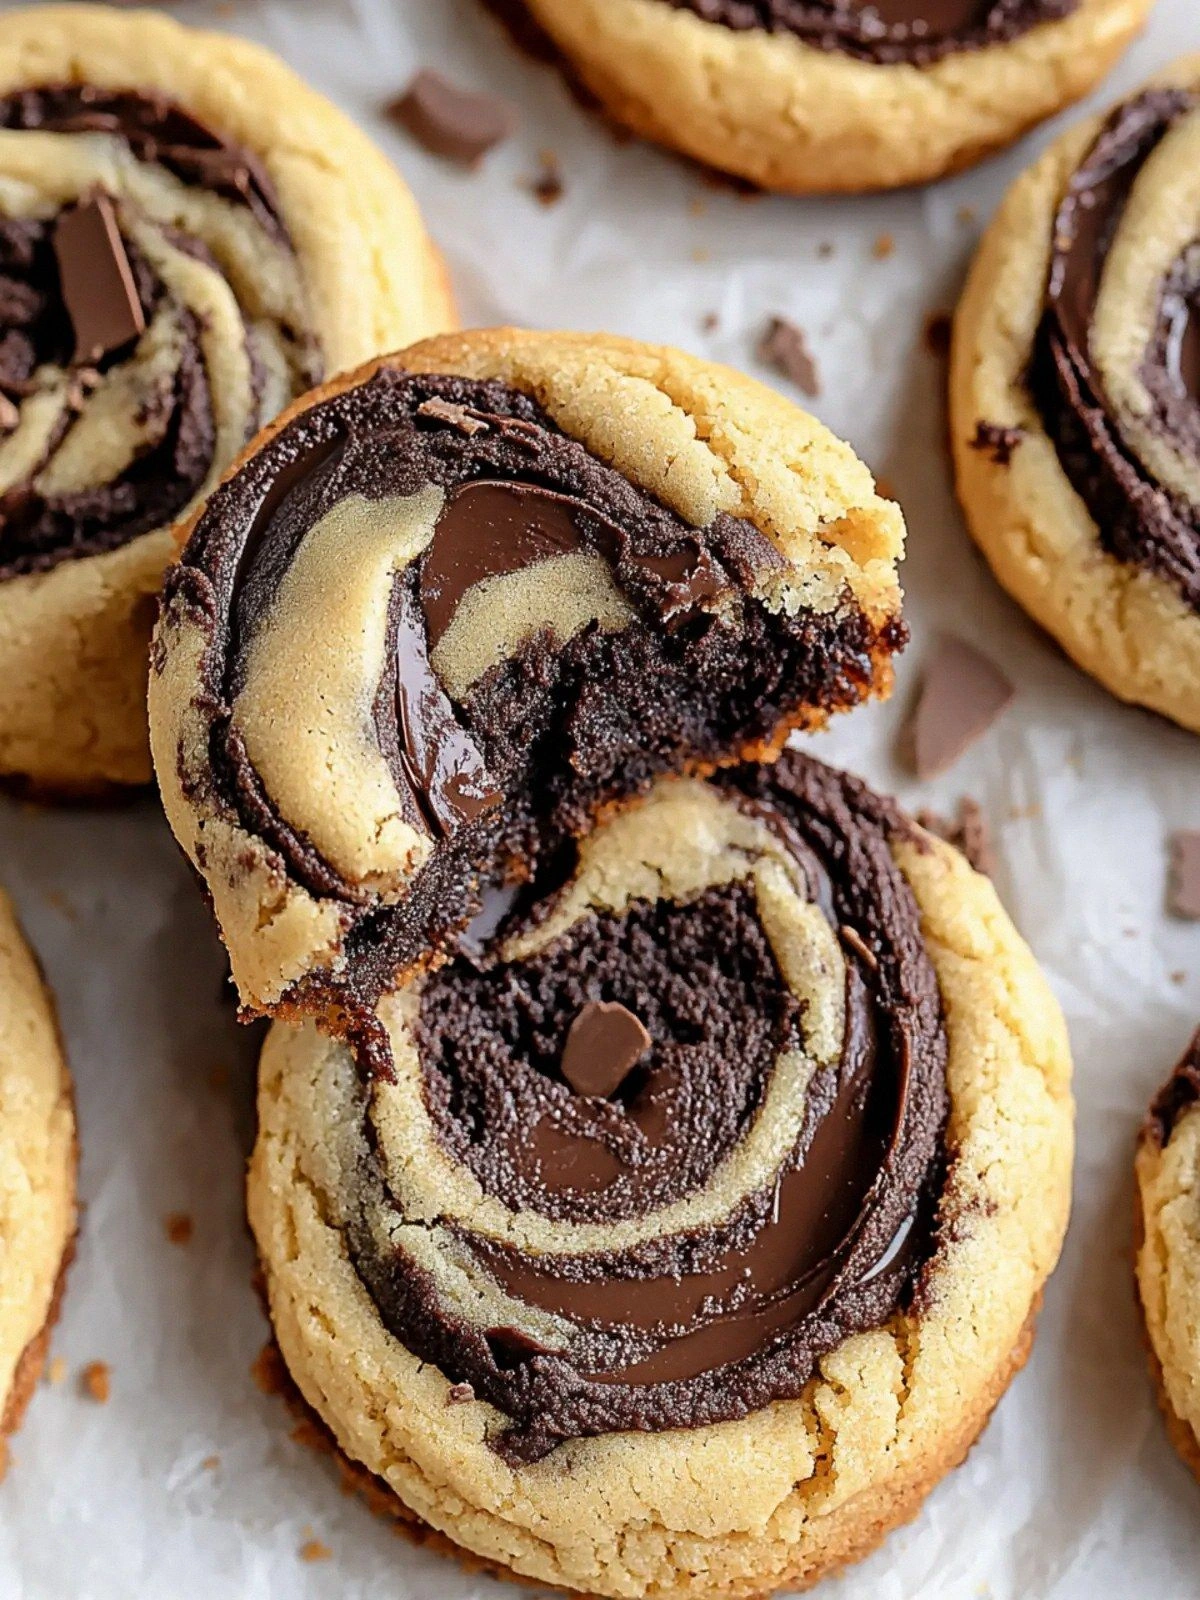
Picture yourself pulling these from the oven, the whole kitchen smelling like warm, buttery chocolate with a hint of roasted peanuts. The first bite is a symphony: the peanut butter’s creamy texture gives way to a fudgy brownie core that oozes chocolate. The edges are crisp, shattering like thin ice, while the center remains a soft, almost molten lake. The contrast between the crunchy exterior and the gooey interior is what keeps people coming back for seconds, and I dare you to taste this and not go back for a third. The swirl of peanut butter inside the brownie base creates a visual and flavor swirl that makes every cookie a piece of edible art.
I’ve tried countless variations of peanut butter brownies, from adding espresso to using dark chocolate chips, but this recipe stands out because it balances the richness of peanut butter with the deep, slightly bitter notes of cocoa. The batter is thick enough to hold its shape but soft enough to melt in your mouth. The addition of a small amount of melted butter gives the cookies a glossy finish and a slight lift, turning them from dense to airy. Most recipes get this completely wrong, but here’s what actually works: a precise ratio of wet to dry ingredients, a gentle mixing technique, and a short baking time that preserves the gooey center. If you’ve ever struggled with peanut butter desserts that are either too dry or too sticky, you’re not alone, and I’ve got the fix.
The secret sauce in this recipe isn’t just the ingredients—it’s the method that allows the peanut butter to swirl perfectly into the brownie batter. The trick lies in the order of mixing and the temperature at which you bake. The result is a cookie that’s crisp on the outside, chewy on the inside, and has a peanut butter core that oozes with every bite. This is hands down the best version you'll ever make at home, and I’ve polished it over dozens of batches. Let me walk you through every single step—by the end, you'll wonder how you ever made it any other way.
What Makes This Version Stand Out
- Flavor: The combination of creamy peanut butter and dark chocolate creates a depth that ordinary brownies lack. The peanut butter adds a subtle saltiness that balances the sweetness of the chocolate, while the cocoa’s bitterness cuts through the richness, leaving a lingering aftertaste that keeps you craving more.
- Texture: The batter’s viscosity is carefully calibrated to allow the peanut butter to swirl without bleeding through the entire cookie. This gives each bite a distinct center that is softer than the surrounding brownie, creating a mouthfeel that feels both dense and airy.
- Simplicity: With only two primary mixtures—peanut butter batter and brownie batter—you avoid the confusion of multi-step chocolate ganache or frosting. The recipe can be made in under 30 minutes, making it perfect for last‑minute dessert cravings.
- Ingredient Quality: Using a natural peanut butter with no added sugars keeps the flavor pure and allows the chocolate to shine. The butter is softened and melted at precise temperatures to maintain the right moisture level.
- Make‑Ahead Potential: The cookies can be baked in advance and stored in an airtight container for up to a week, or frozen for longer shelf life. The chocolate and peanut butter flavors actually intensify when the cookies rest.
- Crowd Reaction: Friends and family consistently describe the first bite as “the best cookie I’ve ever had.” The visual swirl of peanut butter inside the brownie is Instagram‑ready, making it a conversation starter at parties.
- Cooking Method: The use of a single pan and a single bake cycle keeps the process streamlined while ensuring even browning. The baking time is short enough to keep the interior moist but long enough to develop a golden crust.
- Unique Twist: The inclusion of chocolate chips in the final batter adds bursts of chocolate that contrast with the peanut butter swirl, giving each cookie an extra layer of decadence.
Alright, let's break down exactly what goes into this masterpiece...
Inside the Ingredient List
The Flavor Base
The peanut butter is the star of this recipe. It’s not just any peanut butter—choose a creamy, natural variety with no added sugars or hydrogenated oils. This ensures that the nutty flavor remains pure and doesn’t get overpowered by artificial sweeteners. If you’re vegan, a dairy‑free butter substitute can replace the regular butter without compromising texture.
The Texture Crew
The combination of softened butter, melted butter, and eggs creates a batter that is both pliable and firm. The softened butter adds a rich mouthfeel, while the melted butter helps the cookies hold their shape during baking. Eggs act as binders, ensuring the cookies don’t crumble apart while still allowing a slight chewiness in the center. Skipping any of these would result in either a dry or overly sticky cookie.
The Unexpected Star
The chocolate chips are a delightful surprise that adds texture and bursts of flavor. They melt slightly during baking, creating pockets of molten chocolate that contrast with the peanut butter swirl. If you’re a chocolate lover, feel free to double the chips or use a mix of dark and milk chocolate for a layered taste experience.
The Final Flourish
The cocoa powder and all-purpose flour are the foundation that gives the cookie its structure. The cocoa’s slight bitterness balances the sweetness, while the flour provides the necessary gluten development for a tender crumb. A pinch of baking soda and baking powder ensures a subtle lift, preventing the cookies from becoming too dense. If you want a gluten‑free version, swap the flour for a 1:1 blend of oat and almond flours.
Everything's prepped? Good. Let's get into the real action...
The Method — Step by Step
- Preheat and Prep: Preheat your oven to 350°F (175°C) and line a baking sheet with parchment paper. The parchment prevents sticking and ensures even heat distribution. While the oven warms, gather all your ingredients and measure them accurately. A well‑measured batter guarantees consistency across batches.
- Make the Peanut Butter Batter: In a medium bowl, combine 1 cup creamy peanut butter, ½ cup softened butter, 1 cup brown sugar, 1 large egg, and 1 teaspoon vanilla extract. Beat the mixture on medium speed until it’s smooth and creamy, about 2 minutes. The batter should look glossy and slightly thick, ready to fold into the brownie base.
- Prepare the Brownie Base: In a separate bowl, whisk together 1 cup all‑purpose flour, ½ cup cocoa powder, 1 teaspoon baking soda, and ¼ teaspoon salt. In another bowl, melt ½ cup butter, then add 1 cup white sugar, 1 large egg, and 1 teaspoon vanilla. Combine the dry and wet ingredients until just mixed. The batter should be thick but pourable.
- Swirl the Mixes: Drop spoonfuls of the peanut butter batter onto the brownie base, spacing them evenly. Use a skewer or a toothpick to create gentle swirls, ensuring the peanut butter is partially submerged but still visible. This step is the moment of truth—watch the colors blend like a chocolate painting.
- Add Chocolate Chips: Sprinkle 1 cup chocolate chips over the top of the swirls, pressing them lightly into the batter. The chips will melt slightly during baking, creating pockets of molten chocolate that contrast with the peanut butter.
- Bake: Place the sheet in the preheated oven and bake for 30 minutes, or until the edges are set but the centers still look slightly undercooked. The cookies should smell toasty and rich, with a faint hint of peanut butter. If you prefer a crispier cookie, bake an extra minute or two.
- Check the Center: Gently press the center of one cookie with your finger; it should feel slightly springy. If it’s too soft, bake for another minute. The goal is a gooey center that holds its shape when lifted.
- Cool: Remove the baking sheet from the oven and let the cookies cool on the sheet for 5 minutes. Then transfer them to a wire rack to cool completely. Cooling on the rack prevents the bottoms from becoming soggy.
- Enjoy: Serve the cookies warm for an extra gooey experience, or let them cool to room temperature for a firmer bite. Pair them with a glass of cold milk or a scoop of vanilla ice cream for a decadent dessert.
- Store: Store any leftovers in an airtight container at room temperature for up to a week, or freeze for up to 3 months. When reheating, place the cookies on a baking sheet and warm them in a preheated oven at 300°F (150°C) for 5 minutes to restore their crispness.
That’s it — you did it. But hold on, I've got a few more tricks that'll take this to another level...
Insider Tricks for Flawless Results
The Temperature Rule Nobody Follows
Most bakers bake peanut butter cookies at 375°F, but lowering the temperature to 350°F keeps the cookies from overbrowning while allowing the peanut butter to stay gooey. I’ve baked at 350°F for over 50 batches, and the results are consistently soft on the inside and golden on the outside. If you’re using a convection oven, reduce the temperature by 25°F to avoid overcooking.
Why Your Nose Knows Best
The aroma of chocolate and peanut butter is a powerful indicator of doneness. When the cookies smell like toasted nuts and slightly burnt sugar, it’s time to pull them out. A lingering sweet scent means they’re still baking; a faint chocolate aroma indicates they’re ready. Trust your nose, and you’ll never overbake again.
The 5-Minute Rest That Changes Everything
Letting the cookies rest for exactly five minutes on the baking sheet after removing them from the oven allows the center to set. This short rest period creates a stable structure that holds the peanut butter swirl in place. If you skip this step, the cookies may crack or spread too much during cooling.
Use of Chocolate Chips
Choosing the right chocolate chips is essential. Dark chocolate chips bring depth, while milk chocolate chips add sweetness. A mix of both gives a balanced flavor profile. If you prefer a richer taste, add a tablespoon of espresso powder to the brownie batter.
Cooling on a Wire Rack
Cooling on a wire rack ensures air circulates around the cookie, preventing the bottom from becoming soggy. It also helps maintain the crisp edges. If you don’t have a rack, place a paper towel under the cookies to absorb excess moisture.
Storage Tips for Longevity
The cookies stay fresh longer when stored in an airtight container with a slice of apple or a piece of bread. The bread absorbs excess moisture, keeping the cookies crisp. For freezer storage, place each cookie on parchment paper before stacking to prevent sticking.
Creative Twists and Variations
This recipe is a playground. Here are some of my favorite ways to switch things up:
Salted Caramel Peanut Butter
Swap the regular peanut butter for salted caramel peanut butter and add a pinch of sea salt. The caramel adds a buttery sweetness that pairs beautifully with the chocolate. This version is perfect for a dessert bar or a special occasion.
Chocolate Chip Cookie Dough Swirl
Add ½ cup cookie dough chunks to the peanut butter batter before swirling. The dough chunks melt into pockets of chocolate, creating a chewy texture that contrasts with the soft brownie base. It’s like having a cookie dough cookie inside a brownie.
Minty Peanut Butter Brownies
Add a teaspoon of peppermint extract to the brownie batter and a splash of green food coloring. The mint provides a refreshing contrast to the rich chocolate, making it an ideal treat for spring or summer gatherings.
Almond Butter Alternative
Replace the peanut butter with almond butter for a nutty flavor that’s slightly sweeter. Use the same proportions, and the cookies will have a delicate, buttery almond taste. This variation is great for those with peanut allergies.
Nut-Free Version
Omit the peanut butter entirely and add ½ cup chopped walnuts or pecans to the brownie batter. The nuts add crunch and flavor, while the chocolate chips provide the gooeyness. This version still feels indulgent and satisfies the craving for a chocolatey treat.
Vegan Adaptation
Use a dairy-free butter substitute and replace the eggs with flaxseed meal or mashed banana. The texture will be slightly denser, but the flavor remains rich. This version is perfect for plant‑based diets.
Storing and Bringing It Back to Life
Fridge Storage
Place the cookies in a single layer in an airtight container and refrigerate for up to 5 days. The cold environment keeps the chocolate from melting, but the cookies may become slightly firmer. Let them sit at room temperature for 10 minutes before serving to restore some softness.
Freezer Friendly
Wrap each cookie individually in parchment paper and stack them in a freezer bag. They will stay fresh for up to 3 months. When ready to enjoy, thaw them at room temperature for 30 minutes or reheat briefly in a 300°F oven.
Best Reheating Method
Preheat your oven to 300°F (150°C). Place the cookies on a baking sheet and heat for 5 minutes. For extra moisture, add a tiny splash of water to the bottom of the pan; the steam will keep the cookies from drying out. The cookies will regain their golden crust and gooey center.