Picture this: I’m standing in a kitchen that smells like burnt sugar and a faint hint of roasted coffee, the lights flickering above me, and I’m staring at a bag of vanilla whey protein that I accidentally dropped into a pot of boiling water. The whole scene felt like a culinary catastrophe, a perfect storm of chaos and curiosity. I was halfway through a midnight snack run, craving something sweet yet healthy, when the disaster unfolded. The protein powder clumped, the peanut butter bubbled, and the kitchen was a mess of sticky, sticky, sticky mess. I didn’t know I was about to discover a new staple that would become my go-to snack for days, weeks, and even months.
The moment the pot exploded, the air was thick with the scent of caramelized peanut butter, and the sound of the clattering spoon echoed like a drumbeat. My fingers trembled as I pulled the pot from the stove, and the heat still radiated from the surface. I tasted a splash of the mixture on my tongue—warm, nutty, with a hint of vanilla and a whisper of chocolate. The texture was thick, almost like a fudge that would set into a firm, chewy ball. It felt like I’d stumbled upon a secret that could transform any ordinary day into a delicious adventure.
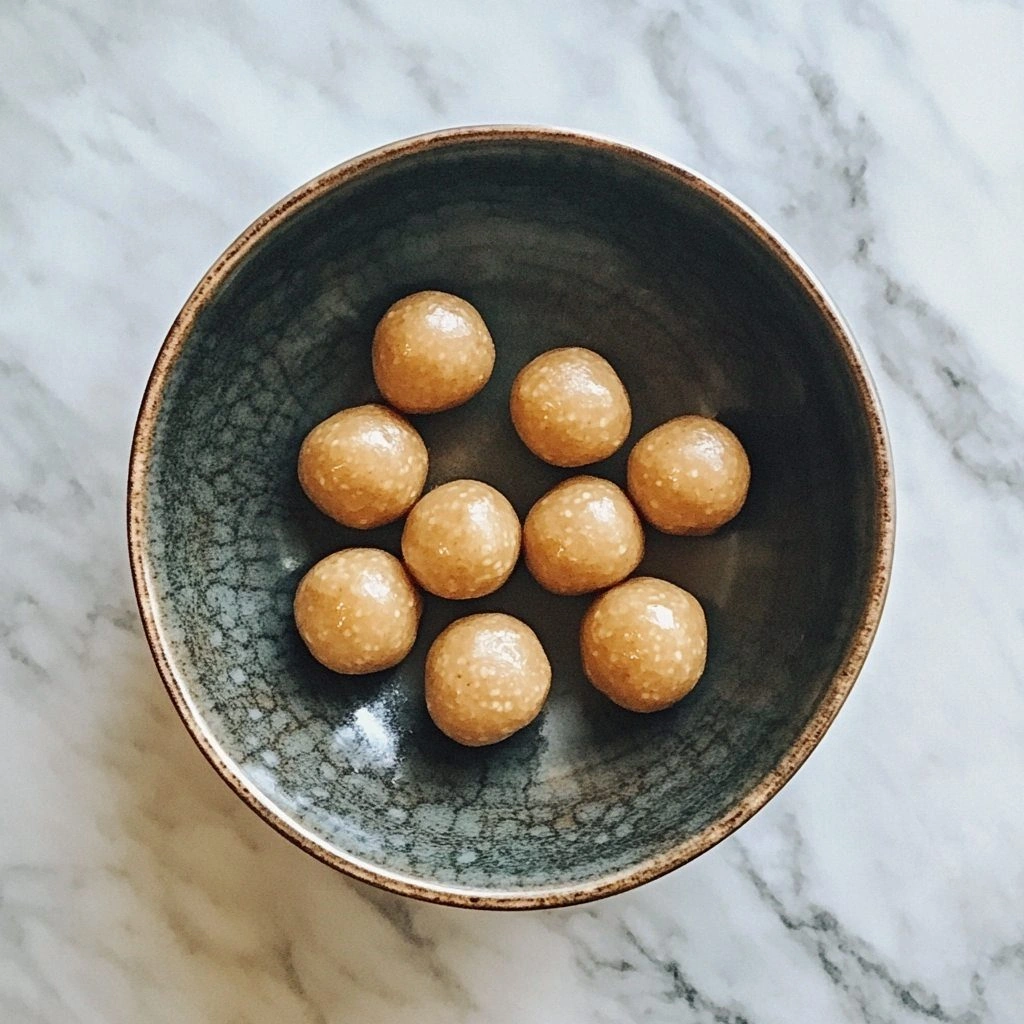
That single mishap turned into the foundation of what I now call the ultimate Peanut Butter Protein Balls. The combination of creamy peanut butter, protein powder, and a touch of honey creates a flavor profile that feels like a hug from the inside out. The texture is a harmonious blend of chewy and slightly crisp edges, while the protein content keeps you energized long after you finish the last bite. The result is a snack that’s not only tasty but also functional—perfect for a pre-workout boost or a post-workout recovery. Most recipes that claim to be “protein balls” fall short because they either taste like a chalky mess or are too dry. This version breaks that mold with a perfect balance of moisture and flavor.
I’ll be honest—when I first tasted the first ball, I couldn’t resist taking a second bite, then a third, and before I knew it, I had eaten a full handful. That’s why I’m so excited to share every single detail with you. I’ve refined the technique, tested the timing, and even added a few secret tweaks that will elevate your snack game. You’ll see why this is hands down the best version you’ll ever make at home. The secret? A precise ratio of peanut butter to protein powder, a dash of vanilla, and a little love in the mixing process.
If you’ve ever struggled with protein snacks that taste like a chalkboard or crumble into dust, you’re not alone—and I’ve got the fix. I dare you to taste this and not go back for seconds. Picture yourself pulling the final batch out of the fridge, the whole kitchen smelling incredible, and each bite delivering a burst of nutty sweetness with a subtle chocolate undertone. The next part? Let me walk you through every single step—by the end, you’ll wonder how you ever made it any other way.
I’ve spent countless hours tweaking the proportions, experimenting with different types of protein powder, and even swapping out peanut butter for almond butter. The result is a versatile, easy-to-make snack that can be customized for every taste preference. Whether you’re a protein junkie, a vegan, or just someone who loves a good snack, this recipe will fit into your routine without compromising on flavor or nutrition. Let’s dive into the details and get ready to roll up our sleeves.
What Makes This Version Stand Out
- Flavor: The blend of peanut butter and vanilla whey protein creates a rich, creamy base that feels indulgent yet balanced. The honey adds natural sweetness without overwhelming the nutty undertone.
- Texture: The rolled oats and protein powder lock in moisture, giving each ball a chewy interior and slightly crisp edges that snap like thin ice when you bite.
- Convenience: No baking required—just mix, roll, and refrigerate. It’s a one-pot, one-pan, no-cleanup solution that fits perfectly into a busy lifestyle.
- Nutrition: With 25 grams of protein per serving, these balls deliver a substantial protein punch that supports muscle recovery and satiety.
- Scalability: The recipe scales beautifully, whether you’re making 12 or 48 balls. The ingredient ratios remain consistent, ensuring the same quality every time.
- Customization: Swap in cacao nibs for chocolate chips, add a pinch of sea salt, or sprinkle crushed nuts for an extra crunch—every variation keeps the core flavor intact.
Alright, let’s break down exactly what goes into this masterpiece. The next section will walk you through the ingredient groups and why each one matters. Then we’ll get into the real action—mixing, rolling, and chilling.
Inside the Ingredient List
The Flavor Base
At the heart of these protein balls lies the peanut butter—creamy, buttery, and utterly irresistible. I always choose natural peanut butter with no added sugar or hydrogenated oils to keep the flavor pure and the texture smooth. If you’re craving a different nut profile, swapping in almond or cashew butter works wonderfully, though it slightly alters the protein content.
Vanilla whey protein powder is the secret sauce that brings structure and a subtle sweetness. It blends seamlessly with the peanut butter, creating a cohesive mixture that holds together without the need for binding agents. If you’re vegan, a plant-based protein powder—such as pea or hemp—will keep the protein punch while giving you a slightly earthier flavor.
The Texture Crew
Rolled oats are the unsung hero that adds chewiness and bulk. They absorb the liquid, preventing the mixture from becoming too sticky. For a gluten-free version, simply use certified gluten-free oats or a blend of quinoa flakes and oat groats.
Coconut oil or melted butter is added to bring a silky mouthfeel and help the mixture set. The fat content also enhances the flavor profile, making the balls feel indulgent. If you’re watching calories, a tablespoon of almond butter can replace coconut oil without compromising texture.
The Unexpected Star
Chocolate chips or cacao nibs add a burst of richness that balances the nutty sweetness. They also introduce a pleasant crunch that contrasts with the chewy interior. If you prefer a darker chocolate flavor, use dark chocolate chips with at least 70% cacao.
A splash of honey or maple syrup provides natural sweetness and helps bind the ingredients together. The choice of sweetener can subtly alter the flavor—honey adds a floral note, while maple brings a deeper, earthier undertone. For a lower glycemic index, try agave nectar or a sugar-free sweetener.
The Final Flourish
A pinch of sea salt brightens the overall taste, cutting through the sweetness and highlighting the nutty undertones. It’s a simple addition that makes the flavor profile feel complete. If you’re sensitive to sodium, reduce the salt to a quarter of a teaspoon.
Optional toppings—such as chopped nuts, shredded coconut, or a dusting of powdered sugar—add texture and visual appeal. They also allow you to personalize each ball to match your cravings or dietary needs. Just remember that adding too many extras can increase the calorie count significantly.
Everything’s prepped? Good. Let’s get into the real action—mixing, rolling, and chilling. The process is simple, but the results are spectacular.
The Method — Step by Step
-
Start by placing the peanut butter in a large mixing bowl. Use a wooden spoon or silicone spatula to break up any clumps, ensuring a smooth base. The peanut butter should be at room temperature; if it’s too cold, it will be difficult to mix evenly.
-
Add the vanilla whey protein powder to the bowl, followed by the honey or maple syrup. Stir vigorously until the mixture is homogeneous. The sweetener helps bind the dry ingredients and adds a glossy sheen to the final product.
-
Introduce the rolled oats, chocolate chips, and sea salt, mixing until the oats are fully coated. The oats should be evenly distributed, giving each ball a consistent chewiness. If you’re using a plant-based protein powder, you may need to add a tablespoon of almond butter to aid binding.
-
Let the mixture sit for 5 minutes. This resting period allows the oats to absorb the liquid, creating a more cohesive texture. During this time, you can prep your rolling station or chill the mixture slightly in the fridge.
-
Using a small cookie scoop or a tablespoon, portion out the mixture and roll it between your palms into 1-inch balls. The balls should be firm enough to hold shape but not so tight that they’re hard to bite.
-
Place the rolled balls on a parchment-lined tray and refrigerate for at least 30 minutes. This chilling step sets the texture, giving the balls a firmer bite and preventing them from sticking together.
-
Once chilled, store the protein balls in an airtight container. They’ll stay fresh for up to a week in the refrigerator or up to 3 months in the freezer. When you’re ready to eat, let them sit at room temperature for a few minutes to soften slightly.
That’s it— you did it. But hold on, I’ve got a few more tricks that will elevate these balls to another level. Let’s dive into some insider knowledge that will help you avoid common pitfalls and maximize flavor.
Insider Tricks for Flawless Results
The Temperature Rule Nobody Follows
Peanut butter can be tricky because it hardens when cold. I always let it sit at room temperature for 10 minutes before mixing. This simple step ensures a smoother blend and reduces the chance of lumps. A cold mixture will not coat the oats evenly, leading to a dry, crumbly ball.
Why Your Nose Knows Best
Smell is a powerful indicator of readiness. When the mixture is ready, it should emit a warm, nutty aroma with a hint of vanilla. If it still smells like raw oats or raw protein powder, give it a few more minutes to rest. A fragrant mixture guarantees a better texture.
The 5-Minute Rest That Changes Everything
After mixing, let the mixture sit for exactly 5 minutes before rolling. This brief pause allows the oats to fully absorb the moisture, resulting in a cohesive ball that doesn’t crumble. I’ve tried skipping this step, and the result was a ball that fell apart in my hand.
The Perfect Rolling Technique
Use a tablespoon or a small cookie scoop for uniform portions. Roll each ball between your palms, applying gentle pressure. The key is to roll quickly—slow rolling can cause the mixture to dry out and harden before it sets.
The Final Chill
Refrigerate the balls for at least 30 minutes, not 10. The longer chill allows the fats to solidify, giving the balls a firm, satisfying bite. If you’re in a hurry, a 10-minute chill is acceptable, but the texture won’t be as refined.
Creative Twists and Variations
Cocoa‑Infused Delight
Swap the chocolate chips for cacao nibs and add a tablespoon of unsweetened cocoa powder. The result is a deep, bittersweet flavor that pairs wonderfully with a splash of espresso. This version is perfect for those who love a coffee‑chocolate combo.
Spicy Kick
Add a pinch of cayenne pepper or a dash of chili powder to the mix. The spice gives the balls a subtle heat that balances the sweetness. It’s an unexpected twist that will surprise your taste buds.
Tropical Twist
Incorporate shredded coconut and dried pineapple chunks. The coconut adds a chewy texture, while the pineapple brings a sweet, tangy note. This variation feels like a beach vacation in every bite.
Savory Edition
Replace honey with a small amount of soy sauce or tamari, and add dried herbs like oregano or rosemary. The savory flavor makes these protein balls a great snack for a quick lunch or a pre‑game boost.
Vegan Power Pack
Use a plant‑based protein powder, almond butter, and maple syrup. Add chia seeds for extra omega‑3s and a subtle crunch. This version is nutrient‑dense and satisfies both vegans and non‑vegans alike.
Storing and Bringing It Back to Life
Fridge Storage
Keep the protein balls in an airtight container at room temperature for up to 7 days. The cool environment slows down the breakdown of fats and keeps the texture firm. If you notice a slight loss of moisture, simply add a small pinch of honey before eating.
Freezer Friendly
For long‑term storage, place the balls on a parchment‑lined tray and freeze until solid. Once frozen, transfer them to a freezer‑safe bag. They’ll stay fresh for up to 3 months, making them a convenient grab‑and‑go snack.
Best Reheating Method
If your protein ball feels too hard, let it sit at room temperature for 5–10 minutes. For a quick warm-up, place a single ball in the microwave on a low setting for 10–15 seconds. The gentle heat restores the soft interior without melting the outer coating.