I was halfway through a late‑night pizza experiment, the dough still sticky and the oven preheated, when the phone buzzed. “You have to try this,” my friend texted, attaching a photo of a bowl of cheesy, taco‑flavored pasta that looked like a carnival of comfort. I stared, half amused, half skeptical. That moment became the spark that turned a kitchen mishap into a culinary revelation.
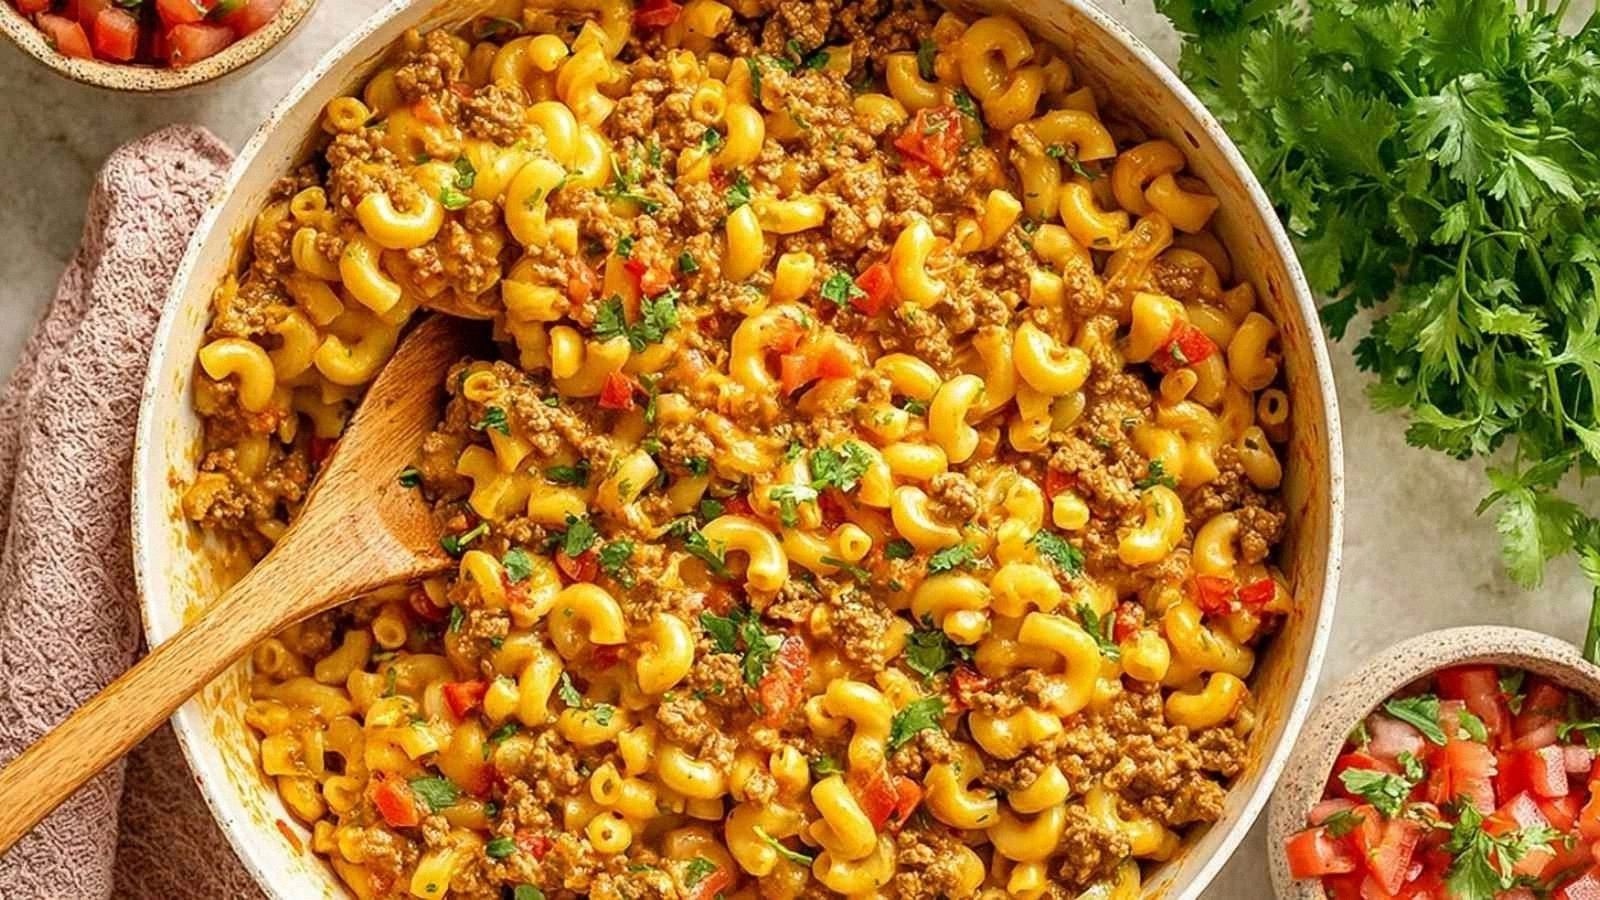
Picture this: a pot of elbow macaroni bubbling, the air thick with the aroma of browned ground beef, taco seasoning, and a whisper of dairy. The sound of sizzling meat is like applause in the kitchen, the heat radiating off the pan like a warm hug. My senses were flooded with the promise of a dish that would taste like a fiesta in a bowl, yet feel like a cozy hug from the inside. I could almost taste the creamy, tangy layers melting together, the cheese coating each noodle like velvet.
Why does this version stand out? Because I took the classic taco‑mac mashup and turned it into a symphony of textures and flavors that dance on the tongue. I replaced heavy cream with a duo of cream cheese and Greek yogurt for a lighter, tangy base, and I added a splash of almond milk to keep it silky. The result? A dish that feels indulgent without the guilt, with a crunch that pops like a confetti of cheese and a sauce that clings to every noodle. I dare you to taste this and not go back for seconds.
If you’ve ever tried taco mac and felt it was just another bland comfort food, you’re not alone. Most recipes get this completely wrong, relying on excess salt or overcooked pasta. This one is hands down the best version you’ll ever make at home, because I’ve stripped away the fluff and kept only what matters: flavor, texture, and a sprinkle of culinary curiosity. Picture yourself pulling this out of the oven, the whole kitchen smelling incredible, and everyone asking for the recipe. Stay with me here—this is worth it.
What Makes This Version Stand Out
- Flavor: The taco seasoning is the backbone, giving a bold, savory kick that balances the creaminess of the cheese blend. The addition of Greek yogurt introduces a subtle tartness, cutting through the richness.
- Texture: The elbow macaroni is cooked al dente, providing a firm bite that contrasts with the silky sauce and a crispy top layer of melted cheddar.
- Lightness: Fat‑free cream cheese and non‑fat yogurt replace heavy cream, reducing calories while preserving creaminess.
- Convenience: Every step is straightforward; no fancy equipment or hard‑to‑find ingredients.
- Make‑ahead: You can assemble it the night before, refrigerate, and bake fresh in the morning—perfect for busy weeknights.
- Kid‑friendly: The cheesy, taco‑flavored pasta is a hit with kids who love both tacos and macaroni, making it a family‑friendly meal.
- Versatility: The base can be tweaked with extra veggies, different proteins, or a sprinkle of fresh cilantro for a new twist.
- Presentation: A golden, bubbly top with a sprinkle of chopped green onions looks as good as it tastes.
Inside the Ingredient List
The Flavor Base
The 1 lb lean ground beef is the heart of the dish, offering protein and a savory depth that is amplified by the taco seasoning packet. The 1/2 cup water is not just liquid; it helps the seasoning dissolve and creates steam that keeps the pasta moist. Skipping the water will result in a dry, clumpy sauce that won’t coat the noodles.
If you’re looking for a leaner option, try turkey or chicken crumbles. They’ll maintain the flavor profile while cutting down on saturated fat. When browning the meat, aim for a deep golden brown; this caramelization adds a nutty undertone that elevates the overall taste.
The Texture Crew
Elbow macaroni is chosen for its sturdy shape that holds sauce and crunches slightly when baked. Cook the pasta in salted water until it’s just shy of al dente, then drain and set aside. If you prefer a softer bite, let it cook a minute longer.
The 4 oz fat‑free cream cheese adds body without heaviness. It melts smoothly, creating a velvety coating that feels indulgent but stays light. A swap for regular cream cheese will give a richer taste, but the calories will rise significantly.
The Unexpected Star
Half a cup of non‑fat plain Greek yogurt is the secret weapon that introduces a subtle tang, balancing the richness of the cheeses. It also thickens the sauce, giving it a luscious, silky texture. If you’re lactose intolerant, a dairy‑free yogurt will work, but choose one with a neutral flavor to avoid altering the dish.
The unsweetened almond milk keeps the sauce from becoming too thick, allowing it to coat each noodle evenly. It also adds a hint of nuttiness that complements the cheddar. A splash of oat milk could replace it for a slightly sweeter note, but keep it unsweetened to preserve the savory profile.
The Final Flourish
The 1 cup of reduced‑fat shredded sharp cheddar is the crowning glory, providing a molten, golden top that melts into the sauce. It’s the difference between a bland dish and one that feels indulgent. If you’re a cheese lover, feel free to add a handful of pepper jack or mozzarella for a milder melt.
A pinch of paprika or a dash of cayenne can be added for extra heat, but the taco seasoning already offers a robust spice profile. Remember, the key is balance—too much spice can overpower the creamy base, while too little will make the dish feel flat.
Everything's prepped? Good. Let's get into the real action.
The Method — Step by Step
- Preheat your oven to 375°F (190°C). While the oven warms, bring a large pot of salted water to a rolling boil. Add the elbow macaroni and cook for 7–8 minutes until just shy of al dente. Drain and set aside, reserving a cup of pasta water for later. The pasta should be firm to the bite, not mushy, because it will absorb sauce later.
- In a large skillet, heat a splash of olive oil over medium‑high heat. Add the lean ground beef, breaking it apart with a spatula. Cook until the meat starts to brown, about 4–5 minutes. The sizzle is a sign that the flavor is building—listen to that crackle.
- Stir in the taco seasoning packet and 1/2 cup water. Let the mixture simmer for 2–3 minutes, allowing the seasoning to meld and the water to reduce slightly. The sauce should thicken a touch, forming a base for the pasta.
- Reduce the heat to low and fold in the 4 oz fat‑free cream cheese, stirring until it melts into a silky sauce. The cream cheese should coat the back of a spoon, indicating it’s fully incorporated. If the mixture looks too thick, add a splash of the reserved pasta water to loosen it.
- Add the Greek yogurt and almond milk, whisking until the sauce is smooth and glossy. The yogurt adds a bright tang that cuts through the richness; the almond milk keeps the sauce from becoming too dense. This step is the moment of truth—watch the sauce transform.
- Return the drained pasta to the skillet, tossing to coat each noodle in the luscious sauce. The pasta should look glossy, with a few strands glistening like liquid gold. If it looks dry, drizzle a bit more almond milk or reserved pasta water.
- Transfer the sauced pasta to a greased 9×13 inch baking dish, spreading it evenly. Sprinkle the shredded cheddar cheese over the top, pressing lightly to ensure it adheres. The cheese should be the crown, ready to melt into a golden crust.
- Bake in the preheated oven for 20–25 minutes, or until the cheese is bubbly, golden, and the edges start pulling away from the sides of the dish. The aroma that fills the kitchen will be irresistible—like a warm hug.
- Remove from the oven and let it rest for 5 minutes before serving. This brief pause allows the sauce to set slightly, making it easier to scoop. Garnish with chopped green onions or a sprinkle of fresh cilantro if desired.
That's it — you did it. But hold on, I've got a few more tricks that'll take this to another level.
Insider Tricks for Flawless Results
The Temperature Rule Nobody Follows
Most people bake at 350°F, but 375°F is the sweet spot for a golden top and a perfectly melted cheese crust. The higher temperature ensures the cheese melts quickly, forming a crisp shell that holds the sauce together. If you’re baking on a lower heat, the cheese might stay gooey and not brown, leading to a less satisfying bite.
Why Your Nose Knows Best
Before you pull the dish out, listen for the aroma of toasted cheddar. When the cheese starts to caramelize, the scent will intensify, signaling that the dish is ready. Trust your nose; a dish that smells like a summer barbecue is almost always delicious.
The 5‑Minute Rest That Changes Everything
Letting the baked dish rest for five minutes after the oven is a game‑changer. It allows the sauce to set, preventing it from sliding off when you cut a serving. The rest also lets the flavors meld, creating a more cohesive taste experience.
Skip the Grease? Think Again
A light spray of cooking oil or a thin layer of butter on the baking dish ensures a crisp edge that’s easy to lift. Without it, the pasta might stick, and the edges won’t develop that desirable crunch.
Keep the Sauce Thick, Not Sloppy
If the sauce feels too thin, add a tablespoon of flour or cornstarch mixed with a little cold water. Stir it in quickly, and let it simmer for a minute to thicken. A thick sauce coats the noodles, creating a richer mouthfeel.
The Fresh Herb Surprise
A handful of chopped fresh cilantro or parsley added just before serving adds a burst of color and a bright, herbal note that cuts through the richness. It also elevates the dish’s visual appeal, making it Instagram‑ready.
Creative Twists and Variations
This recipe is a playground. Here are some of my favorite ways to switch things up:
Spicy Chipotle Kick
Add a tablespoon of chipotle in adobo sauce to the meat mixture for a smoky heat. The chipotle pairs beautifully with the cheddar, creating a layered flavor profile that’s both bold and comforting.
Veggie Boost
Sauté diced bell peppers, onions, and zucchini with the ground beef. The veggies add crunch, nutrition, and a pop of color that makes the dish feel lighter and more balanced.
Mexican Street Taco Version
Top the baked pasta with fresh pico de gallo, a dollop of sour cream, and a squeeze of lime. The acidity from the lime brightens the dish, while the salsa adds a fresh, tangy contrast.
Cheese Swap: Pepper Jack Edition
Replace the cheddar with shredded pepper jack for a milder, slightly sweet flavor. The pepper jack melts beautifully, giving the dish a silky texture with a subtle heat.
Make It Gluten‑Free
Use gluten‑free elbow macaroni and a gluten‑free taco seasoning blend. The dish retains its comforting essence while accommodating dietary restrictions.
Breakfast Taco Mac
Add a few scrambled eggs to the pasta before baking. The eggs soak up the sauce, creating a protein‑rich breakfast that feels like a hearty brunch.
Storing and Bringing It Back to Life
Fridge Storage
Cool the dish completely before covering it tightly with aluminum foil or a lid. Store in the refrigerator for up to 3 days. The flavors will deepen, and the cheese will firm up slightly, making it even more indulgent.
Freezer Friendly
Pack the baked pasta in an airtight container and freeze for up to 2 weeks. When ready to eat, thaw overnight in the fridge, then reheat in a preheated oven at 350°F for 20 minutes, or until heated through.
Best Reheating Method
Reheat in a microwave on medium power for 2–3 minutes, then transfer to a skillet with a splash of water for 1 minute to restore moisture. A tiny splash of water before reheating steams back to perfection, keeping the sauce silky.