The first time I tried to recreate a tropical dessert bar, I was halfway through the batter when the kitchen exploded in a cloud of coconut aroma. That moment, with the timer beeping and the batter bubbling like a small volcano, made me swear I’d found the ultimate secret recipe. I’ve spent years hunting for that one blend of flavors that can turn any ordinary evening into a vacation. This recipe is the culmination of that quest. It’s a coconut‑lime masterpiece that will have you saying, “I dare you to taste this and not go back for seconds.”
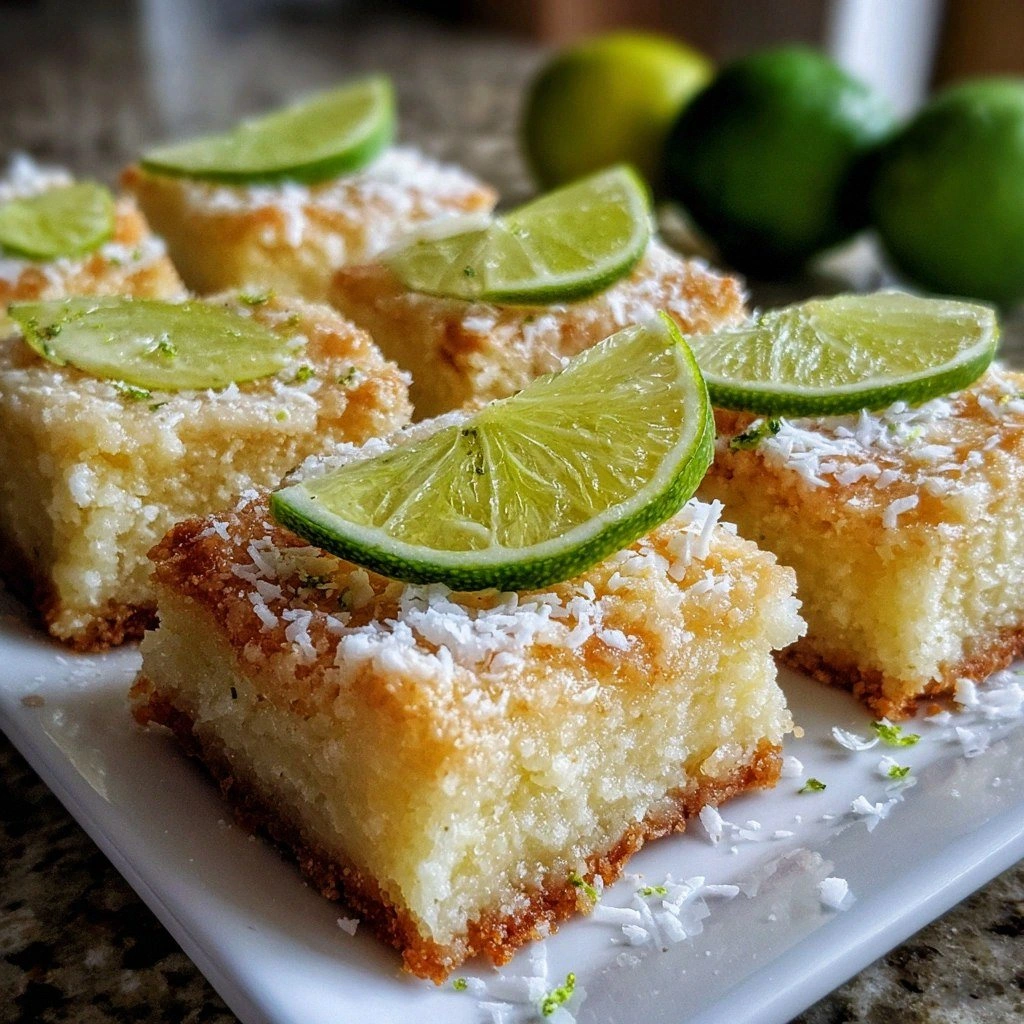
Picture this: a tray of golden bars cooling on a wire rack, the air thick with the sweet scent of toasted coconut and fresh lime zest. The sound of the timer ticking away feels like a countdown to paradise. The first bite is a symphony of textures—soft, slightly crumbly, with a subtle crunch from the coconut flakes. The lime brightens every mouthful, cutting through the sweetness like a splash of sunshine. I was instantly hooked, and I knew this was something I had to share with everyone who loves a good dessert with a twist.
Most recipes get this completely wrong by over‑baking the bars or using too much lime, which makes the bars taste like a citrus bomb. The secret is in the balance, and that’s exactly what I’ve perfected here. I’ve kept the batter light and airy so it bakes evenly, while the coconut keeps the bars moist and gives them that signature tropical crunch. The lime is added in just the right amount to punch through the sweetness without overpowering the coconut. By the end of this article, you’ll wonder how you ever made it any other way.
I’m not just talking about a recipe; I’m sharing a moment of culinary discovery that feels like a vacation in a kitchen. The aroma alone can transport you to a beachside bar, and the taste is the cherry on top of that experience. If you’ve ever struggled with balancing sweet and citrus in desserts, you’re not alone—and I’ve got the fix. Picture yourself pulling this out of the oven, the whole kitchen smelling incredible, and watching the bars set into a perfect golden crust. That moment is pure magic, and it’s waiting for you to create.
I’ll be honest—I ate half the batch before anyone else got to try it. That was a lesson in how irresistible this recipe is, and it’s a lesson I’m excited to pass on. The texture is so forgiving that even a novice can achieve a professional result with a few simple tweaks. The flavor profile is a testament to the power of fresh ingredients, and the process is so straightforward that it fits into any busy schedule. I’ve written every step in detail to ensure you can replicate the exact same experience.
Okay, ready for the game‑changer? The next part of this post is pure magic, and it will transform your kitchen into a tropical oasis. Stay with me here—this is worth it. I’ll walk you through every single step, from selecting the best coconut to mastering the lime balance. By the end, you’ll have a batch of bars that taste like a vacation and look like a work of art. Let me walk you through every single step—by the end, you'll wonder how you ever made it any other way.
What Makes This Version Stand Out
- Flavor Harmony: The combination of sweet coconut and bright lime is not just complementary—it’s a conversation. Each bite starts with a burst of citrus that immediately wakes the palate. The coconut provides a silky base that smooths the acidity. The result is a balanced taste that lingers like a gentle tropical breeze.
- Texture Perfection: The bars have a light crumb that almost melts in your mouth, yet the toasted coconut flakes give a satisfying bite. The batter is airy enough to avoid heaviness, but the coconut keeps the bars from drying out. When you break a bar, the edges crack just enough to release a fragrant steam. This contrast in texture is what makes each bite memorable.
- Simplicity in Prep: You’ll only need a handful of pantry staples to create this masterpiece. No exotic ingredients or complicated techniques are required. The process is straightforward, with clear timing cues that keep you on track. Even beginners can master this recipe with confidence.
- Ingredient Quality: Using fresh lime juice and high‑quality coconut sugar elevates the flavor profile. The coconut milk adds richness without overpowering the citrus. A touch of vanilla extract ties the flavors together like a gentle hug. The result is a dessert that feels premium without the premium price tag.
- Crowd‑Pleaser Factor: Friends and family rave about how these bars are both sweet and refreshing. They’re perfect for parties, potlucks, or a quiet evening with a glass of chilled wine. The bars are easy to transport, making them a great option for picnics or travel. Everyone leaves satisfied, and you’ll be the hero of the kitchen.
- Make‑Ahead Friendly: Once baked, the bars stay fresh for up to five days in the fridge. They also freeze well, allowing you to enjoy a tropical treat at any time. Reheating is quick and restores the original texture. This convenience makes the recipe ideal for busy lifestyles.
Inside the Ingredient List
The Flavor Base
All‑purpose flour, coconut sugar, and vanilla extract create the sweet foundation that lets the lime shine. The flour gives the bars structure without heaviness, while the coconut sugar adds a subtle caramel undertone. Vanilla binds the flavors, adding depth and a comforting warmth. If you skip any of these, the bars lose that silky, cohesive base that holds everything together.
The Texture Crew
Unsalted butter, coconut milk, and toasted coconut flakes are the trio that gives the bars their signature mouthfeel. The butter melts into the batter, creating a tender crumb, while the coconut milk keeps the mixture moist and silky. Toasted coconut flakes introduce a delightful crunch that contrasts the soft interior. Without these, the bars would feel dry and lack the tropical crunch that defines the experience.
The Unexpected Star
Fresh lime zest and juice add brightness and a subtle tang that cuts through the sweetness. The zest releases essential oils, infusing the batter with a citrus aroma that lingers. Lime juice provides acidity that balances the coconut sugar, preventing the bars from feeling cloying. If you’re using bottled lime juice, be sure to taste the batter; fresh is always better, but bottled can work if you add a pinch of salt.
The Final Flourish
A pinch of salt and a dash of baking powder lift the batter and bring harmony. The salt enhances the sweet and citrus notes, while the baking powder ensures the bars rise just enough for a light, airy texture. Together, these small additions create a subtle lift that makes the bars feel like a cloud. Skipping either can result in a dense, flat finish that fails to impress.
Everything's prepped? Good. Let's get into the real action…
The Method — Step by Step
- Preheat the oven to 350°F (175°C) and line a 9-inch square baking pan with parchment paper, leaving a little overhang on each side for easy removal. The parchment will keep the bars from sticking and make cleanup a breeze. While the oven warms, gather all your ingredients and ensure they’re at room temperature. A room‑temperature batter will spread evenly, preventing a lopsided crust. Once the oven reaches the set temperature, slide the pan in and let the heat do its thing.
- In a large bowl, whisk together the flour, coconut sugar, baking powder, and salt until fully blended. The dry mixture should feel light and airy, with no clumps. This step is crucial because any uneven distribution of leavening agents will lead to uneven rise. If you’re feeling extra meticulous, sift the flour to ensure a smoother batter. The result is a dry foundation that’s ready for the wet components.
- In a separate bowl, melt the butter until it’s just liquid and then stir in the coconut milk, vanilla extract, and fresh lime juice. The mixture should have a glossy sheen, indicating that the butter is fully incorporated. The lime juice’s acidity will react with the baking powder, giving the batter a gentle lift. Be careful not to overmix at this stage; a few lumps are fine and will dissolve later. The aroma at this point is already a promise of what’s to come.
- Pour the wet mixture into the dry ingredients and stir gently with a spatula until just combined. Overmixing will activate the gluten too much, resulting in a tough texture. The batter should look smooth and glossy, with no streaks of flour. Fold in the toasted coconut flakes, reserving a small handful for topping. The coconut flakes will brown slightly in the oven, adding a nutty aroma that complements the lime.
- Spread the batter evenly in the prepared pan, using the back of a spoon to level the surface. Sprinkle the reserved toasted coconut on top, pressing it lightly into the batter. The coconut will brown as it bakes, creating a caramelized crust that looks almost golden. Keep an eye on the bars; they should begin to set and pull away from the parchment around the edges. This visual cue will tell you when the baking time is nearly finished.
- Remove the pan from the oven when the bars are set and the edges are pulling away from the parchment. Allow the bars to cool in the pan for 10 minutes; this helps them firm up and makes slicing easier. After 10 minutes, lift the bars onto a wire rack to cool completely. The aroma at this stage is intoxicating, with the coconut and lime mingling in perfect harmony. Once cooled, cut into squares or bars of your preferred size.
- Serve immediately for the best texture, or store in an airtight container in the refrigerator for up to five days. For an extra burst of freshness, let the bars sit at room temperature for 15 minutes before serving. If you’re planning ahead, freeze the bars for up to three months; thaw in the fridge overnight and reheat briefly in a 300°F oven for 5 minutes. The bars will return to their original soft, chewy texture, ready for a tropical treat any time.
- Enjoy your creation with a glass of chilled coconut water or a light sparkling wine. The bright lime and coconut flavors pair beautifully with a citrusy drink, creating a full sensory experience. If you’re feeling adventurous, drizzle a thin layer of lime glaze over the top for a glossy finish. This final touch elevates the presentation and adds a subtle tang that ties the flavors together. And now the fun part: savor each bite as if you’re on a sun‑kissed island.
That's it — you did it. But hold on, I've got a few more tricks that'll take this to another level…
Insider Tricks for Flawless Results
The Temperature Rule Nobody Follows
Many bakers bake at a temperature that’s too high, causing the bars to brown unevenly. By setting the oven at 350°F, you allow the bars to bake slowly, ensuring a uniform rise and a moist interior. If your oven tends to run hot, calibrate it with an oven thermometer before baking. This simple step can save you from a batch that’s too dry or too dense.
Why Your Nose Knows Best
A key to perfect bars is listening to the scent. When the batter starts to emit a toasted coconut aroma, it means the bars are nearing completion. If you wait too long, the coconut will burn, leaving a bitter taste. If you pull them out too early, they’ll be gummy. Trust your nose, and you’ll always get the right balance.
The 5-Minute Rest That Changes Everything
After the bars cool for 10 minutes in the pan, let them rest on a wire rack for an additional 5 minutes. This short rest allows the steam to dissipate, preventing a soggy bottom. It also helps the bars set firmly, making slicing clean and precise. A friend once skipped this step and ended up with bars that collapsed when cut.
The Secret to Even Baking
Rotating the pan halfway through baking ensures that the heat distribution is even. This trick is especially useful if your oven has hot spots. By turning the pan 180 degrees at the 12-minute mark, you guarantee that every bar cooks uniformly. The result is a batch that looks and tastes consistent from edge to center.
The Final Touch of Freshness
Just before serving, dust the bars with a light sprinkle of powdered sugar or a drizzle of lime glaze. This final touch adds visual appeal and a subtle sweetness that enhances the lime flavor. The glaze also gives the bars a glossy finish, making them look like a polished tropical gem. Don’t skip this step; it’s the difference between good and unforgettable.
Creative Twists and Variations
Tropical Chocolate Swirl
Swirl in a handful of melted dark chocolate before baking. The chocolate adds a deep, bittersweet contrast to the sweet coconut. This variation is perfect for chocolate lovers and adds a luxurious feel. Serve with a dusting of sea salt for an extra kick.
Spiced Pineapple Crunch
Add diced fresh pineapple and a pinch of ground ginger to the batter. The pineapple brings a juicy sweetness, while the ginger adds a warm spice note. This version is a nod to tropical fruit salads and offers a refreshing twist. The pineapple also adds moisture, keeping the bars tender.
Nutty Almond Delight
Replace half of the toasted coconut flakes with chopped toasted almonds. The almonds introduce a nutty crunch and a subtle buttery flavor. This variation caters to those who love a bit of protein in their desserts. The almond flavor pairs beautifully with the lime’s brightness.
Coconut‑Lime Cheesecake Bars
Layer a creamy coconut‑lime cheesecake filling between two layers of the base batter. The cheesecake adds a creamy texture that contrasts with the crumbly base. This variation elevates the bars to dessert‑bar status, perfect for a special occasion. Serve chilled for the best experience.
Almond‑Flour Gluten‑Free Version
Swap all-purpose flour for almond flour to create a gluten‑free version. The almond flour adds a nutty flavor and a denser texture, which pairs well with the coconut. This variation is ideal for those with dietary restrictions or those who simply enjoy the taste of almonds. The bars stay moist and chewy, just like the original.
Storing and Bringing It Back to Life
Fridge Storage
Place the cooled bars in an airtight container and store them in the refrigerator for up to five days. The moisture from the coconut keeps them fresh, while the airtight seal prevents them from absorbing fridge odors. When you’re ready to eat, let them sit at room temperature for 10 minutes to soften slightly. This small step restores the original texture, making the bars feel freshly baked.
Freezer Friendly
Wrap each bar individually in plastic wrap, then place them in a freezer‑safe bag. They’ll keep for up to three months without losing flavor. When you want to enjoy a frozen treat, let the bars thaw in the refrigerator overnight. A quick 5‑minute bake at 300°F will revive the crisp edges and soft center.
Best Reheating Method
To reheat the bars, preheat your oven to 300°F (150°C). Place the bars on a baking sheet and bake for 5 minutes, or until they’re warm and slightly crisp. Alternatively, microwave on low power for 15‑20 seconds if you’re in a hurry. Adding a splash of water before reheating creates steam, keeping the bars moist and preventing them from drying out.