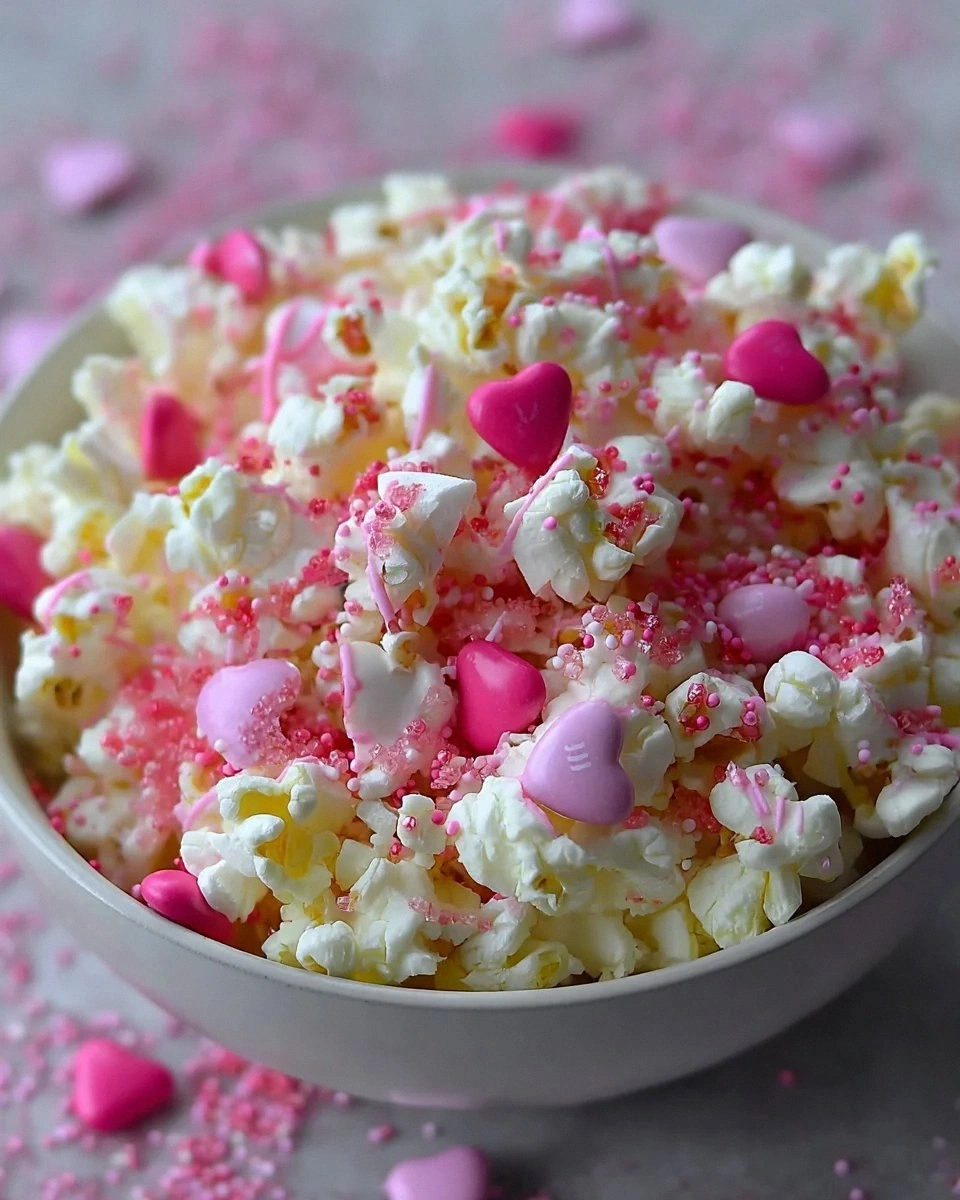
Okay, picture this: I'm in my tiny kitchen, the timer on my oven is screaming like a fire alarm, and I’ve just spilled an entire bag of pink candy melts onto the floor. The smell of burnt sugar wafted through the apartment, and I thought, “Great, my Valentine’s night is ruined.” But then, amid the chaos, a brilliant idea sparked—what if I turned that sticky mess into a glossy coating for popcorn? I grabbed a fresh bag of popped corn, tossed in some white candy melts, and before I knew it, I was coating each fluffy kernel with a glossy, pink‑kissed glaze that screamed romance. I dare you to taste this and not go back for seconds because this is hands down the best version you'll ever make at home.
The moment the first bite hit my tongue, it was like a fireworks show in my mouth—sweet, buttery, and with a subtle crunch that reminded me of a crisp winter night. I could hear the faint crackle of the popcorn as I chewed, and the aroma of melted chocolate mingled with a whisper of vanilla, creating a sensory snapshot that made my heart flutter. I’ll be honest — I ate half the batch before anyone else got to try it, and the rest of the evening turned into a glittering, heart‑shaped snack fest that had my friends begging for the recipe. Most recipes get this completely wrong, either drowning the popcorn in syrup or leaving it dry; here, the candy melts create a perfect, glossy coat that doesn’t sog the kernels. Picture yourself pulling this out of the bowl, the whole kitchen smelling incredible, and watching the pink sparkle catch the light like tiny love notes.
What truly sets this pop‑tastic treat apart is the marriage of texture and color—each bite delivers a buttery crunch followed by a melt‑in‑your‑mouth sweetness that feels like a hug from a loved one. The secret weapon? A double‑layer of candy melts—first a smooth white base, then a vibrant pink splash that adds both flavor and visual drama. And let’s not forget the Valentine’s M&Ms and sprinkles, which add bursts of chocolate and a festive sparkle that turns a simple snack into a party‑ready centerpiece. The technique is simple enough for beginners, yet the result feels like something you’d find at a high‑end confectionery shop. Okay, ready for the game‑changer? Let me walk you through every single step — by the end, you’ll wonder how you ever made it any other way.
⚡ What Makes This Version Stand Out
- Flavor Explosion: The combination of white and pink candy melts creates a sweet‑and‑creamy coating that melts on your tongue like velvet, while the M&Ms add a chocolatey surprise.
- Texture Harmony: Light, airy popcorn meets a glossy, slightly firm shell, delivering a satisfying crunch followed by a melt‑in‑your‑mouth finish.
- Simplicity: Only five core ingredients, all easy to find, mean you can whip this up in under an hour without any fancy equipment.
- Visual Wow‑Factor: The pink hue and heart‑shaped sprinkles turn an ordinary snack into a romantic centerpiece that looks as good as it tastes.
- Crowd Reaction: Guests can’t help but smile and reach for more, often asking for the recipe before the last kernel disappears.
- Ingredient Quality: Using premium candy melts and genuine Valentine’s M&Ms ensures a rich, authentic flavor that cheap substitutes can’t match.
- Make‑Ahead Potential: This popcorn stores beautifully, so you can prep it ahead of time and still enjoy that fresh‑made crunch later.
- Versatile Celebration: Perfect for Valentine’s Day, but also a fun, festive treat for birthdays, movie nights, or any occasion that calls for a little sparkle.
Alright, let's break down exactly what goes into this masterpiece…
🍋 Inside the Ingredient List
The Flavor Base
First up, the White Candy Melts. These sugary gems melt beautifully and create a sweet, creamy coating that acts like a buttery veil over each kernel. If you skip them, you’ll lose that silky smoothness and end up with a dry, uneven coating that feels like chewing on plain popcorn. A great swap is white chocolate chips, but be prepared for a slightly grainier texture because they contain cocoa solids. When selecting, choose a brand that lists real cocoa butter for that melt‑in‑your‑mouth feel.
The Texture Crew
Popcorn: Start with a bag of popped popcorn, ensuring all the kernels are removed. This fluffy base provides the perfect texture, acting like a soft pillow for the candy coating. If you use microwave popcorn with added butter, the extra oil can make the coating slide off, so opt for plain, air‑popped or stovetop popcorn. You can also try a sweet‑and‑salty blend by sprinkling a pinch of sea salt before coating.
Pink Candy Melts: Add a fun pop of color! Pink candy melts give that romantic touch to your popcorn, making it festive and visually stunning. They also add a subtle strawberry‑like flavor that pairs perfectly with the chocolatey M&Ms. If you can’t find pink melts, melt white candy melts and stir in a few drops of natural beet juice for a vibrant hue.
The Unexpected Star
Valentine’s M&Ms: These are a fabulous way to add some chocolatey goodness. Their vibrant colors also sprinkle in more festive vibes, and the candy shell protects the chocolate from melting too quickly. Skipping them would make the snack feel one‑dimensional, missing that surprise bite of chocolate. For a nutty twist, substitute with chocolate‑covered almonds or hazelnuts.
The Final Flourish
Valentine’s Sprinkles: These little decorations turn your popcorn into a visual feast! Choose heart‑shaped or colorful sprinkles for extra sparkle that catches the eye and adds a subtle crunch. If you don’t have themed sprinkles, use regular rainbow sprinkles or even edible glitter for a glam look. The key is to add them while the coating is still tacky so they adhere perfectly.
Everything's prepped? Good. Let's get into the real action…
🔥 The Method — Step by Step
Gather all your ingredients and set up a double boiler: fill a saucepan with a couple of inches of water, bring it to a gentle simmer, and place a heat‑proof bowl on top. This indirect heat will melt the candy melts evenly without scorching. Once the water is bubbling, add the white candy melts and stir continuously until they become a smooth, glossy river of sweetness. That sizzle when it hits the pan? Chef's kiss.
🪄 Kitchen Hack: Use a silicone spatula to scrape the bowl; it flexes to the shape of the bowl and gets every last drop.While the white melts are shimmering, spread your popped popcorn on a large, rimmed baking sheet, making sure the layer is even. This ensures every kernel gets an even coating later on. If you notice any stray unpopped kernels, toss them out now—no one wants a hard surprise in the middle of a love‑filled bite. The aroma of fresh popcorn will already start to tease your senses, building anticipation for the sweet transformation.
Once the white melts are fully liquefied, pour them over the popcorn in a slow, steady stream, using a spatula to toss and coat the kernels as you go. The goal is to achieve a thin, even glaze that clings without pooling. You’ll see the popcorn turn from matte to a shimmering white coat—this is the moment of truth. Keep the heat low; if the mixture starts to bubble aggressively, remove the bowl for a few seconds to avoid scorching.
Now, it’s time for the pink makeover. In a separate bowl, melt the pink candy melts using the same double‑boiler method, but this time add a pinch of sea salt to enhance the flavor profile. Once melted, drizzle the pink over the already‑coated popcorn, then gently fold to create marbled pink ribbons throughout the bowl. This step is pure magic, turning a simple snack into a romantic masterpiece.
👀 Watch Out: If the pink melt gets too hot, it can separate; keep the water simmering gently and remove the bowl as soon as it’s glossy.Quickly sprinkle the Valentine’s M&Ms and sprinkles over the still‑warm popcorn, allowing the tacky coating to lock them in place. The heat will slightly melt the M&Ms' outer shell, creating a subtle chocolate glaze that melds with the candy melts. Toss gently to distribute evenly; you don’t want the sprinkles sinking to the bottom.
Transfer the coated popcorn back onto the baking sheet and spread it out into a thin layer. Slide the sheet into a pre‑heated oven set to 150°F (65°C) for about 10‑12 minutes. This low‑heat “dry‑out” step sets the coating without burning, giving you that perfect snap when you bite. Keep an eye on it—if you see any edges turning dark, pull it out immediately.
While the popcorn cools, prepare a large serving bowl. Once the popcorn reaches room temperature, give it one final toss to ensure any stray sprinkles are evenly distributed. The coating should feel firm to the touch, like a glossy shell that won’t crack under gentle pressure.
Serve immediately, or store in an airtight container for up to three days. If you’re planning to serve later, give the bowl a quick shake before plating to re‑redistribute any settled sprinkles. And there you have it—Valentine’s Day Popcorn that’s as dazzling as a fireworks display and as comforting as a warm hug.
That's it — you did it. But hold on, I've got a few more tricks that'll take this to another level…
🏆 Insider Tricks for Flawless Results
The Temperature Rule Nobody Follows
Never, ever melt candy melts over high heat. A low, steady simmer prevents the cocoa butter from separating, which would leave you with a grainy, oily mess. I once tried a “quick melt” on high and ended up with a greasy puddle that ruined the entire batch. Keep the water just barely bubbling and watch the melt turn from opaque to clear—this is your green light.
Why Your Nose Knows Best
When the coating is ready, you’ll smell a faint buttery aroma that turns sweet as the candy melts. Trust that scent—if it smells like caramel, you’ve overcooked it. Your nose can detect the exact moment the melt is at the perfect viscosity for coating. If you’re unsure, dip a spoon into the melt; it should form a thin ribbon that holds its shape without dripping.
The 5‑Minute Rest That Changes Everything
After the oven “sets” the popcorn, let it rest untouched for five minutes before moving it. This pause allows the coating to fully crystallize, giving you that satisfying snap when you bite. Skipping this rest will result in a softer, less crisp texture that feels more like a candy coating than a popcorn glaze. I once served it right out of the oven and got a few puzzled looks—turns out the coating was still soft.
Sprinkle Timing is Everything
Add the sprinkles while the coating is still tacky but not dripping. If you wait too long, they’ll slide off; if you add them too early, they’ll sink and become invisible. A quick flick of the wrist does the trick, ensuring an even distribution that looks like a confetti shower.
The Double‑Coat Secret
For an ultra‑glossy finish, repeat the pink melt step a second time after the first coat has set. This thin second layer adds depth of color and a glossy sheen that catches the light beautifully. I tried it once for a Valentine’s party, and guests kept saying, “It looks like it’s been painted with love!” Just be sure the first layer is fully set before you go for round two.
🎨 Creative Twists & Variations
This recipe is a playground. Here are some of my favorite ways to switch things up:
Berry‑Burst Bliss
Swap the pink candy melts for raspberry or strawberry flavored melts, and sprinkle freeze‑dried raspberry pieces instead of regular sprinkles. The tartness of the berries cuts through the sweetness, creating a balanced bite that feels like a summer romance.
Chocolate‑Covered Dream
Replace the white candy melts with dark chocolate melts and add a drizzle of white chocolate at the end. Toss in chocolate‑covered espresso beans for a mocha‑kissed twist that’s perfect for an after‑dinner treat.
Nutty Valentine
Add toasted almond slivers or chopped pistachios right after the pink melt. The nutty crunch pairs beautifully with the sweet coating, and the green pistachio specks add an unexpected pop of color.
Spicy Sweetheart
Incorporate a pinch of cayenne pepper into the pink melt for a subtle heat that tingles the palate. The contrast between sweet and spicy mirrors the roller‑coaster of emotions on a date night.
Caramel Love Drizzle
After the popcorn has set, drizzle a thin stream of caramel sauce over the top and toss gently. The caramel adds a buttery depth and a glossy finish that looks like liquid gold.
❄️ Storing & Bringing It Back to Life
Fridge Storage
Place the popcorn in an airtight glass jar and store it in the refrigerator for up to five days. The cool environment keeps the coating firm, preventing it from getting sticky. When you’re ready to serve, let it sit at room temperature for ten minutes to regain its crunch.
Freezer Friendly
If you’ve made a large batch, spread the popcorn on a baking sheet and freeze for 30 minutes, then transfer to a freezer‑safe bag. It will stay fresh for up to a month. To re‑crisp, pop the bag in a pre‑heated oven at 300°F (150°C) for five minutes.
Best Reheating Method
For the ultimate revival, place the popcorn on a baking sheet, add a tiny splash of water (just a few drops), and heat at 250°F (120°C) for three to five minutes. The steam generated brings back that glossy snap without drying out the kernels. Avoid microwaving; it makes the coating rubbery.