I remember the night I almost burned down the kitchen. I was trying to recreate the Cantonese ground beef rice that my grandmother used to make, but my curiosity got the better of me. I tossed ground beef into a pan, added a splash of soy sauce, and then, in a moment of culinary bravery, I added eggs directly into the sizzling meat. The result? A mess of scrambled beef and eggs that looked like a disaster movie set. But the aroma that escaped the stove was intoxicating—savory, sweet, and unmistakably Cantonese. That single moment turned into a revelation: I could turn a chaotic mess into a perfectly balanced dish with a few key tweaks.
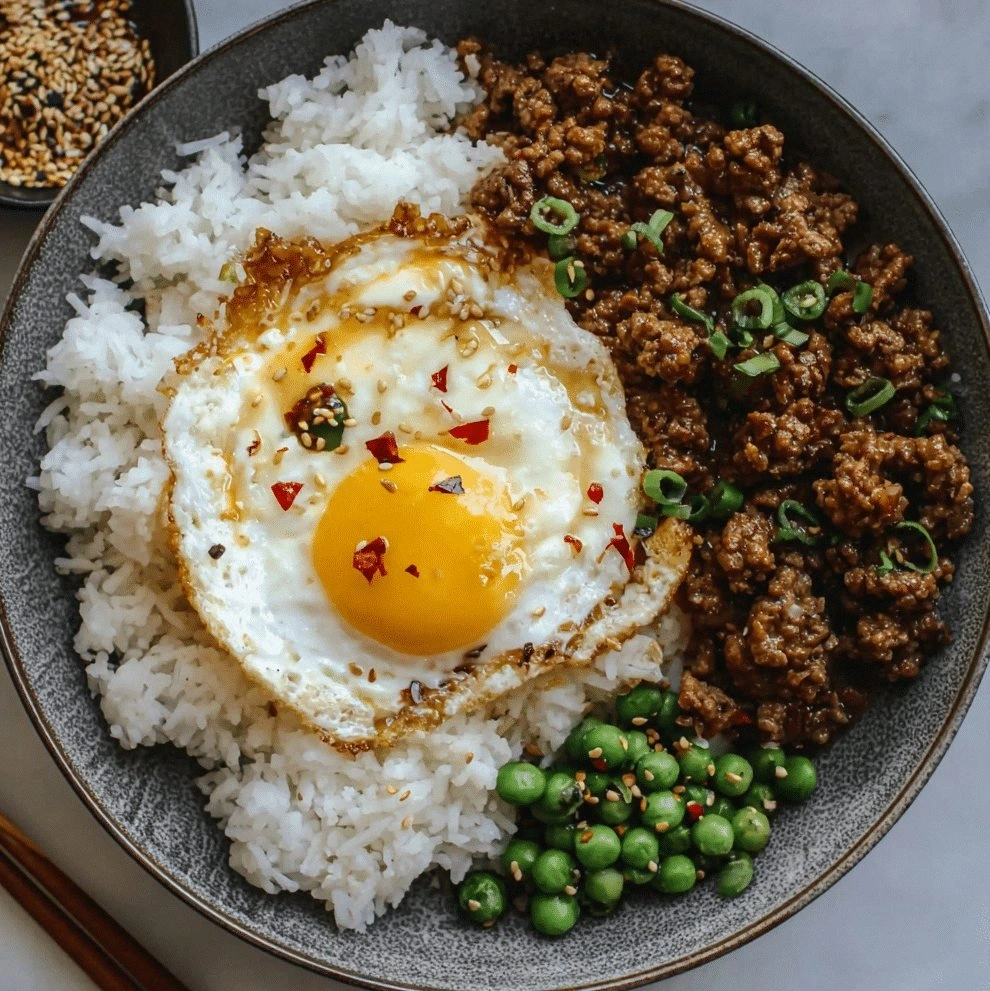
Picture this: a plate of fragrant rice, each grain a canvas for a glossy, savory sauce that coats the grains like velvet. The beef is tender, not overcooked, and the eggs are soft, creating a silky contrast that melts in your mouth. The sauce is a harmonious blend of soy, oyster, and Shaoxing wine, with a hint of sesame oil that adds depth and a subtle nutty finish. The final touch is a sprinkle of scallions that adds a bright, almost citrusy pop, cutting through the richness. It’s the kind of dish that turns a simple weeknight dinner into a celebration.
What makes this version stand out is not just the flavor profile, but the way it balances technique and convenience. I discovered that a quick sear of the beef locks in juices, while a brief addition of eggs after the meat is cooked creates a silky, cohesive sauce. The secret is in the timing: letting the eggs swirl into the pan just long enough so they cook but don’t dry out. I dare you to taste this and not go back for seconds. The dish is hands down the best version you'll ever make at home, and I’ve got the proof in the form of a kitchen that smells like victory.
If you've ever struggled with Cantonese-style rice dishes, you're not alone. Many recipes get this completely wrong by overcooking the rice or using too much sauce. Here’s what actually works: use day‑old rice for the best texture, keep the sauce thin enough to coat but not drown the grains, and finish with a quick egg swirl. Picture yourself pulling this out of the pan, the whole kitchen smelling incredible, and the first bite sending a wave of savory, umami joy through your taste buds. Okay, ready for the game‑changer? Let me walk you through every single step—by the end, you'll wonder how you ever made it any other way.
What Makes This Version Stand Out
- Flavor: The sauce is a balanced trio of soy, oyster, and Shaoxing wine, delivering depth without overpowering the beef.
- Texture: Ground beef is seared to a golden crust, then softened by the eggs, creating a silky, melt‑in‑your‑mouth consistency.
- Simplicity: The recipe requires only a handful of pantry staples—no exotic ingredients or complex steps.
- Speed: From prep to plate, you’re looking at 45 minutes, perfect for a busy weekday dinner.
- Crowd‑pleaser: It’s the kind of dish that satisfies both kids and adults, making it ideal for family meals.
- Versatility: Swap the rice for quinoa or cauliflower rice and you still get the same flavor explosion.
- Make‑ahead potential: Leftovers keep well in the fridge and reheat beautifully, thanks to the sauce’s moisture retention.
- Ingredient Quality: Using fresh ginger, garlic, and scallions elevates the dish beyond a standard ground beef stir‑fry.
Inside the Ingredient List
The Flavor Base
Soy sauce, oyster sauce, and Shaoxing wine form the backbone of the sauce. Soy sauce provides umami and saltiness; oyster sauce adds sweetness and a subtle briny depth; Shaoxing wine brings a mellow, slightly sweet aroma that is quintessential to Cantonese cooking. Skipping any of these will leave the dish feeling flat, like a plain bowl of rice. If you’re allergic to shellfish, replace oyster sauce with hoisin or a splash of hoisin and a bit of sugar to mimic the sweetness.
The Texture Crew
Ground beef is the star, but it’s the eggs that transform it into a silky, cohesive sauce. The eggs are added after the beef has browned, allowing them to scramble gently and coat the meat. A cornstarch slurry is added at the end to thicken the sauce without making it gloopy. If you prefer a vegetarian version, swap the beef for crumbled tofu or tempeh, and use a plant‑based protein powder to maintain the savory profile.
The Unexpected Star
Fresh ginger and garlic are more than just aromatics; they punch through the richness of the beef and eggs, leaving a clean, bright finish. The ginger’s subtle heat balances the sweetness of the sauce, while the garlic adds depth. If you’re short on fresh ginger, a pinch of ground ginger will do, but the flavor will be less vibrant. Always mince finely to avoid lumps in the sauce.
The Final Flourish
Scallions, sesame oil, and a dash of black pepper finish the dish with a burst of freshness and a hint of nuttiness. The sesame oil’s aroma is unmistakable and elevates the dish’s overall profile. If you’re avoiding sesame, a splash of toasted rice oil works well. A pinch of chili or sriracha adds a subtle heat that many find irresistible.
Everything’s prepped? Good. Let’s get into the real action.
The Method — Step by Step
- Heat the pan: Place a large non‑stick skillet over medium‑high heat and add 1 tablespoon of vegetable oil. Let the oil shimmer; when it starts to lightly smoke, it’s ready. This step is crucial—too low heat and the beef will steam; too high and it will burn.
- Brown the beef: Add the ground beef to the pan, breaking it apart with a wooden spoon. Cook until it turns a deep mahogany color and releases its juices, about 5 minutes. Avoid stirring constantly; let it sear to develop a crust.
- Introduce aromatics: Toss in minced garlic and ginger, stirring for 30 seconds until fragrant. The aroma should fill the kitchen—this is the moment of truth. Keep the heat high so the aromatics don’t burn.
- Deglaze and sauce: Pour in soy sauce, oyster sauce, Shaoxing wine, and a splash of water or broth. Stir to combine and scrape up any browned bits from the pan. The sauce should bubble gently, not boil.
- Simmer: Reduce heat to medium-low and let the mixture simmer for 3 minutes. The beef should be tender, and the sauce slightly reduced. At this point, the rice is ready to be added.
- Add rice: Stir in the cooked rice, ensuring each grain is coated with the savory sauce. The rice should be heated through and slightly sticky, not mushy. This is where the dish’s texture comes alive.
- Egg swirl: Create a well in the center of the rice and crack the eggs into it. Let them sit for a few seconds, then stir them in gently, allowing them to scramble into the rice. The eggs should be soft, not fully set, creating a silky sauce that clings to the grains.
- Final touches: Sprinkle sesame oil, black pepper, and scallions over the dish. Toss everything together, letting the sesame oil coat the grains for that nutty aroma. Taste and adjust salt if needed.
- Serve: Plate the rice while it’s hot, ensuring each scoop is a mix of beef, egg, and sauce. The dish should look glossy, with a slight sheen from the sesame oil. Serve immediately for the best texture.
That’s it— you did it. But hold on, I’ve got a few more tricks that will take this to another level. The next section will reveal insider tips that even seasoned cooks will appreciate.
Insider Tricks for Flawless Results
The Temperature Rule Nobody Follows
Many people think that high heat is always better for sautéing, but in this dish, a controlled medium‑high heat is key. Too low and the beef won’t develop a crust; too high and it will burn before it cooks through. I’ve found that a quick sear followed by a lower simmer preserves the beef’s juiciness and keeps the sauce from becoming too thick.
Why Your Nose Knows Best
When the soy and oyster sauces hit the pan, they should emit a sweet, umami aroma that makes your mouth water. If the aroma is weak, the sauces are too diluted or the heat is insufficient. Trust your nose; if it’s not singing, step back and adjust the heat or add a splash of soy sauce.
The 5‑Minute Rest That Changes Everything
After adding the eggs, let the dish rest for 5 minutes off the heat. This allows the residual heat to finish cooking the eggs without over‑cooking them. The result is a silky sauce that clings to each grain of rice.
Keep the Rice Separate
Using freshly cooked rice that’s been cooled to room temperature prevents the grains from clumping together. If you’re using microwave‑heated rice, spread it out on a baking sheet to cool before adding it to the pan.
Don’t Over‑Season
The sauce is already salty due to the soy and oyster sauces. Adding too much salt can overpower the delicate balance. Taste before you add, and if you need extra salt, sprinkle a pinch at the end.
Use a Wok for Authenticity
A wok’s high sides allow you to stir the rice without spilling, and the heat distribution gives the dish a subtle char. If you don’t have a wok, a wide skillet works fine, but the texture may be slightly different.
Creative Twists and Variations
This recipe is a playground. Here are some of my favorite ways to switch things up:
Spicy Sichuan Twist
Add a tablespoon of Sichuan peppercorn paste and a dash of chili oil. The numbing heat pairs beautifully with the savory sauce, and the dish becomes a bold, spicy adventure for heat lovers.
Vegetarian Version
Replace ground beef with crumbled tempeh or finely chopped mushrooms. Use a plant‑based protein powder to maintain protein content, and keep the sauce the same for authentic flavor.
Citrus Kick
Finish the dish with a squeeze of fresh lime or a splash of lemon juice. The citrus brightness cuts through the richness and adds a refreshing contrast.
Noodle Swap
Serve the beef and sauce over cooked lo mein or rice noodles instead of rice. The noodles soak up the sauce, creating a different but equally satisfying texture.
Protein Switch
Swap the beef for diced pork or chicken. The cooking times remain similar, but the flavor profile shifts slightly, offering a new experience each time.
Gluten‑Free Upgrade
Use tamari instead of soy sauce and ensure your oyster sauce is gluten‑free. The dish remains delicious, and it’s safe for those with gluten sensitivities.
Storing and Bringing It Back to Life
Fridge Storage
Cool the dish completely before transferring it to an airtight container. Store in the refrigerator for up to 3 days. The sauce will thicken slightly, so a quick stir before serving restores the original consistency.
Freezer Friendly
Pack the dish in freezer‑safe bags, leaving a little space for expansion. It can be frozen for up to 2 weeks. Thaw overnight in the fridge, then reheat gently on the stove.
Best Reheating Method
Reheat on low heat with a splash of water or broth to keep the rice from drying out. Add a tiny splash of water before reheating—this steams the dish back to perfection and restores the silky sauce.